# Intro

<figure><img src="/files/51cl75qSGp5N48vLpJSB" alt=""><figcaption></figcaption></figure>

### Welcome to the Adena Docs!

**Adena is a friendly web3 wallet** for managing assets and connecting to dapps **on the Gnoland blockchain**. As the first non-custodial wallet on Gnoland, we aim to provide Gnomes with a seamless web3 interaction experience. Whether you're an adventurous user exploring the world of crypto or an aspiring developer looking to build innovative blockchain applications, Adena will be your most reliable Gateway to Gnoland.

### Why Adena?

1. **Frictionless Onboarding**: All you need is just a few clicks to sign into your crypto wallet! Adena also supports signing in with Google for high accessibility.
2. **Built for Gnoland**: As a standalone smart contracts blockchain, Gnoland needs a native wallet for its mass adoption. Adena is designed to be Gnoland-friendly and fully compatible with Gnolang, the language that powers all dapps on Gnoland.
3. **Explore the Gnoland Ecosystem**: Adena showcases dapps that are building on Gnoland. Discover aspiring projects developing innovative products!
4. **Seamless NFT Management**: Adena provides a simple gallery for your digital collectibles. Managing NFTs has never been easier!
5. **Secure**: As a non-custodial wallet, your seed phrase private keys are encrypted and stored exclusively on your device. Only you have full control of your data.

Adena is currently available as a Chrome extension (soon available on iOS and Android).


# Download

{% tabs %}
{% tab title="Chrome Extension" %}
1\. Download a Chromium browser (e.g. Google Chrome, Brave).

2\. Visit [the official download page](https://chrome.google.com/webstore/detail/adena/oefglhbffgfkcpboeackfgdagmlnihnh) on the Chrome Web Store.

<figure><img src="/files/OHeqz5DllXPV6QXz1EsX" alt=""><figcaption></figcaption></figure>

3\. Install Adena and add it to your browser.

<figure><img src="/files/vwQXSewyXXcEnw5P2qdY" alt=""><figcaption></figcaption></figure>

4\. The welcome page will automatically pop up. You're ready to get started. Follow the instructions on the following page to create your first account on Adena!

<figure><img src="/files/PbDW5LmCkjJTzitvH7S4" alt=""><figcaption></figcaption></figure>
{% endtab %}

{% tab title="Mobile App" %}
{% hint style="info" %}
**Soon available on both iOS and Android!**
{% endhint %}
{% endtab %}
{% endtabs %}


# Sign In


# Connect Hardware Wallet

## What is a hardware wallet?

A hardware wallet is a device that generates and stores your private keys in an offline environment. Hardware wallets mitigate attack vectors by protecting your keys from hackers attempting to steal your funds by remotely penetrating your vulnerable, internet-connected devices. It is essentially a physical vault that stores your private key.

Once you create an account on your hardware wallet, it is extremely important to NOT directly enter its private key into software wallets such as web extension wallets, smartphone wallets, or desktop wallets, to ensure that it never leaves your hardware wallet.

## How do I sign a transaction with a hardware wallet?

While hardware wallets have the ability to sign transactions using the stored private keys, they cannot directly send transactions to the blockchain due to their offline setup. This means you need a separate PC that is connected to the internet with an app like Adena installed to broadcast the signed transactions. To exchange the data for signed transaction files with the PC, hardware wallets use USB cables or Bluetooth to avoid direct internet connections.

Refer to [this section](broken://pages/kzEWehAJ2IRfsxQDnsSN) on how to send transactions with Ledger accounts on Adena.

## Which hardware wallets are supported by Adena?

Adena currently only supports [Ledger](https://www.ledger.com/), with plans to integrate with [Keystone](https://keyst.one/) soon. We will add support for other hardware wallets that are compatible with Cosmos to offer a wide range of selections for users.


# Ledger

1\. Click on <mark style="color:blue;">**Connect Hardware Wallet**</mark>.

<figure><img src="/files/OQP1BFJxWfSF9NE8JApD" alt=""><figcaption></figcaption></figure>

2\. Select <mark style="color:blue;">**Continue with Ledger**</mark>.

<figure><img src="/files/ZHCLN93zyWrSCEcSUBHN" alt=""><figcaption></figcaption></figure>

3\. Plug in your Ledger device to your PC and click on <mark style="color:blue;">**Connect**</mark>.

<figure><img src="/files/wnMU4ogCkKqySUYEHScr" alt=""><figcaption></figcaption></figure>

4\. Your browser will display a pop-up asking you to approve Adena's request to connect to your Ledger device. Select your Ledger device on the list and click on <mark style="color:blue;">**Connect**</mark> from the pop-up.

<figure><img src="/files/cEyzpUMfdIIGnGtmtoZF" alt=""><figcaption></figcaption></figure>

5\. Open the Cosmos App in your Ledger. Adena will automatically detect the app once it's open. If you don't have the Cosmos App on your Ledger device, click on [this link](https://support.ledger.com/hc/en-us/articles/360013713840-Cosmos-ATOM-?support=true) for a detailed installation guide.

<figure><img src="/files/GgwGynaJYTLg3eq7DIMe" alt=""><figcaption></figcaption></figure>

6\. Wait for Adena to load accounts from your Ledger. This process takes a few seconds to complete.

<figure><img src="/files/nA8LJ0Y9ZTAeoHZ2pPDz" alt=""><figcaption></figcaption></figure>

7\. Once the loading is complete, Adena will display a list of your accounts. Select the ones you'd like to add to Adena and click on <mark style="color:blue;">**Next**</mark>.

<figure><img src="/files/U9hG6Fbnp78UomGZAcnM" alt=""><figcaption></figcaption></figure>

8\. Create a password that you will use to unlock your wallet. Confirm your password by re-entering it in the lower field, activate the <mark style="color:blue;">**Checkbox**</mark>, and click on <mark style="color:blue;">**Save**</mark> to proceed.

{% hint style="info" %}
**How to create a secure password**

Your password must be 8\~256 characters long and contain alphanumeric or special characters. Avoid using common passwords such as *12345678*, *qwerty12*, or *password*. Note that this password is unique to your current device.&#x20;
{% endhint %}

<figure><img src="/files/dAgYGHKarPXElufu3y1n" alt=""><figcaption></figcaption></figure>

9\. That's it! You've successfully signed into Adena with your Ledger wallet. Be sure to pin Adena for easy access, and click on <mark style="color:blue;">**Start**</mark> to complete your setup!

<figure><img src="/files/3Tt9Q4uZGPWoqCLMJwto" alt=""><figcaption></figcaption></figure>


# Keystone

{% hint style="info" %}
**Support for Keystone coming soon!**
{% endhint %}


# Set Up Air-gap Account

## What is an air-gap account?

Air-gap is a term for an environment in which a device is completely isolated from the Internet or any kind of wireless communication such as Wifi, Bluetooth, or NFC, and even direct connections with online devices via USB cables.

When applied to key management in crypto, an air-gap account refers to an account in which its private key is created and kept in an air-gapped device.

Air-gap accounts are considered the most secure key management method as they are completely disconnected from the internet while being independent of third-party vendors who are vulnerable to supply-chain attacks or software bugs.

## How does the air-gapped signing work?

<figure><img src="/files/1bEjgIGRpYas4w2VO0Z8" alt=""><figcaption></figcaption></figure>

Signing a transaction from your air-gapped environment and broadcasting it to the blockchain involves a 3-step process.

1. **Create a signed transaction file** from your air-gapped device with the Gno CLI.
2. **Transfer the signed transaction file** from your air-gapped device to your online device in which Adena is installed, using a USB or a flash drive.
3. **Broadcast the signed transaction file** to the blockchain by uploading the file to Adena.

## How do I create an air-gap account?

1. Purchase a new PC or reset an existing one to factory settings to use as an air-gapped device. This is done to ensure that the device is completely free from malware.
2. [Set up the local environment and install gnokey on your device.](https://docs.gno.land/getting-started/local-setup)
3. Disconnect your device from the internet forever.
4. [Create a new account with `gnokey`.](https://docs.gno.land/getting-started/working-with-key-pairs)
5. Back up your seed phrase somewhere safe and secure.

## How do I sign transactions with an air-gap account?

In an air-gapped environment, a device must only exchange data via indirect physical connections using QR codes, micro SD cards, or flash drives. This means that you must create a signed transaction file from your air-gapped device and transfer it over to Adena for broadcasting. Please refer to [this section](https://app.gitbook.com/o/0g6gOImplW08Npt0UWXx/s/E9KbeG02NWziIZPTAFaB/~/changes/67/user-guide/wallet/send/air-gap-accounts) for a detailed guide.


# Air-gap Account

1\. Select <mark style="color:blue;">**Set Up Air-gap Account**</mark>.

<figure><img src="/files/B3vQt4UzyRok1k5Bu93i" alt=""><figcaption></figcaption></figure>

2\. Confirm that you acknowledge how Air-gap accounts work, and click on <mark style="color:blue;">**Next**</mark> to proceed.

<figure><img src="/files/dk0InqzjHqMqGGfYxQXs" alt=""><figcaption></figcaption></figure>

3\. Enter your account address and click on <mark style="color:blue;">**Next**</mark>.

<figure><img src="/files/wNVUtmn82C0RvVnhUTLu" alt=""><figcaption></figcaption></figure>

4\. Wait for your account to sync.

<figure><img src="/files/6NM12Xs5w3a29ZAgG72V" alt=""><figcaption></figcaption></figure>

5\. Create a password that you will use to unlock your wallet. Confirm your password by re-entering it in the lower field, activate the <mark style="color:blue;">**Checkbox**</mark>, and click on <mark style="color:blue;">**Save**</mark> to proceed.

{% hint style="info" %}
**How to create a secure password**

Your password must be 8\~256 characters long and contain alphanumeric or special characters. Avoid using common passwords such as *12345678*, *qwerty12*, or *password*. Note that this password is unique to your current device.&#x20;
{% endhint %}

<figure><img src="/files/HzKZ6o62mK7ICORY8SHv" alt=""><figcaption></figcaption></figure>

6\. That's it! You've successfully signed into Adena with your Ledger wallet. Be sure to pin Adena for easy access, and click on <mark style="color:blue;">**Start**</mark> to complete your setup!

<figure><img src="/files/5vfq0PuqaJG20jRIIs0J" alt=""><figcaption></figcaption></figure>


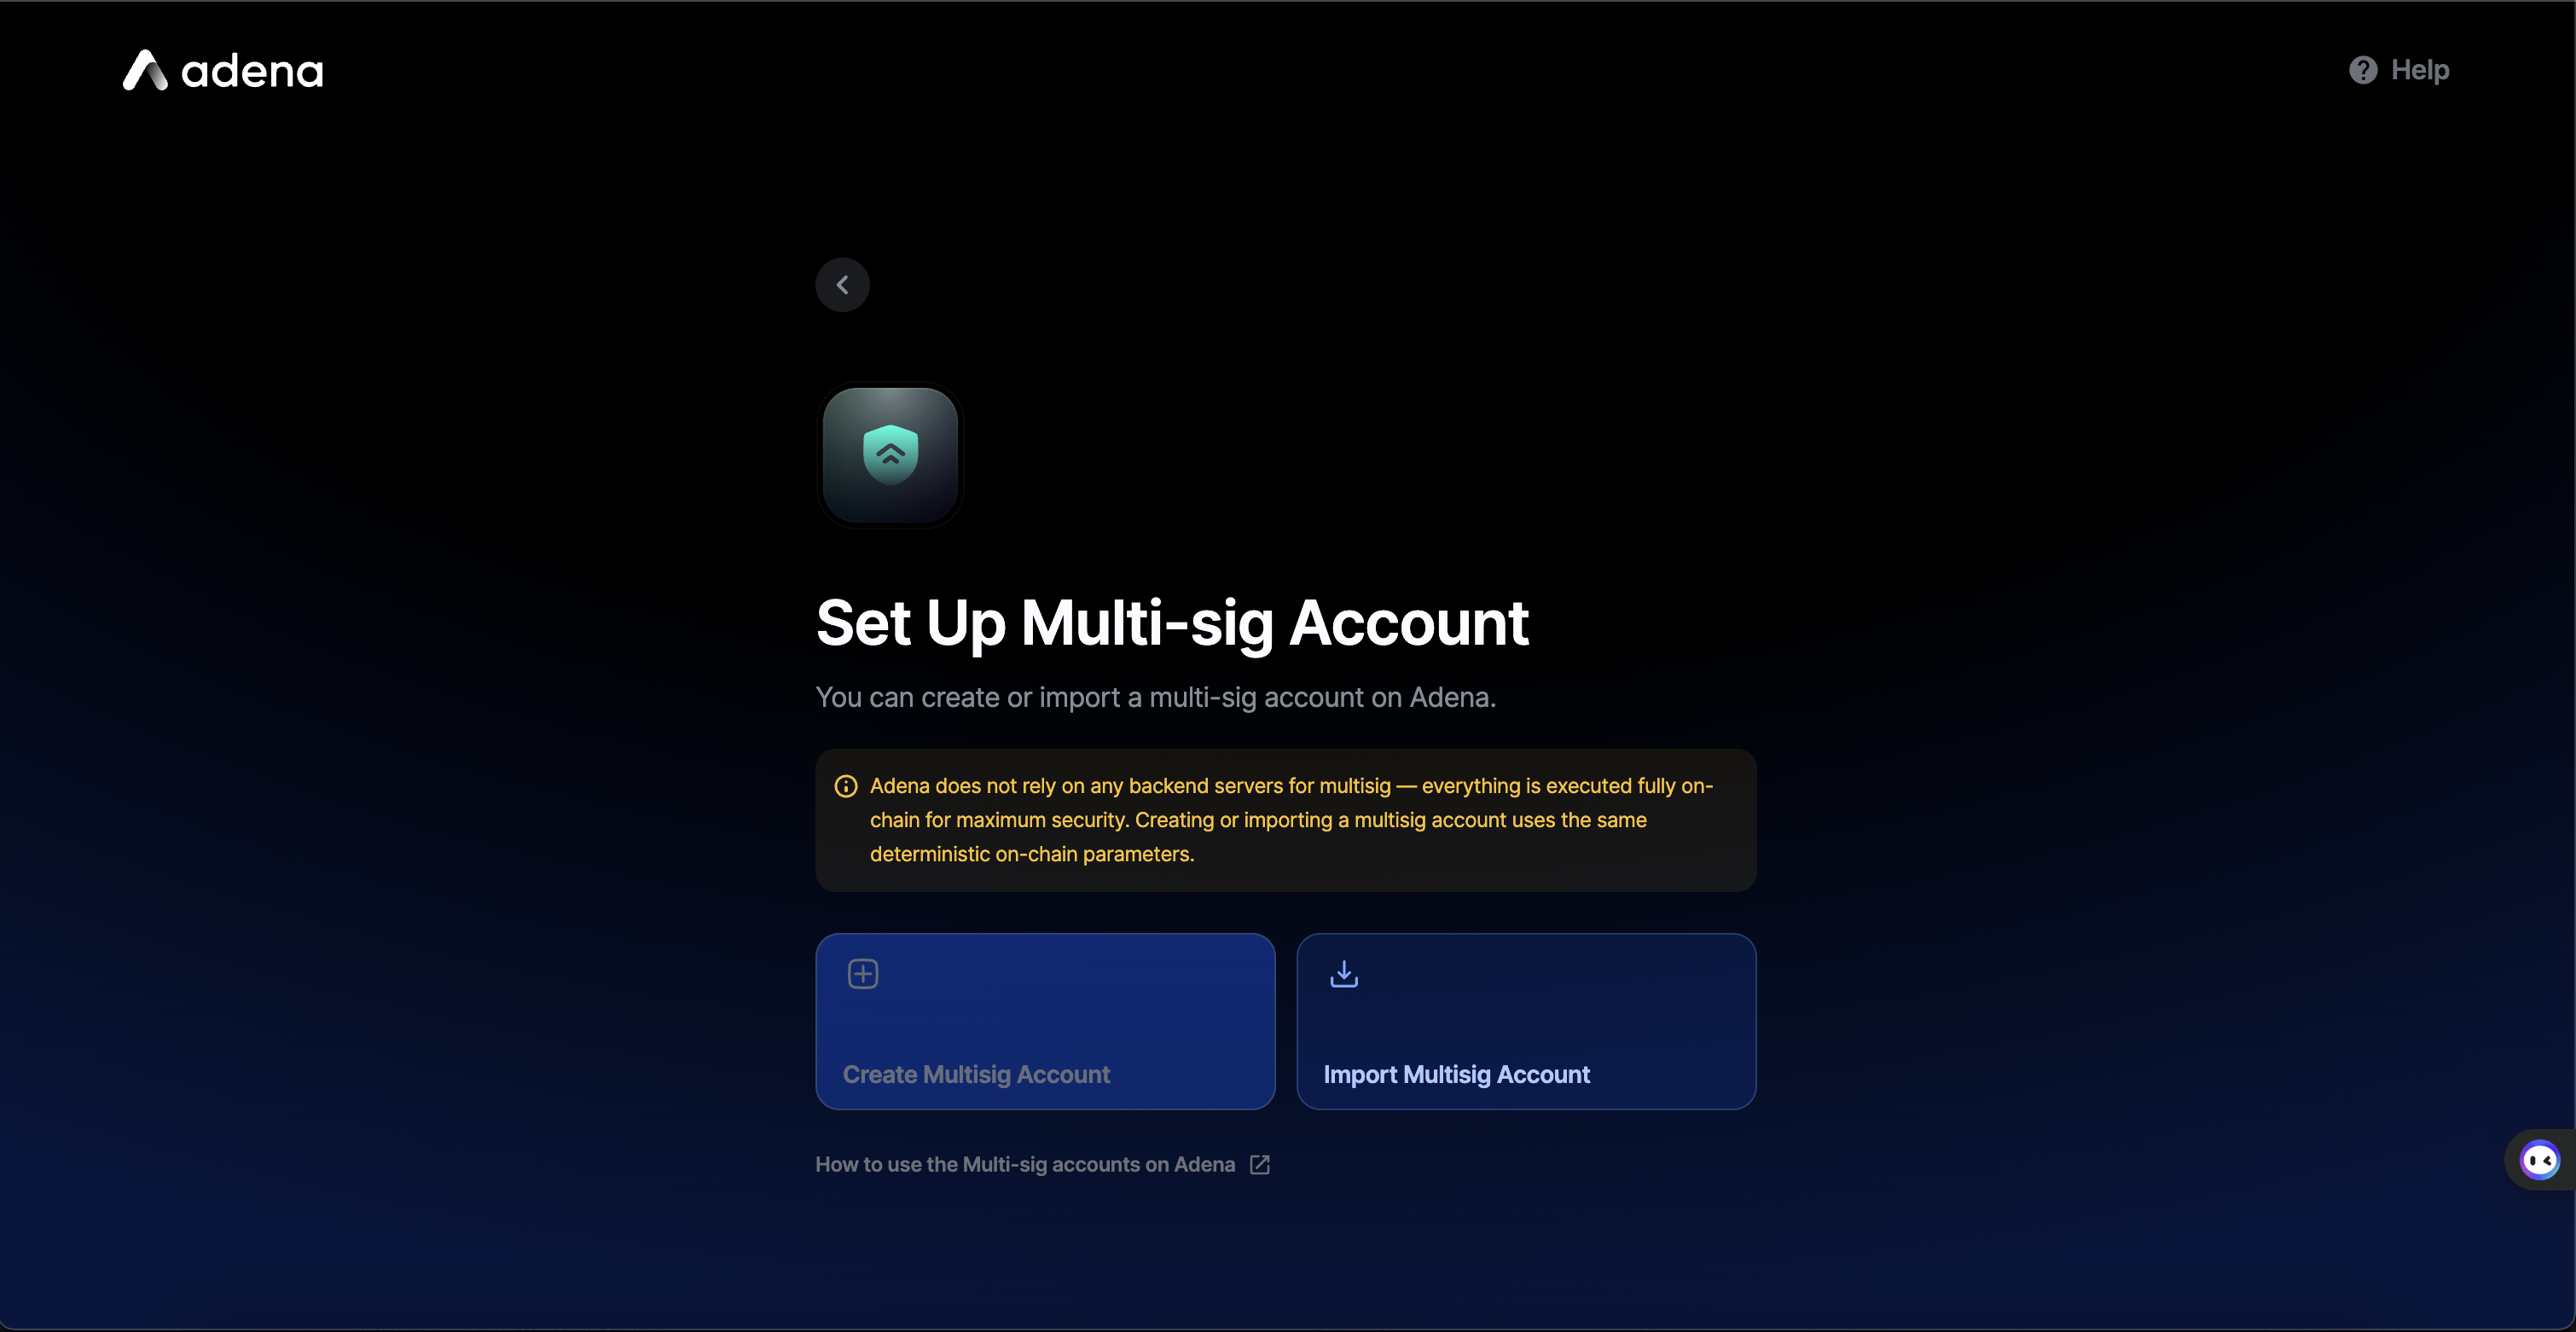
# Set Up Multi-sig Account

### What is a Multi-sig account?

Multi-sig (multi-signature) is a term for an account that requires multiple private keys to authorize a transaction, rather than a single signature from one private key.

When applied to key management in crypto, a multi-sig account refers to an account that requires M-of-N signatures to execute transactions, where M is the minimum number of required signatures and N is the total number of authorized signers.

Multi-sig accounts are considered a highly secure key management method as they distribute trust among multiple parties, eliminating single points of failure and providing enhanced security against key compromise or unauthorized transactions.

### How does multi-sig signing work?

Signing a transaction from your multi-sig account and broadcasting it to the blockchain involves a 3-step process.

1. The **multisig account** creates a transaction proposal using Adena.
2. **Collect the required signatures** from other authorized signers by sharing the unsigned transaction file.
3. **Broadcast the fully-signed transaction** to the blockchain once the minimum signature threshold (M-of-N) is met by uploading the file to Adena.

### How do I create a multi-sig account?

1. **Gather all participants** who will be authorized signers for the multi-sig account.
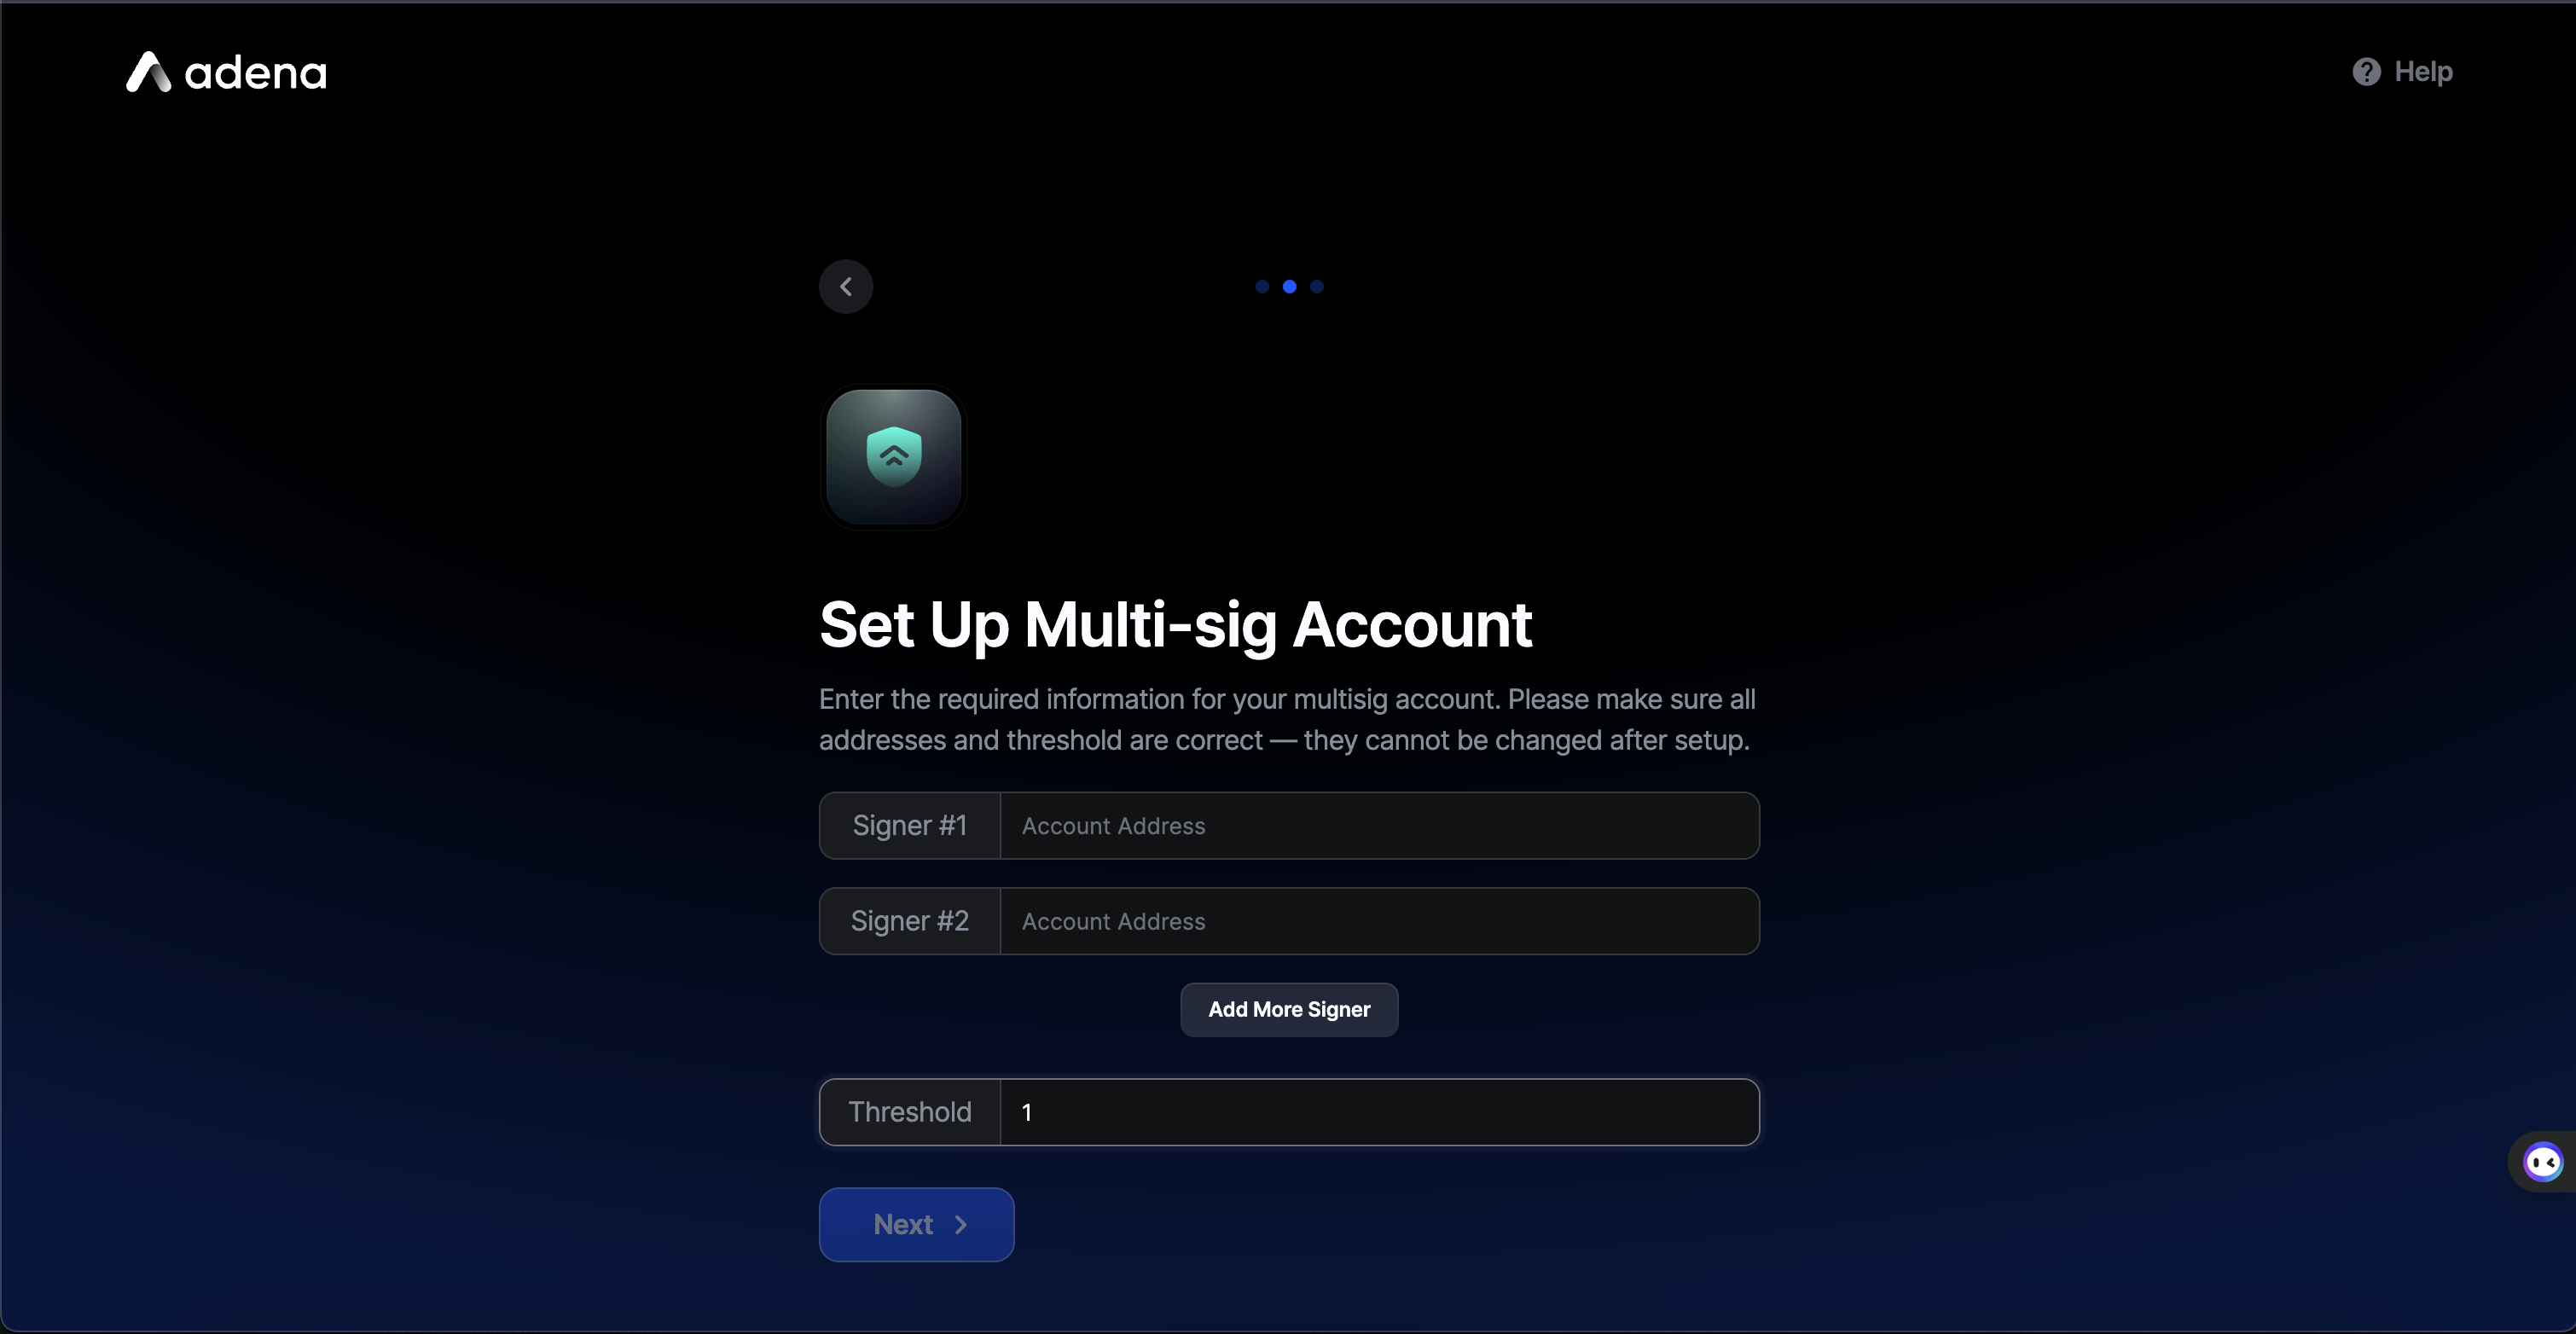
2. **Collect addresses** from all participants (e.g., "g1...address1", "g1...address2") who will be part of the multi-sig account.
3. **Determine the threshold** - the minimum number of signatures required to execute transactions (e.g., 1, 2).
4. **Create a multi-sig account** in Adena by specifying the signers' addresses and the threshold.

The configuration information, including the list of signers and threshold settings, is stored as metadata of the account when the multi-sig account is created

### How do I sign transactions with a multi-sig account?

1. **Create an unsigned transaction proposal** from the multisig account using Adena.
2. Share the unsigned transaction file with the authorized signer accounts **to collect the required signatures.**
3. **Each signer signs the transaction** using their own private key, and the signatures are added to the transaction file.
4. Once the minimum signature threshold (M-of-N) is met, upload the fully signed transaction file to Adena to broadcast the transaction to the blockchain.


# Multi-sig Account

1. Select <mark style="color:$primary;">**Set Up Multi-sig Account**</mark>.

<figure><img src="/files/UM1qtckS78vEoPlDvAEX" alt="" width="563"><figcaption></figcaption></figure>

2. Confirm that you acknowledge how Multi-sig accounts work

<figure><img src="/files/ccibefy8VwihAsbhhLbU" alt="" width="563"><figcaption></figcaption></figure>

3. Enter signer addresses and threshold

<figure><img src="/files/3dyrrVFdqPdzZ4BMoib3" alt="" width="563"><figcaption></figcaption></figure>

4. Wait for your account to sync

<figure><img src="/files/oSOh0gjGSxfSABAke4hw" alt="" width="563"><figcaption></figcaption></figure>

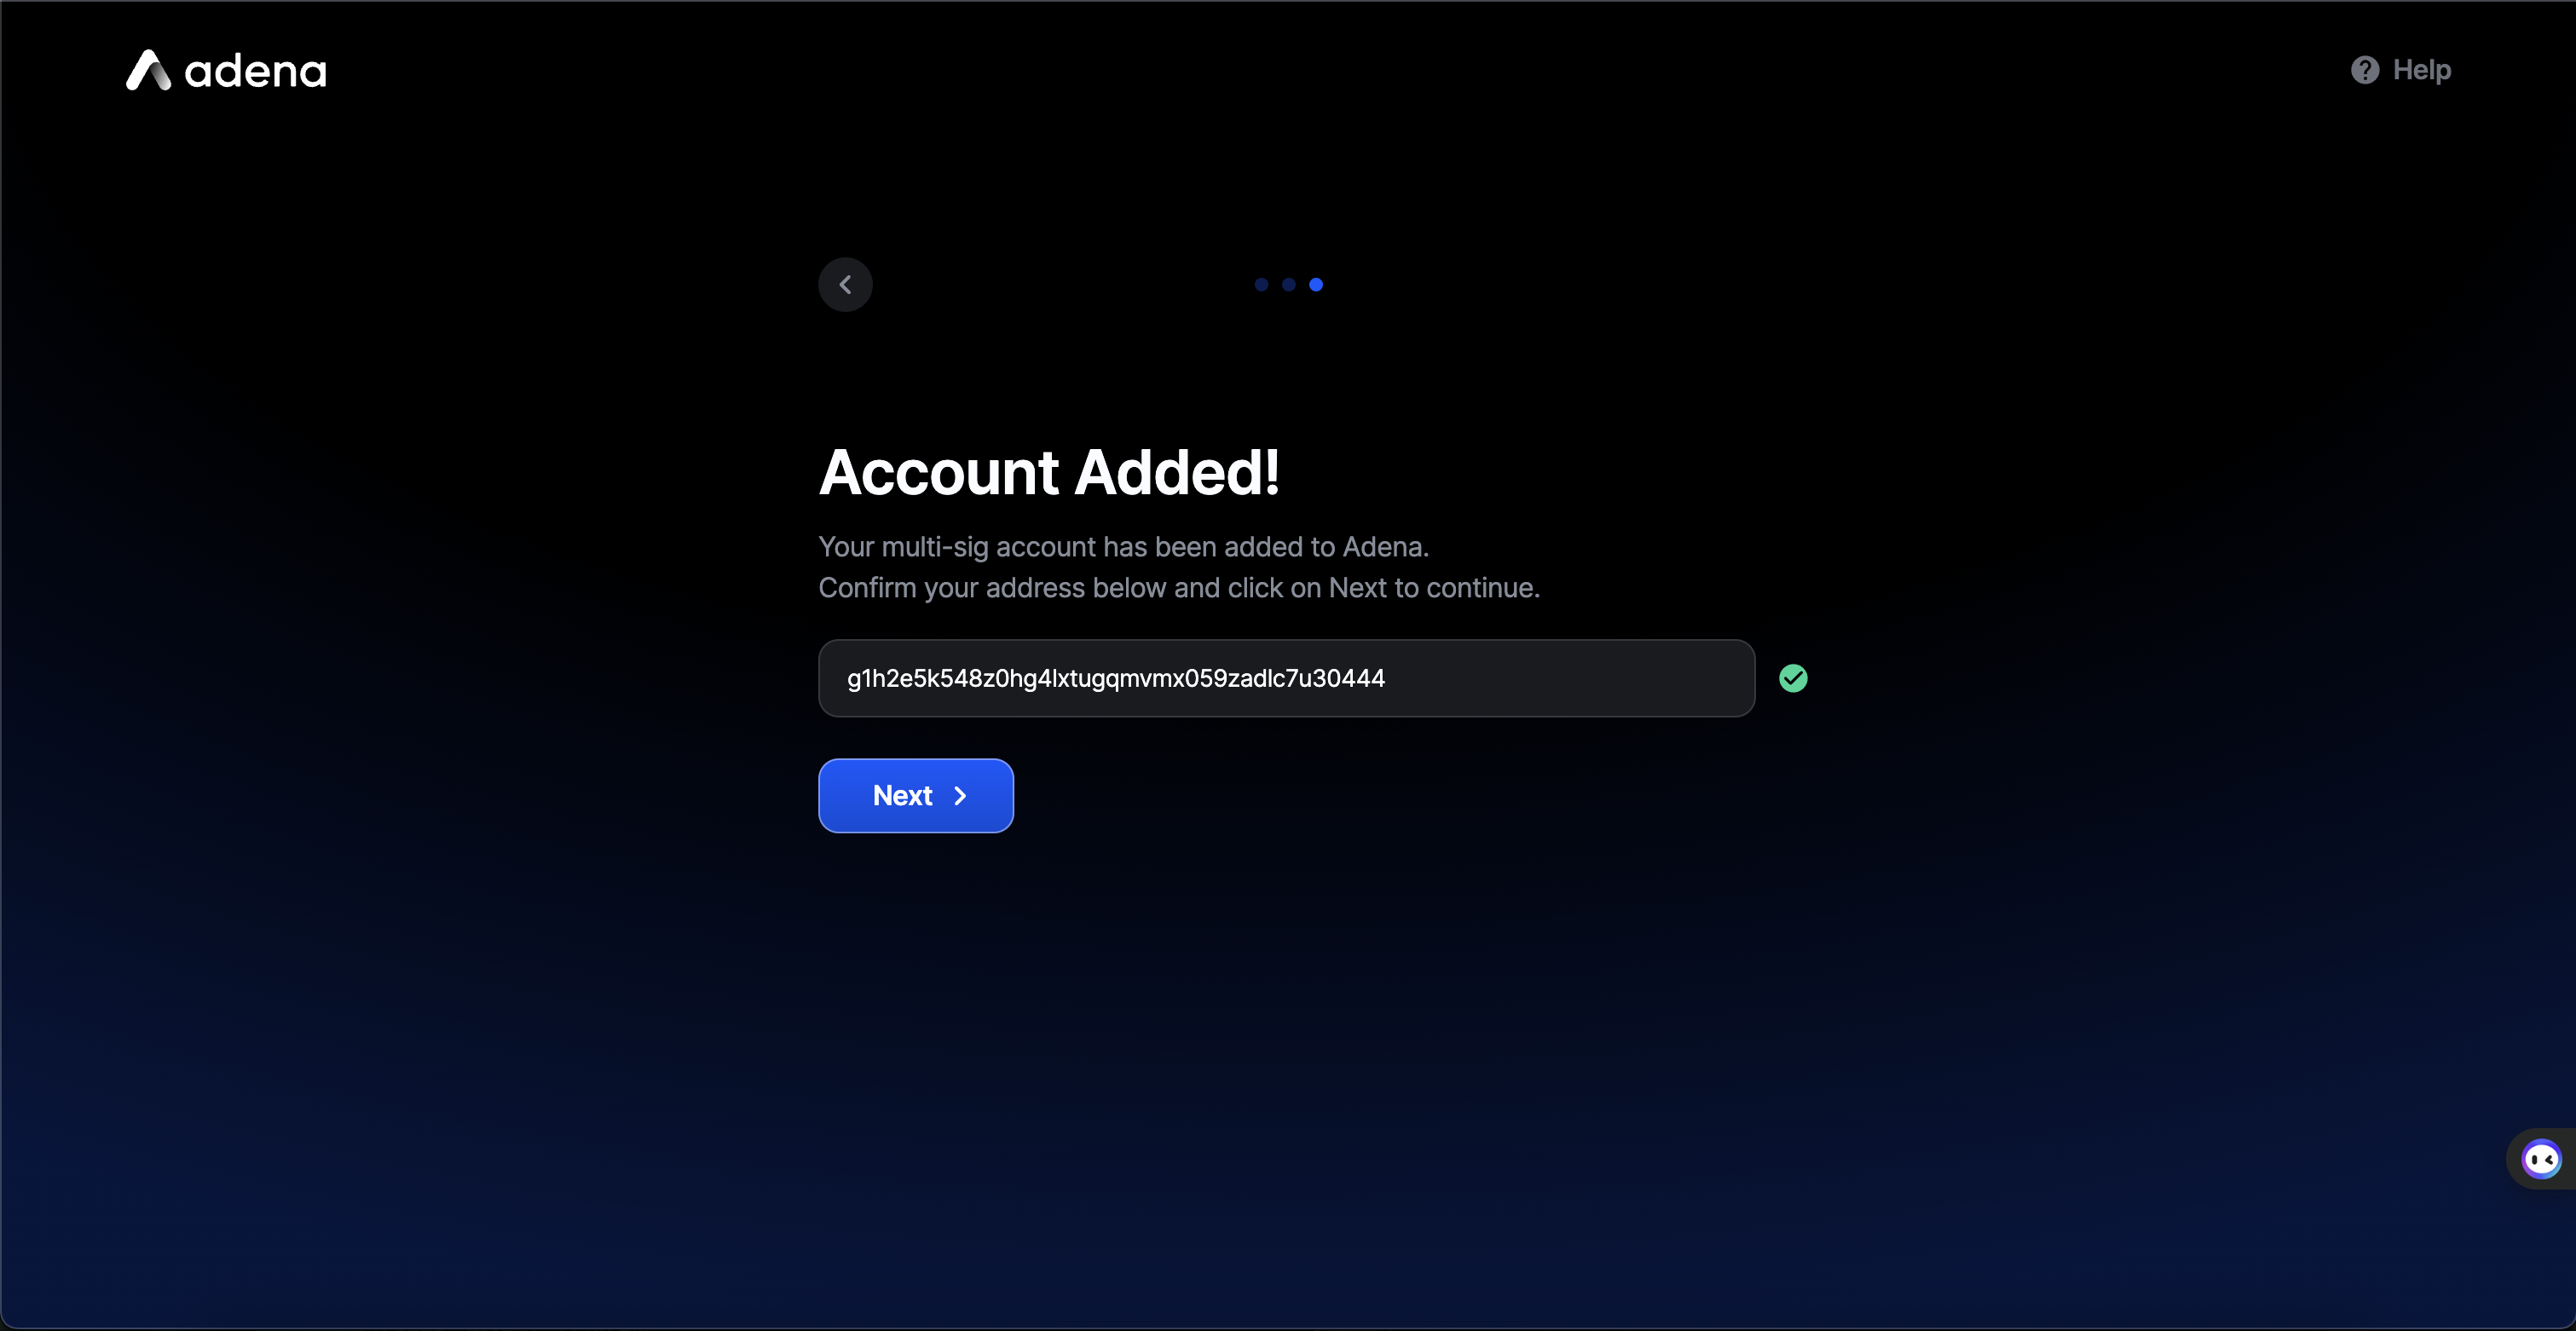
5. Confirm your multi-sig account address

<figure><img src="/files/8XPdQ2VsSCduk2O4pQPZ" alt="" width="563"><figcaption></figcaption></figure>

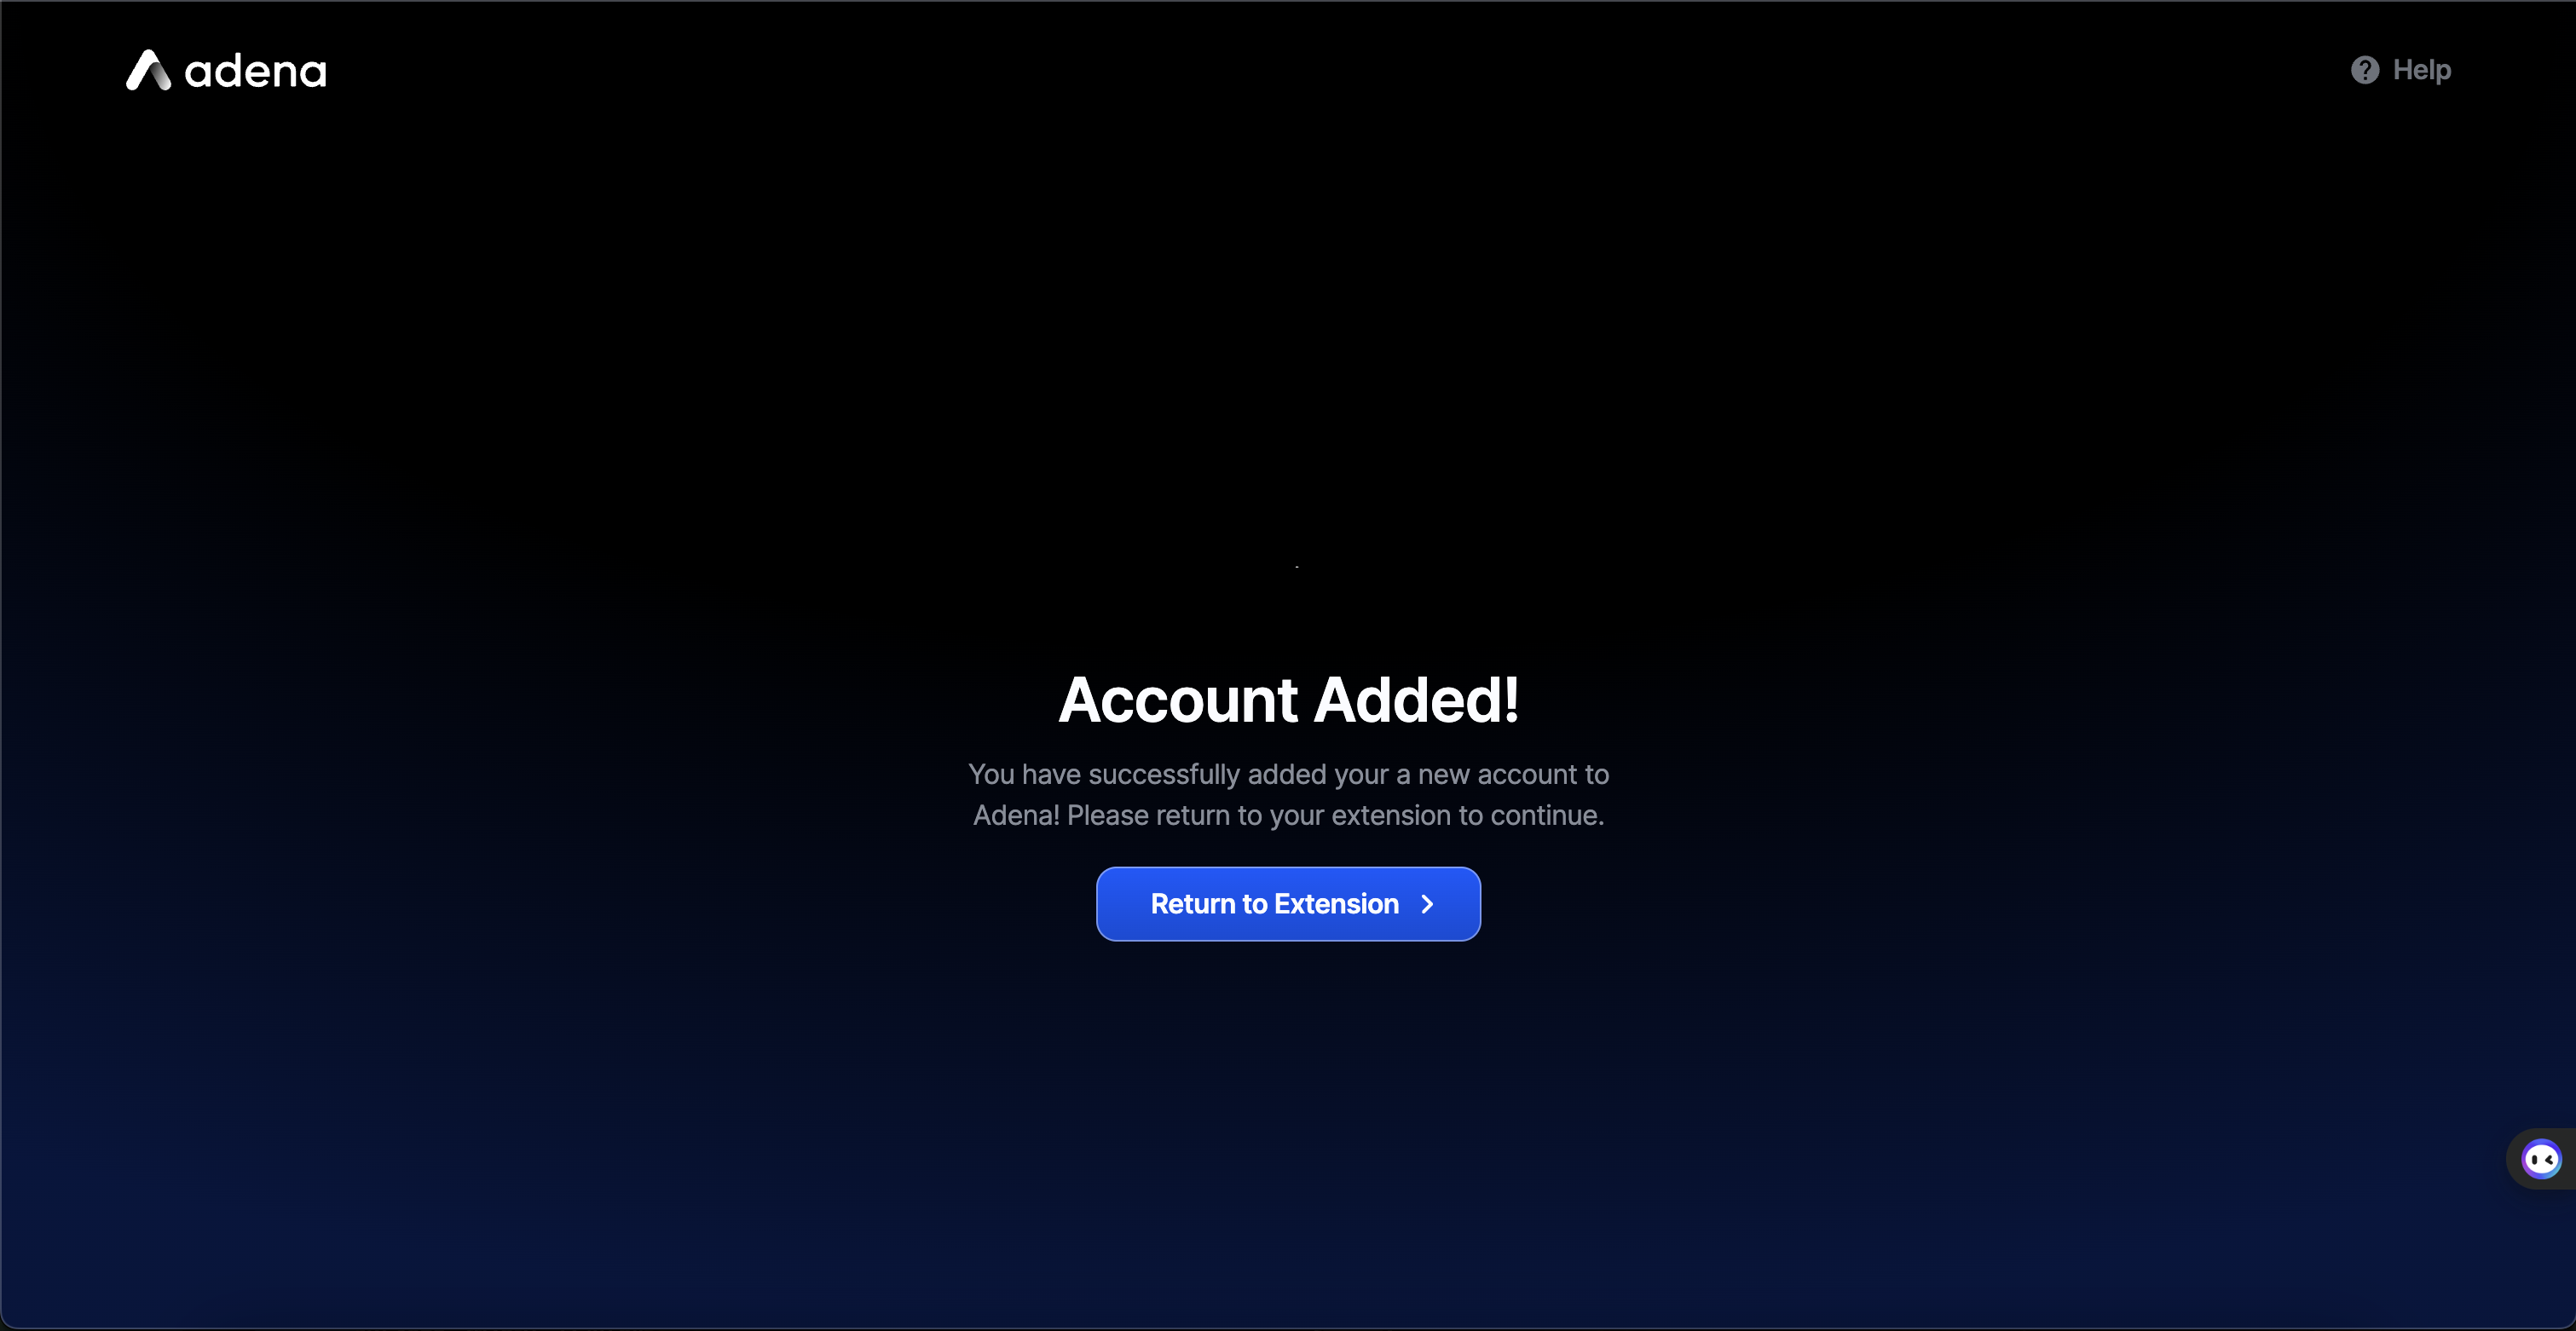
6. Setup Complete!

<figure><img src="/files/cr9FGriCIyAceg8pb1CX" alt="" width="563"><figcaption></figcaption></figure>


# Advanced options

{% hint style="warning" %}
These options will generate a seed phrase or a private key on your device. Only proceed if you understand and have a sufficient understanding of how to safely store them.
{% endhint %}

## What are seed phrases and private keys?

A seed phrase is a randomly generated set of words that gives you access to a wallet. A wallet can hold several accounts, each with a unique address. A seed phrase serves as a master key to all of your accounts, meaning that losing it will result in the loss of all associated accounts.

Meanwhile, a private key is unique to a single account and is derived from your seed phrase, meaning that you can always recover your private key as long as you have your seed phrase. Furthermore, private keys are used to sign transactions sent from your account.

It is important to NEVER share your seed phrase or private keys with anyone, it will give full access to your wallet along with all assets in it. The Adena support team will NEVER ask you for your seed phrase under any circumstances.

## How should I manage my private keys?

Below are things to avoid when managing your private key created or imported with advanced options:

❌ DO NOT store it in online environments such as your email or cloud storage.

❌ DO NOT share it with anyone besides yourself.

❌ DO NOT enter it in an untrusted third-party dApp.

## How does the Google Login work?

Adena supports multi-party computation (MPC) technology, provided by [Web3auth](https://web3auth.io/). Simply put, MPC "splits" your private key into multiple shares, which are each bound to various factors including passwords, devices, or social accounts (Google Login). You may recover the account by reconstructing the private key by submitting your shares, which provides a convenient sign-in flow that's similar to traditional logins. This method is entirely non-custodial, as only you have access to your whole private key. You may also export the key to restore your account in external wallets or services.


# Create New Wallet

1\. Click on <mark style="color:blue;">**Advanced Options**</mark>.

<figure><img src="/files/RKqOnAY35sOsZ9OiW3mO" alt=""><figcaption></figcaption></figure>

2\. Select <mark style="color:blue;">**Create New Wallet**</mark>.

<figure><img src="/files/72k56c5PrakGroc7472K" alt=""><figcaption></figcaption></figure>

3\. Confirm that you acknowledge that this will store a seed phrase on your device, and click on <mark style="color:blue;">**Next**</mark>.

<figure><img src="/files/6IKwumZFQKXv4W6OPbin" alt=""><figcaption></figcaption></figure>

4\. Complete a mandatory Questionnaire to demonstrate your understanding of good security practices for self-custody.

<figure><img src="/files/DCiMdyD61zWn0zjwsuuA" alt=""><figcaption></figcaption></figure>

5\. Adena will generate a new seed phrase for you. Carefully read the warnings and proceed by activating the <mark style="color:blue;">**Checkbox**</mark> and clicking on <mark style="color:blue;">**Reveal Seed Phrase**</mark>.

<figure><img src="/files/dGxLCtj1Rmh3u3sAtWCe" alt=""><figcaption></figcaption></figure>

6\. Your seed phrase will be hidden by default. Press on <mark style="color:blue;">**Hold to Reveal**</mark> to view your phrase. After you have saved it in a secure place, activate the <mark style="color:blue;">**Checkbox**</mark> and click on <mark style="color:blue;">**Next**</mark> to proceed to the next step.

{% hint style="danger" %}
**Protect your seed phrase!**

Your seed phrase is the only way to recover your wallet. Anyone with your seed phrase can steal your funds, so be sure to keep it somewhere safe. Also, note that our team will NEVER ask for your seed phrase under any circumstances. Check out [this blog post](https://medium.com/onbloc/mnemonic-101-730cf03cb254) to learn more about how seed phrases work and tips to keep them secure.
{% endhint %}

<figure><img src="/files/8RYFVvrZeawqSHx3VN08" alt=""><figcaption></figcaption></figure>

7\. Create a password that you will use to unlock your wallet. Confirm your password by re-entering it in the lower field, activate the <mark style="color:blue;">**Checkbox**</mark>, and click on <mark style="color:blue;">**Save**</mark> to proceed.

{% hint style="info" %}
**How to create a secure password**

Your password must be 8\~256 characters long and contain alphanumeric or special characters. Avoid using common passwords such as *12345678*, *qwerty12*, or *password*. Note that this password is unique to your current device.&#x20;
{% endhint %}

<figure><img src="/files/l8QtKlCS0TmoURTcBCYu" alt=""><figcaption></figcaption></figure>

8\. That's it! You've successfully signed into Adena with your newly created seed phrase. Be sure to pin Adena for easy access, and click on <mark style="color:blue;">**Start**</mark> to complete your setup!

<figure><img src="/files/csU4bkz6scq5ydUhyfZc" alt=""><figcaption></figcaption></figure>


# Import Wallet

1\. Click on <mark style="color:blue;">**Advanced Options**</mark>.

<figure><img src="/files/slJ0shR7zY6hkYaivYEp" alt=""><figcaption></figcaption></figure>

2\. Select <mark style="color:blue;">**Import Existing Wallet**</mark>.

<figure><img src="/files/Ulskd7k9CYBZFAgVa7U1" alt=""><figcaption></figcaption></figure>

3\. Confirm that you acknowledge that this will store a seed phrase on your device, and click on <mark style="color:blue;">**Next**</mark>.

<figure><img src="/files/A18aqomjDkSCFhj5wgK9" alt=""><figcaption></figcaption></figure>

4\. Complete a mandatory Questionnaire to demonstrate your understanding of good security practices for self-custody.

<figure><img src="/files/LQ4reFOv8hM0Rq5HcxoD" alt=""><figcaption></figcaption></figure>

5\. Enter your 12/24-word seed phrase or your private key. Be sure to double-check your entry to avoid typos. Click on <mark style="color:blue;">**Next**</mark> to proceed.

<figure><img src="/files/1J3ZTuNCdkzT9nVTx0vJ" alt=""><figcaption></figcaption></figure>

6\. Wait for Adena to load your account. This step takes a few seconds.

<figure><img src="/files/a0O0AgngFi0zsKK7xnwl" alt=""><figcaption></figcaption></figure>

7\. Create a password that you will use to unlock your wallet. Confirm your password by re-entering it in the lower field, activate the <mark style="color:blue;">**Checkbox**</mark>, and click on <mark style="color:blue;">**Save**</mark> to proceed.

{% hint style="info" %}
**How to create a secure password**

Your password must be 8\~256 characters long and contain alphanumeric or special characters. Avoid using common passwords such as *12345678*, *qwerty12*, or *password*. Note that this password is unique to your current device.
{% endhint %}

<figure><img src="/files/gvOPoyMF1NUK9aT7uoYR" alt=""><figcaption></figcaption></figure>

8\. That's it! You've successfully signed into Adena with your imported wallet. Be sure to pin Adena for easy access, and click on <mark style="color:blue;">**Start**</mark> to complete your setup!

<figure><img src="/files/ILTrqIMkfodk4TdQ1v6K" alt=""><figcaption></figcaption></figure>


# Sign In With Google

1\. Click on <mark style="color:blue;">**Advanced Options**</mark>.

<figure><img src="/files/cjmME4sBwyH5adtVFq2p" alt=""><figcaption></figcaption></figure>

2\. Select <mark style="color:blue;">**Sign In With Google**</mark>.

<figure><img src="/files/QbgdES7f1m8qgTYIx6hn" alt=""><figcaption></figcaption></figure>

3\. Confirm that you acknowledge that this will store a seed phrase on your device, and click on <mark style="color:blue;">**Next**</mark>.

<figure><img src="/files/LzAFFDSpTl78QGoBGI2q" alt=""><figcaption></figcaption></figure>

4\. Complete a mandatory Questionnaire to demonstrate your understanding of good security practices for self-custody.

<figure><img src="/files/sWdDz0rbAsoDubLmrOVF" alt=""><figcaption></figcaption></figure>

5\. A new window will pop up and prompt you to sign in with your Google account. Once you sign in, Adena will automatically detect your login and take you to the next step.

{% hint style="info" %}
**How does this work?**

Adena has integrated with Web3Auth, a key management infrastructure provider that relies on multi-party computation. Simply put, Web3Auth splits your keys between its nodes and lets you retrieve them with your Google Account. The Web3Auth Login is a non-custodial service, meaning that no single party ever has access to your keys. If you'd like to learn more about Web3Auth, visit their [website](https://web3auth.io/).
{% endhint %}

<figure><img src="/files/3dO9wBxupwluvaa5LzzN" alt=""><figcaption></figcaption></figure>

6\. Create a password that you will use to unlock your wallet. Confirm your password by re-entering it in the lower field, activate the <mark style="color:blue;">**Checkbox**</mark>, and click on <mark style="color:blue;">**Save**</mark> to proceed.

{% hint style="info" %}
**How to create a secure password**

Your password must be 8\~256 characters long and contain alphanumeric or special characters. Avoid using common passwords such as *12345678*, *qwerty12*, or *password*. Note that this password is unique to your current device.
{% endhint %}

<figure><img src="/files/YBAeQneWmflvxT3Z0bbG" alt=""><figcaption></figcaption></figure>

7\. That's it! You've successfully signed into Adena with your Google Account. Be sure to pin Adena for easy access, and click on <mark style="color:blue;">**Start**</mark> to complete your setup!

<figure><img src="/files/SaalPjJx4byysfIV0Bv1" alt=""><figcaption></figcaption></figure>


# Sidebar Menu

Once you sign in, you can click on the <mark style="color:blue;">**☰ button**</mark> on the left side of the header to enter the <mark style="color:blue;">**Sidebar Menu**</mark>. The menu provides you with a series of useful functionalities:

* Copy addresses, check the balances, or switch between existing accounts
* [View Account Details](/user-guide/sidebar-menu/account-details)
* [Add more accounts](/user-guide/sidebar-menu/add-account)
* [Manage your Settings](/user-guide/sidebar-menu/settings)
* Lock your wallet

<figure><img src="/files/zzPhQMEL34ihXsjeykYn" alt=""><figcaption></figcaption></figure>


# Account Details

1\. Click on the <mark style="color:blue;">**⋮ button**</mark> to open the <mark style="color:blue;">**Popup Menu**</mark>.

<figure><img src="/files/t4zxttItYSjIS68a5mX5" alt=""><figcaption></figcaption></figure>

2\. Click on <mark style="color:blue;">**Account Details**</mark>.

<figure><img src="/files/tQT3o3bTasbzermvMYq2" alt=""><figcaption></figcaption></figure>

3\. In the <mark style="color:blue;">**Account Details Menu**</mark>, click on the name field to edit the name of your account.

<figure><img src="/files/dELNT8vOLvMqER6Amffx" alt=""><figcaption></figcaption></figure>

4\. To back up your account, click on <mark style="color:blue;">**Export Private Key**</mark>.

<figure><img src="/files/LCMMlbGvo5xE6K3WAi7C" alt=""><figcaption></figcaption></figure>

5\. Confirm that you acknowledge that this will reveal your private key on your screen, and click on <mark style="color:blue;">**Next**</mark>.

<figure><img src="/files/qZxa1xF4cJLZaF1KnBY7" alt=""><figcaption></figcaption></figure>

6\. Enter your password, carefully review the warning, activate the Checkboxes, and click on <mark style="color:blue;">**Next**</mark>.

<figure><img src="/files/8jGgQKqZ92av6aedWkNo" alt=""><figcaption></figcaption></figure>

7\. Your private key will be displayed hidden. Press on <mark style="color:blue;">**Hold to Reveal**</mark> to reveal it. You may click on <mark style="color:blue;">**Copy**</mark> to copy your key to the clipboard. Click <mark style="color:blue;">**Done**</mark> to exit.

<figure><img src="/files/MPCWTBrnPmFmy9cR9Ohk" alt=""><figcaption></figcaption></figure>


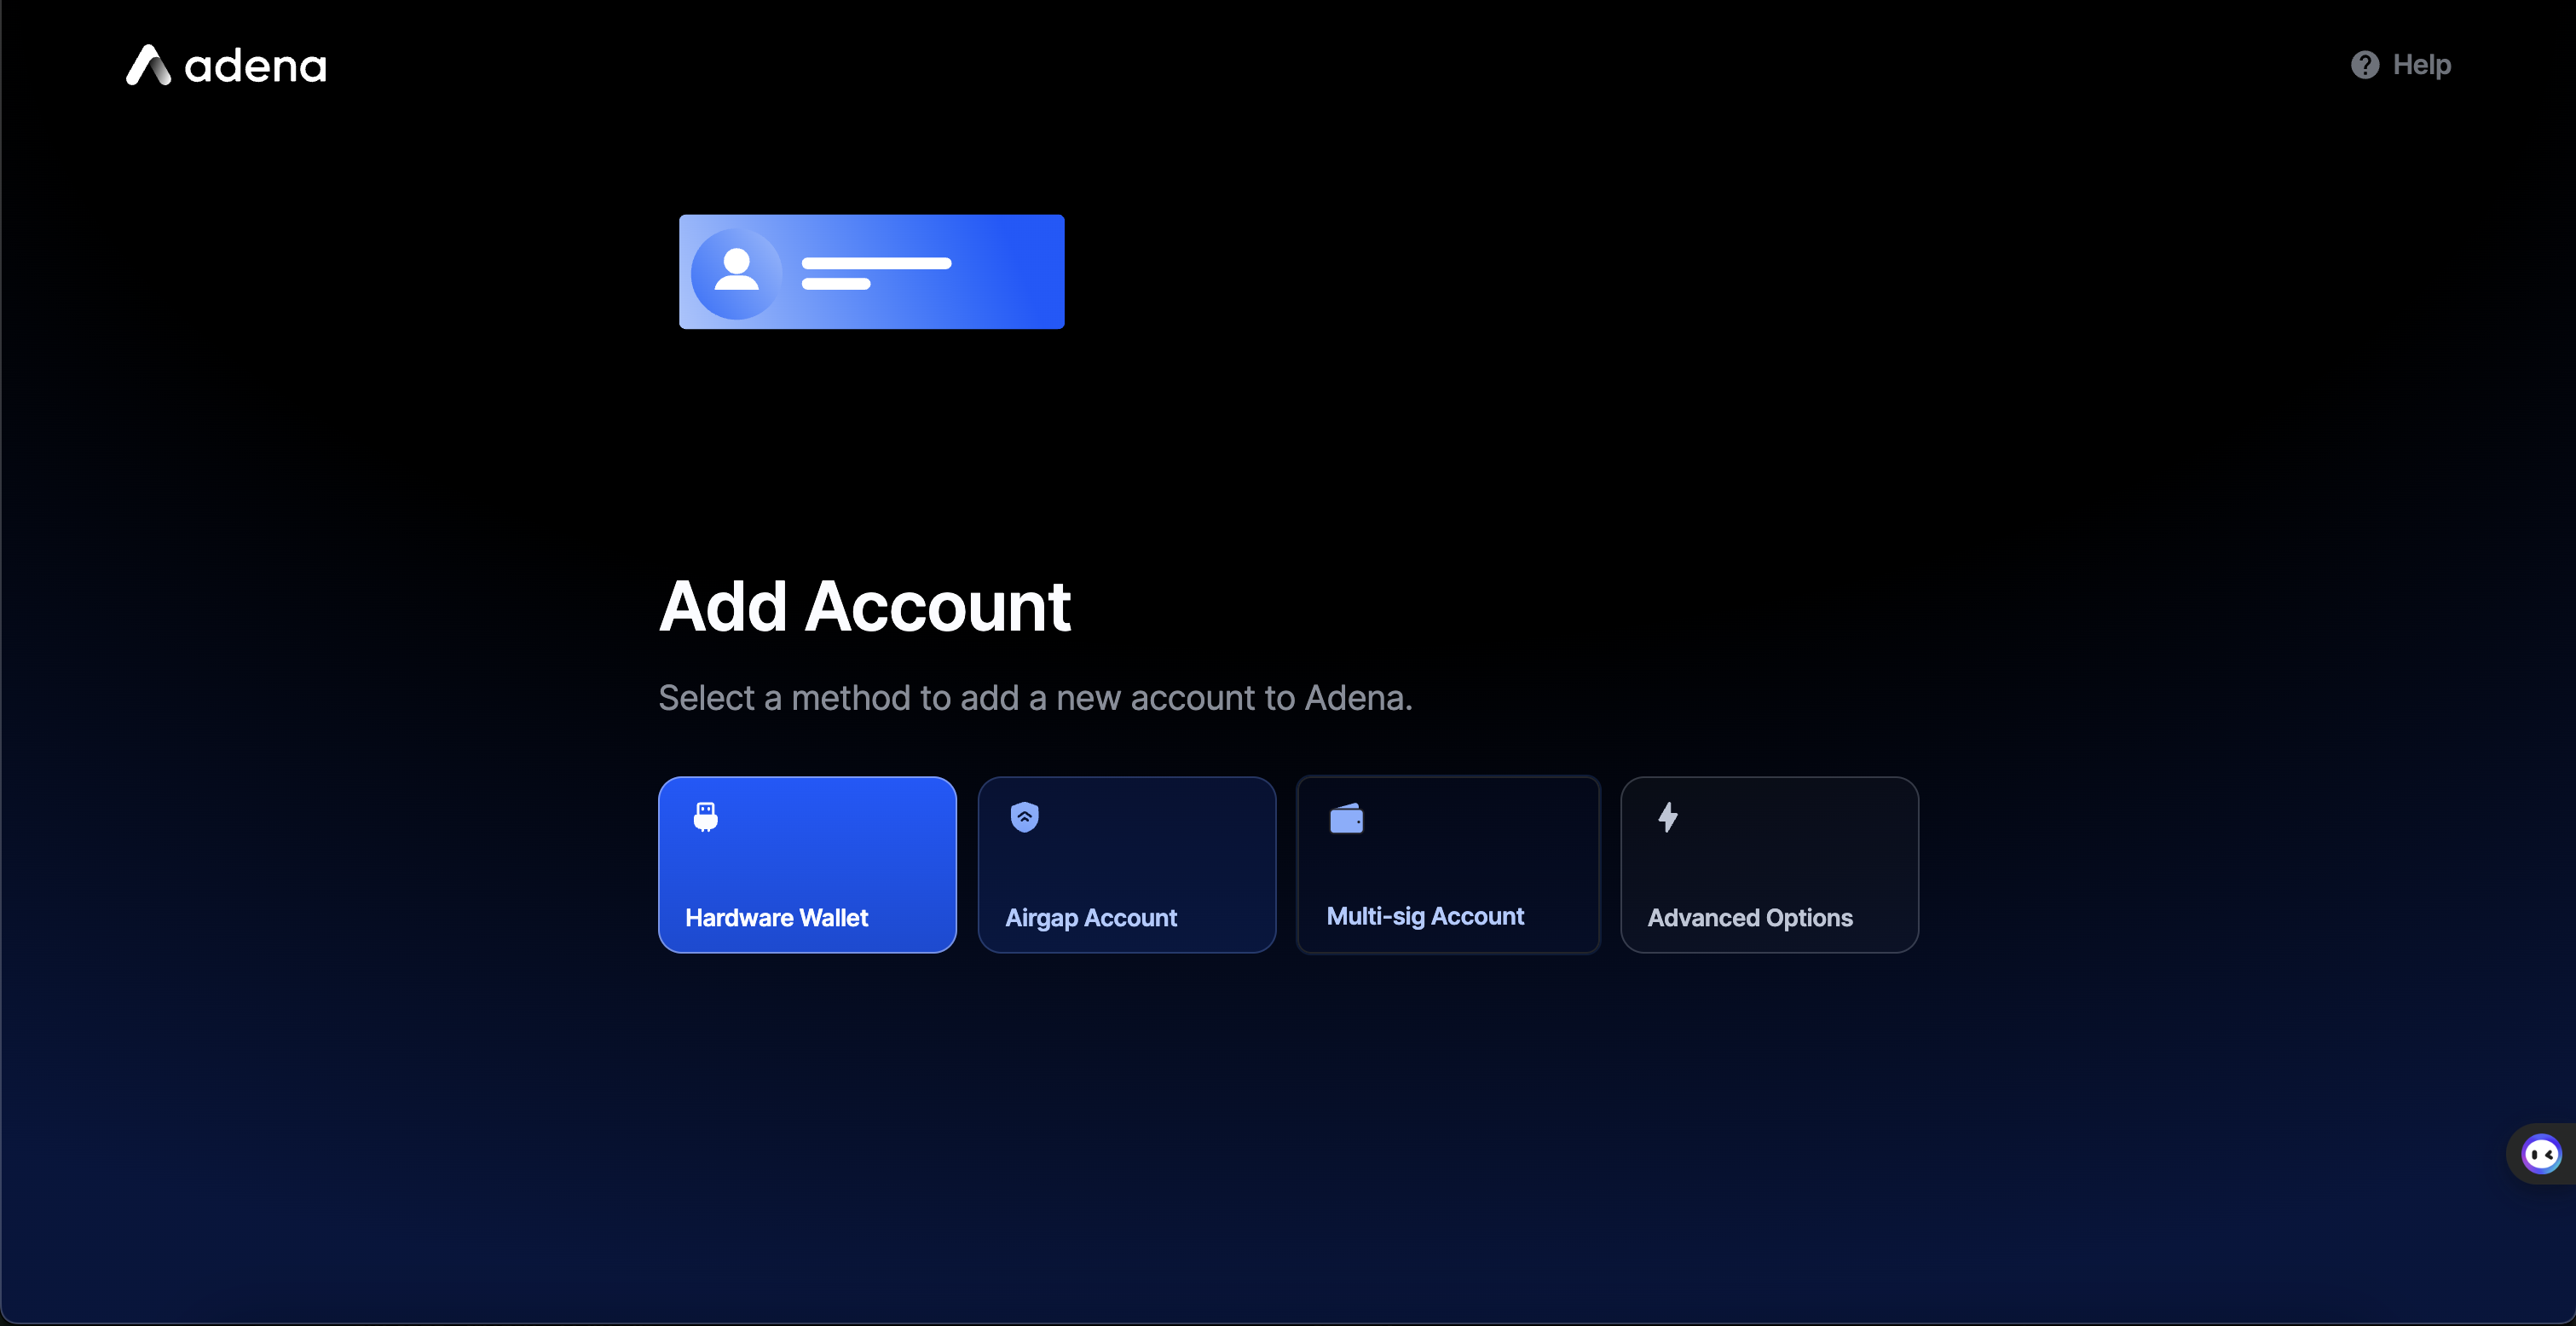
# Add Account

After you create your first account, you may add additional accounts to your wallet with various methods. Once you're in the <mark style="color:blue;">**Sidebar Menu**</mark>, click on <mark style="color:blue;">**Add Account**</mark>.

<figure><img src="/files/KUrHmcMyHCKboPtvQASa" alt=""><figcaption></figcaption></figure>

Adena offers 3 different ways to add a new account:

1. **Create New Account:** Create a new account using your current seed phrase.
2. **Import Private Key:** Import an existing account using your private key.
3. **Connect Ledger:** Connect your Ledger device to add accounts from.

Refer to the [Sign In](/user-guide/sign-in) section for a step-by-step guide on how to complete each method.

<figure><img src="/files/RhnD1srkpD1HyGJo5cvo" alt=""><figcaption></figcaption></figure>


# Settings


# Connected Apps

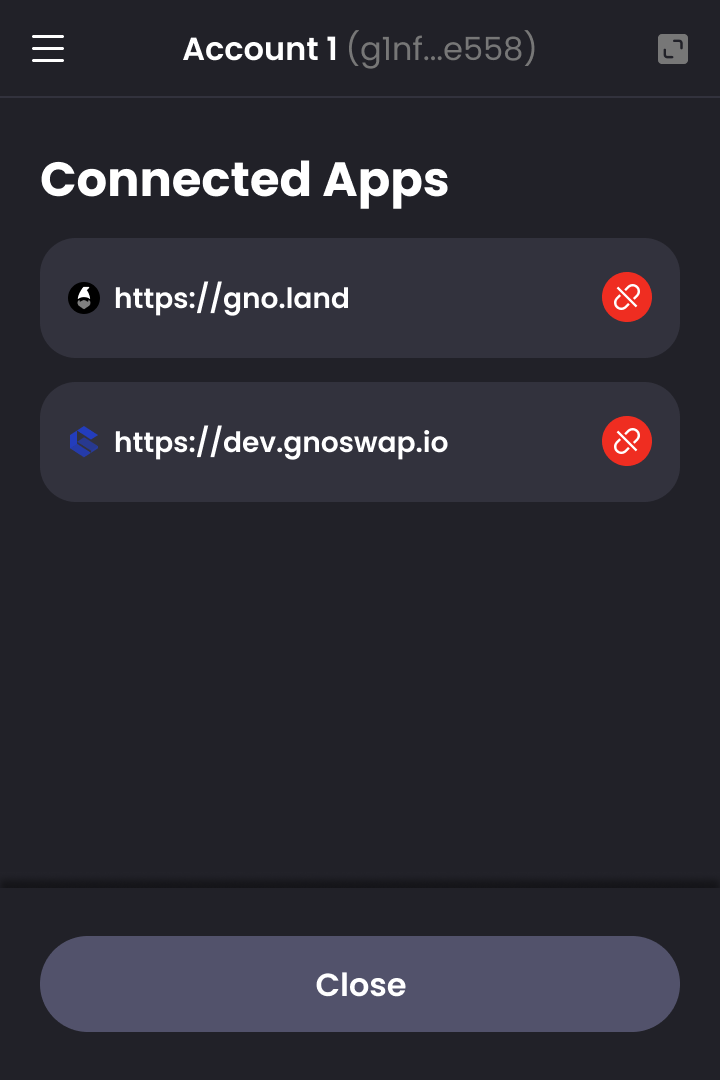
The <mark style="color:blue;">**Connected Apps**</mark> page allows you to **manage your connections with dapps**. Each item includes the logo and the domain of the application registered in the whitelist that's managed on your device. You may disconnect from the application by clicking on the <mark style="color:blue;">**Disconnect Icon**</mark> on the right side of the list. Note that connections are unique to each account on your wallet.

<figure><img src="/files/2G7Fz4H2pLaqyZWPnke7" alt="" width="180"><figcaption></figcaption></figure>


# Address Book

You may **add a frequently-used address** to your <mark style="color:blue;">**Address Book**</mark> to avoid copy-and-pasting the recipient's address for each transfer. Follow the steps below to learn how.

1\. Click on the <mark style="color:blue;">**+ button**</mark> in the top right corner to register a new address.

<figure><img src="/files/vyWRB0fsvYrEIM4dXi2B" alt="" width="180"><figcaption></figcaption></figure>

2\. Enter an address and a name that you will use to identify it. Click on <mark style="color:blue;">**Save**</mark> to register the address.

<figure><img src="/files/MGppFTVNI0MLS3f03dm7" alt="" width="180"><figcaption></figcaption></figure>

3\. You will see the newly registered address at the bottom of the list.

<figure><img src="/files/kVudTgdlqgpT7gJAehhR" alt="" width="180"><figcaption></figcaption></figure>

4\. You may click on the address to make changes. Once you're done, click on <mark style="color:blue;">**Save**</mark> to confirm your changes.

<figure><img src="/files/hVzWOyhoiJAFPKqvxpa5" alt="" width="180"><figcaption></figcaption></figure>

5\. If you wish to remove an address from the Address Book, click on <mark style="color:blue;">**Remove Address**</mark> on the Edit Address page. This will remove the address from the list.

<figure><img src="/files/tBFPVU8SD6y5TWqfhfru" alt="" width="180"><figcaption></figcaption></figure>


# Change Network

A variety of Gnoland blockchain networks are available on Adena by default. A blue checkmark will indicate which network you're connected to.

* **Testnet 3:** The official testnet supported by Gnoland's official RPC endpoint.
* **Local:** A local Gnoland network running on your device.
* **Gno-Teritori-Testnet:** A custom Gnoland network developed and maintained by the [Teritori Team](https://teritori.com/).

1\. Switch between networks by simply clicking on the one you'd like to connect to.

<figure><img src="/files/w8YMbD6d3b5K0kIN1ke2" alt="" width="180"><figcaption></figcaption></figure>

2\. To add a custom Gnoland network on Adena, click on <mark style="color:blue;">**Add Custom Network**</mark>.

<figure><img src="/files/SFFxwoPxPqHrNWMnQbsw" alt="" width="180"><figcaption></figcaption></figure>

3\. Enter the Network name, the RPC address, and the Chain ID of your custom network and click on <mark style="color:blue;">**Save**</mark>.

<figure><img src="/files/iIeMe5snfcEh0XxCz0u9" alt="" width="180"><figcaption></figcaption></figure>

4\. You may edit a custom network by clicking on the <mark style="color:blue;">**Pencil Icon**</mark> next to the name of the network.

<figure><img src="/files/Lwzb6YAQisVYfU4FAWAz" alt="" width="180"><figcaption></figcaption></figure>

5\. Edit any field and press <mark style="color:blue;">**Save**</mark> to save your changes, or delete the network by clicking on <mark style="color:blue;">**Remove Network**</mark>.

<figure><img src="/files/nrmvs5BG2Rcik1JuTV4t" alt="" width="180"><figcaption></figcaption></figure>


# Security & Privacy


# Change Password

1\. Click on <mark style="color:blue;">**Change Password**</mark>.

<figure><img src="/files/w2wukHO3sQaXH2pYmuvl" alt="" width="180"><figcaption></figcaption></figure>

2\. Enter your current password followed by a new password and a confirmation of the new password. Note that your password must be 8\~256 characters long and only contain alphanumeric characters. You may change your password as many times as you want.

<figure><img src="/files/wRMBdkpwNPMNE0YQjLYO" alt="" width="180"><figcaption></figcaption></figure>


# Reveal Seed Phrase

{% hint style="danger" %}
**Protect your seed phrase!**

Your seed phrase is the only way to recover your wallet. Anyone with your seed phrase can steal your funds, so be sure to keep it somewhere safe. Also, note that our team will NEVER ask for your seed phrase under any circumstances. To learn more about how seed phrases work and tips to keep them secure, check out [this blog post](https://medium.com/@onbloc/mnemonic-101-730cf03cb254).
{% endhint %}

1\. Click on <mark style="color:blue;">**Reveal Seed Phrase**</mark>.

<figure><img src="/files/ULplueRiQpmv8Zg6UbRi" alt="" width="180"><figcaption></figcaption></figure>

2\. Confirm that you acknowledge that this will reveal your seed phrase on your screen, and click on <mark style="color:blue;">**Next**</mark>.

<figure><img src="/files/jXiGaa85XubY8vLQDTYA" alt=""><figcaption></figcaption></figure>

3\. Enter your password, carefully review the warning, activate the Checkboxes, and click on <mark style="color:blue;">**Next**</mark>.

<figure><img src="/files/Ne3q5E94YKIIDQTquucq" alt=""><figcaption></figcaption></figure>

4\. Your seed phrase will be displayed hidden. Press on <mark style="color:blue;">**Hold to Reveal**</mark> to reveal it. You may click on <mark style="color:blue;">**Copy**</mark> to copy your seed phrase to the clipboard. Click <mark style="color:blue;">**Done**</mark> to return to <mark style="color:blue;">**Settings**</mark>.

<figure><img src="/files/rhktiA9otJn9ugf5clZH" alt=""><figcaption></figcaption></figure>


# Export Private Key

1\. Click on <mark style="color:blue;">**Export Private Key**</mark>.

<figure><img src="/files/rpMSulk0W2B1QaPiAFpv" alt="" width="180"><figcaption></figcaption></figure>

2\. Confirm that you acknowledge that this will reveal your private key on your screen, and click on <mark style="color:blue;">**Next**</mark>.

<figure><img src="/files/qZxa1xF4cJLZaF1KnBY7" alt=""><figcaption></figcaption></figure>

3\. Enter your password, carefully review the warning, activate the Checkboxes, and click on <mark style="color:blue;">**Next**</mark>.

<figure><img src="/files/8jGgQKqZ92av6aedWkNo" alt=""><figcaption></figcaption></figure>

4\. Your private key will be displayed hidden. Press on <mark style="color:blue;">**Hold to Reveal**</mark> to reveal it. You may click on <mark style="color:blue;">**Copy**</mark> to copy your key to the clipboard. Click <mark style="color:blue;">**Done**</mark> to exit.

<figure><img src="/files/MPCWTBrnPmFmy9cR9Ohk" alt=""><figcaption></figcaption></figure>


# Remove Account

1\. Click on <mark style="color:blue;">**Remove Account**</mark>.

<figure><img src="/files/DSKoGlwFGCdg5UQSGQlX" alt="" width="180"><figcaption></figcaption></figure>

2\. Carefully review the warning and click on <mark style="color:blue;">**Remove**</mark>. This will remove the account from your wallet.

{% hint style="danger" %}
**Save your private key!**

Once you remove your account, you can only recover it with your private key or your seed phrase. Adena cannot retrieve your account for you, as your keys are only saved on your device. Be sure to save your key in a safe place before you proceed.
{% endhint %}

<figure><img src="/files/1KvEFU6Cb14w91VPCEDq" alt="" width="180"><figcaption></figcaption></figure>


# Reset Wallet

1\. Click on <mark style="color:blue;">**Reset Wallet**</mark>.

<figure><img src="/files/FK0P61gXBoT4uSwfHbSb" alt="" width="180"><figcaption></figcaption></figure>

2\. Carefully review the warning and click on <mark style="color:blue;">**Reset**</mark>. This will remove all your keys and seed phrases from your wallet and reset your wallet to the default state.

{% hint style="danger" %}
**Save your seed phrase!**

Once you reset your wallet, you can only recover your accounts with your private key or your seed phrase. Adena cannot retrieve your accounts for you, as your credentials are only saved on your device. Be sure to save your phrases and keys in a safe place before you proceed.
{% endhint %}

<figure><img src="/files/Bwo9hAbCMT8e9i5S1JeT" alt="" width="180"><figcaption></figcaption></figure>

3\. You will be taken to the <mark style="color:blue;">**Sign In**</mark> page once your wallet is completely reset.

<figure><img src="/files/jDU9a6ALGjw8svvcbSTc" alt=""><figcaption></figcaption></figure>


# About Adena

1\. Click on <mark style="color:blue;">**About Adena**</mark>.

<figure><img src="/files/YRHS5Y8AKWWTiTy9DXKI" alt="" width="180"><figcaption></figcaption></figure>

2\. You can check the version of Adena installed on your device. You can also find official links to the following pages: [Website](https://adena.app/), [Developer Docs](https://docs.adena.app/), [GitHub](https://github.com/onbloc/adena-wallet), [Help & Support](https://docs.adena.app/resources/faq), [Terms of Use](https://adena.app/terms), and [Privacy Policy](https://adena.app/privacy).

<figure><img src="/files/31pTBPQvPL2otZz8irc4" alt="" width="180"><figcaption></figcaption></figure>


# Wallet


# Deposit

1\. Click on <mark style="color:blue;">**Deposit**</mark>.

<figure><img src="/files/dh0soFczoUrUsBrrQruE" alt="" width="180"><figcaption></figcaption></figure>

2\. Select the token to deposit.

<figure><img src="/files/MwYjQ0qVRj9wUQjJ5clN" alt="" width="180"><figcaption></figcaption></figure>

3\. A page that displays your deposit address will open. Scan the QR code from an external wallet or click on <mark style="color:blue;">**Copy**</mark> to copy your address to the clipboard.

{% hint style="danger" %}
**Check your network!**

You may only use your address on Adena to deposit tokens minted on the Gnoland blockchain. Sending tokens from another blockchain may lead to a loss of funds.
{% endhint %}

<figure><img src="/files/w2ucgsmSg3KdmsL18APk" alt="" width="180"><figcaption></figcaption></figure>

4\. Your balance will be updated once you complete the deposit.


# Send


# Hardware Wallets

1\. Click on <mark style="color:blue;">**Send**</mark>.

<figure><img src="/files/AJdQQKLcLt4Oe7nPBZxb" alt="" width="180"><figcaption></figcaption></figure>

2\. Select the token to send.

<figure><img src="/files/uJrC9pvukT36WRk4uPl3" alt="" width="180"><figcaption></figcaption></figure>

3\. Enter the recipient's account address and the amount to send. Click on <mark style="color:blue;">**Next**</mark> to proceed.

<figure><img src="/files/d2uKPumDmSYMnAv5KJhr" alt="" width="180"><figcaption></figcaption></figure>

4\. Review your transaction, select the network fee, and click on <mark style="color:blue;">**Send**</mark> to confirm your transaction.

<figure><img src="/files/HbkzFRaHHXZCBGcupQX3" alt="" width="180"><figcaption></figcaption></figure>

5\. Adena will request approval from your hardware wallet. Connect your hardware wallet to your PC and open the Cosmos App.

<figure><img src="/files/drUeA35ORorpXRIw56OM" alt="" width="180"><figcaption></figcaption></figure>

6\. Review and approve the transaction in your hardware wallet.

7\. You will be sent to the History page where you can check your transaction.

<figure><img src="/files/RoIbd65JDsCdDebDCipC" alt="" width="180"><figcaption></figcaption></figure>

8\. If your transaction was successful, it will appear on your History page and your balance will be updated accordingly.


# Air-gap Accounts

1\. [Create](https://docs.gno.land/gno-tooling/cli/gno-tooling-gnokey#sign-and-broadcast-a-transaction) and [sign](https://docs.gno.land/gno-tooling/cli/gno-tooling-gnokey#sign-a-document) a transaction file from your air-gapped device.

2\. Transfer the signed transaction file from your air-gapped device to your online device in which Adena is installed, using a USB or a flash drive.

3\. Click on <mark style="color:blue;">**Send**</mark>.

<figure><img src="/files/LU7cONNn4aoUmfOOnXfr" alt="" width="180"><figcaption></figcaption></figure>

4\. Drag and drop or upload the signed transaction file.

<figure><img src="/files/vavwnKyMZmMZQ5UPf0YH" alt="" width="180"><figcaption></figcaption></figure>

5\. Adena will automatically interpret your file and display a preview. Review the transaction file, and click on <mark style="color:blue;">**Broadcast**</mark> to complete your transaction.

<figure><img src="/files/MlmNQMK0OubmyfdZdPW4" alt="" width="180"><figcaption></figcaption></figure>


# Multi-sig Accounts

1. **Create an unsigned transaction file from Adena**

In a multi-sig environment, transactions must be signed by multiple authorized parties before they can be broadcast to the blockchain. This means that you must create an unsigned transaction file, collect signatures from the required number of signers, and then broadcast the fully-signed transaction. Please refer to [this section](/integrations/transactions/create-a-multisig-transaction) or [gno.land docs](https://docs.gno.land/users/interact-with-gnokey/#2-creating-an-unsigned-transaction-locally) for a detailed guide on creating transaction files.

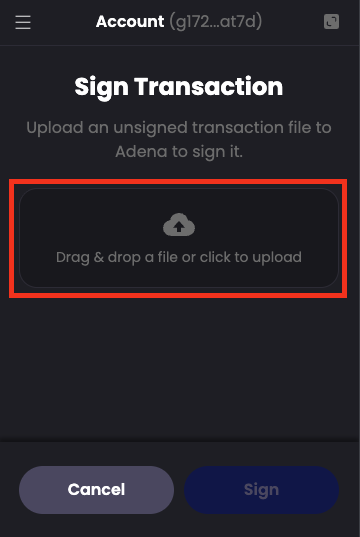
2. **Upload the transaction file**

Each authorized signer should upload the unsigned transaction file (.tx) to Adena wallet to review and sign it.

<figure><img src="/files/8xIANqfzHTXowHaNtwfO" alt="" width="181"><figcaption></figcaption></figure>

<figure><img src="/files/e6LHSxcrlolKoWzOqUlz" alt="" width="180"><figcaption></figcaption></figure>

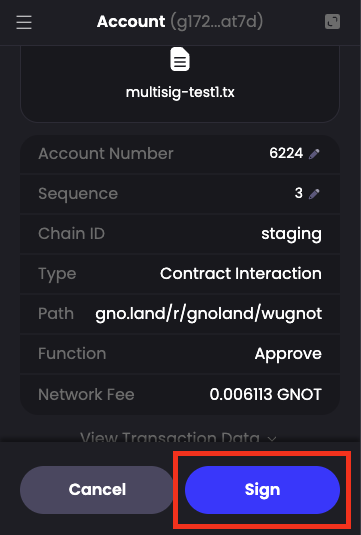
3. **Review the transaction**

Adena will display the transaction details. Each signer should carefully review

4. **Sign the transaction**

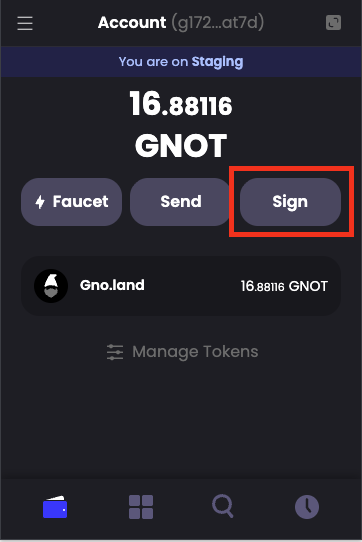
If the transaction details are correct, click the **Sign** button to create your signature.

> Signing using gnokey: [signing-the-transaction](https://docs.gno.land/users/interact-with-gnokey/#3-signing-the-transaction)

<figure><img src="/files/YWKsWTnmBEJV0PzCro0F" alt="" width="181"><figcaption></figcaption></figure>

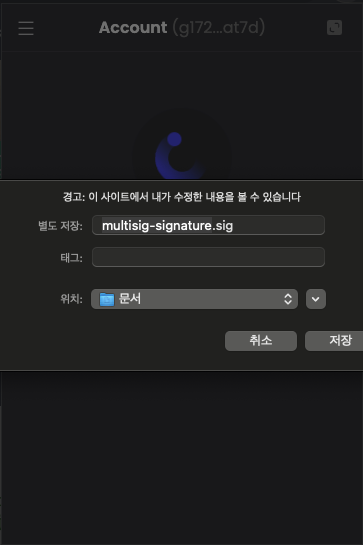
5. **Download signature file**

After signing, Adena will allow you to download a signature file (.sig) containing your signature. Save this file to your device.

<figure><img src="/files/xsGB2cKpIrp39jXsvokT" alt="" width="182"><figcaption></figcaption></figure>

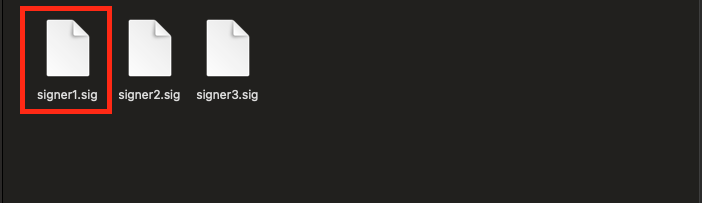
6. **Share signature files**

Each signer should share their signature file (.sig) with the person who will broadcast the final transaction. Once enough signatures are collected to meet the multisig threshold, the transaction can be broadcast to the blockchain.

<figure><img src="/files/f9Sf1zWwvHbgVzSL2G9w" alt="" width="351"><figcaption></figcaption></figure>

7. **Collect signatures from authorized signers**

Share the unsigned transaction file (.tx) with other authorized signers. Each signer must:

* Import the unsigned transaction file into their Adena wallet
* Review and sign the transaction with their private key
* Export the signature file (.sig)

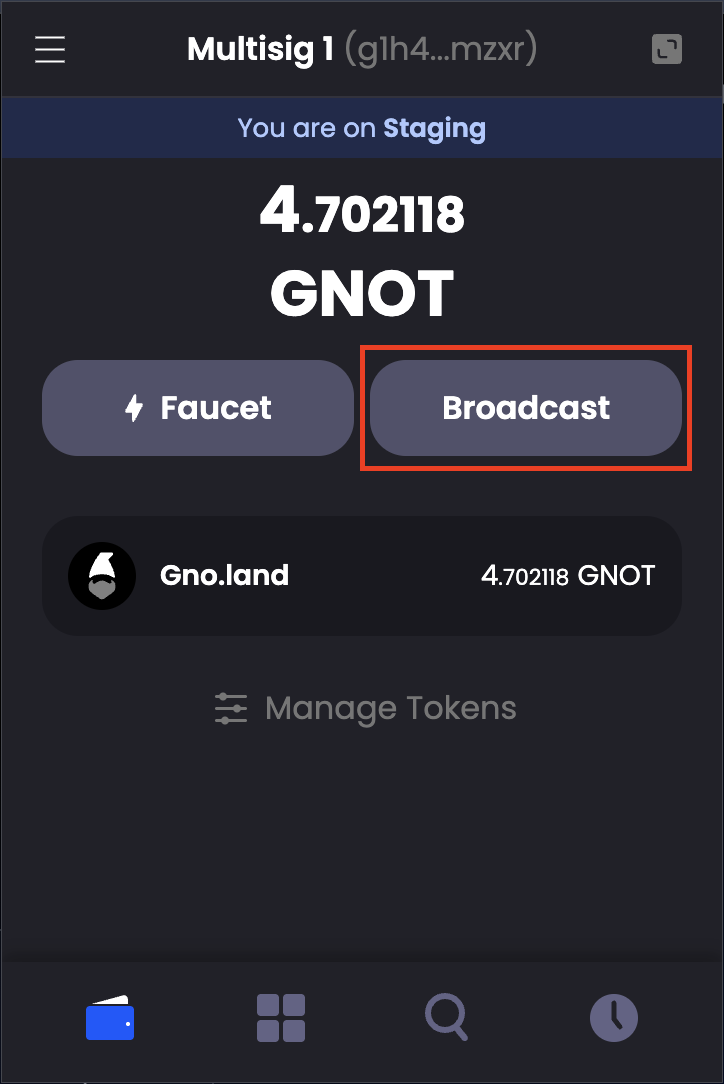
8. **Click on Broadcast**

Once you have collected the required number of signature files, open Adena and navigate to the Broadcast function.

<figure><img src="/files/N9v4Hgh3fO8eblHJZoER" alt="" width="362"><figcaption></figcaption></figure>

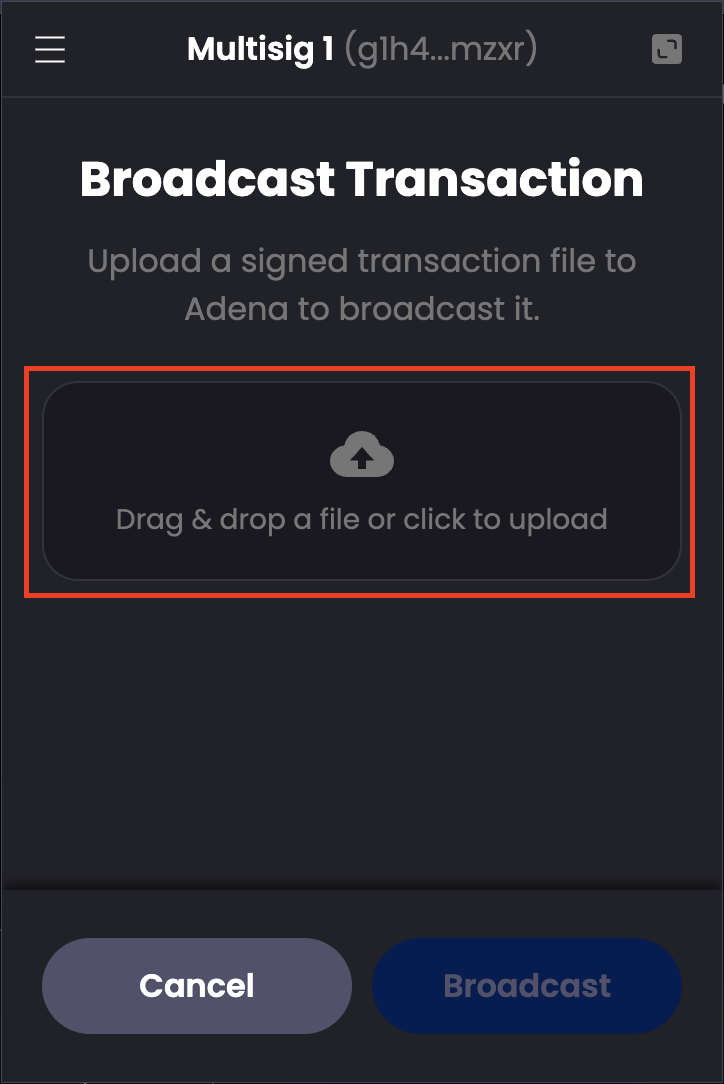
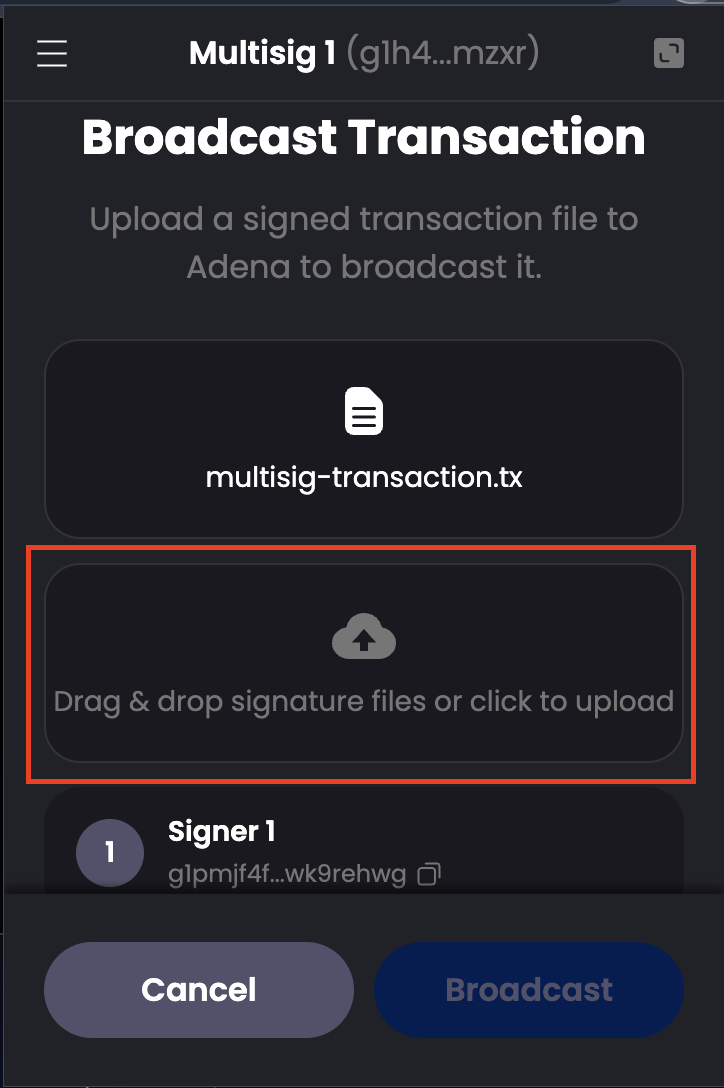
9. **Drag and drop or upload the transaction file**

Upload the unsigned transaction file (.tx) along with all the collected signature files (.sig) from authorized signers. You can upload multiple .sig files at once.

<figure><img src="/files/eHiLPlu7pZub69jbVumN" alt="" width="362"><figcaption></figcaption></figure>

<figure><img src="/files/HRcYaWZaqOJORV9l27WG" alt="" width="362"><figcaption></figcaption></figure>

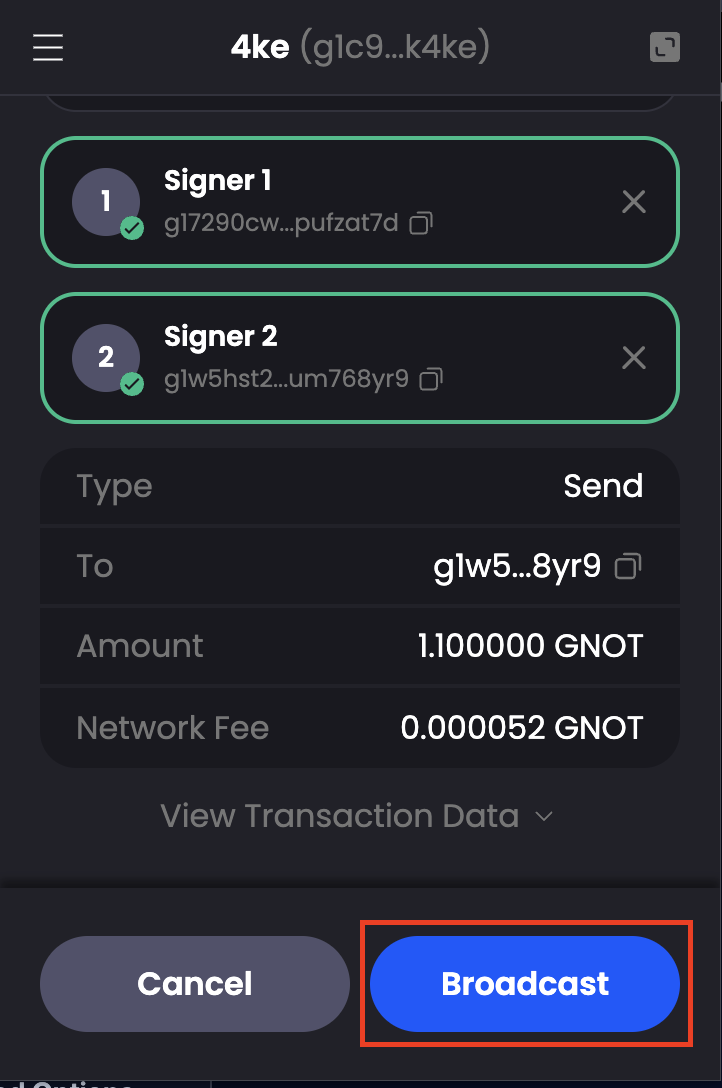
10. **Broadcast**

Adena will automatically interpret your files and display a preview showing all collected signatures. Review the transaction details and the list of signers, then click on **Broadcast** to complete your transaction.

<figure><img src="/files/rvNhXlISFa1BjJvIL5xH" alt="" width="361"><figcaption></figcaption></figure>

<br>


# Advanced Accounts

1\. Click on <mark style="color:blue;">**Send**</mark>.

<figure><img src="/files/gCcF54DyOBs0raIdPMBs" alt="" width="180"><figcaption></figcaption></figure>

2\. Select the token to send.

<figure><img src="/files/itIMxN5JiEiqLo3KFtRX" alt="" width="180"><figcaption></figcaption></figure>

3\. Enter the recipient's account address and the amount to send. Click on <mark style="color:blue;">**Next**</mark> to proceed.

<figure><img src="/files/MTB2873dbhjd5yYwVvFR" alt="" width="180"><figcaption></figcaption></figure>

4\. Review your transaction, select the network fee, and click on <mark style="color:blue;">**Send**</mark> to confirm your transaction.

{% hint style="danger" %}
**Double-check your inputs!**

Make sure you've entered the correct address and amount! Your transaction cannot be reverted once it's confirmed on the blockchain, meaning that there's no way to recover funds sent to the wrong address.
{% endhint %}

<figure><img src="/files/bjvtJTZJ5MrzWJX0jBD9" alt="" width="180"><figcaption></figcaption></figure>

5\. You will be sent to the <mark style="color:blue;">**History**</mark> page where you can check your transaction.

<figure><img src="/files/RnBrPAJ28208ajgB9BQT" alt="" width="180"><figcaption></figcaption></figure>

6\. If your transaction is successful, it will appear on your History page and your balance will be updated accordingly.


# Manage Tokens

1\. Click on <mark style="color:blue;">**Manage Tokens**</mark>.

<figure><img src="/files/UoOXgQOzJ9u7cDsCFeup" alt="" width="180"><figcaption></figcaption></figure>

2\. If the token that you're looking for is already on the list, click on the toggle button to show or hide the token from the <mark style="color:blue;">**Wallet**</mark> menu. If you can't find the token, click on the + button to enter the <mark style="color:blue;">**Add Custom Token**</mark> page.

<figure><img src="/files/THYzRQAZlFGqRj77Qyyh" alt="" width="180"><figcaption></figcaption></figure>

3\. Click on <mark style="color:blue;">**Select a GRC-20 Token**</mark>. A dropdown will appear where you can search for a GRC-20 by using a name, a symbol, or a path as a keyword. Once you find the token of your choice, click on it. This will select the token and automatically fill out the info section on the page.

<figure><img src="/files/FwD5al84QAiIjlYK6cFL" alt="" width="180"><figcaption></figcaption></figure>

4\. Click on <mark style="color:blue;">**Add**</mark> to add the token to your custom token list.

<figure><img src="/files/Ux5IPTpXS13tDPfYQdry" alt="" width="180"><figcaption></figcaption></figure>

5\. Your token will appear on the list on the token management page.&#x20;

<figure><img src="/files/KIID7uOgJawwxARGJWap" alt="" width="180"><figcaption></figcaption></figure>

6\. Return to your wallet to view your newly added token.

<figure><img src="/files/QRJDcCcMiEksvc1Y7pXH" alt="" width="180"><figcaption></figcaption></figure>


# NFTs


# Asset Details

1\. Click on <mark style="color:blue;">**Collectables**</mark>.

<figure><img src="/files/9Kw4JnTYobntTopByuIF" alt="" width="180"><figcaption></figcaption></figure>

2\. Your NFT Collection will appear on the list on the <mark style="color:blue;">**Collectables**</mark> page. Click on the NFT assets to enter the <mark style="color:blue;">**NFT Asset Details**</mark> page.

<figure><img src="/files/Tq4Z3OyansZDcsFs5Dpb" alt="" width="180"><figcaption></figcaption></figure>

3\. Click on the <mark style="color:blue;">・・・</mark> <mark style="color:blue;"></mark><mark style="color:blue;">**button**</mark> to open the <mark style="color:blue;">**Popup Menu**</mark>, you can <mark style="color:blue;">**Pin**</mark> and <mark style="color:blue;">**Hide**</mark> your collection.

<figure><img src="/files/pqvszFtxvzwAAaAYa9fo" alt="" width="180"><figcaption></figcaption></figure>

4\. Scroll down to view the details of your NFT asset, such as description and attributes.

<figure><img src="/files/2KC8nChyPMoObLUwrd8l" alt="" width="180"><figcaption></figcaption></figure>


# Manage Collectables

1\. Click on <mark style="color:blue;">**Manage Collectables**</mark>

<figure><img src="/files/JmmBf1A6q8X64dadjHSp" alt="" width="180"><figcaption></figcaption></figure>

2. Your Collectable will appear on the list on the Collectable management page.

<figure><img src="/files/F9DtHtPsjOAJSoAsdSUd" alt="" width="180"><figcaption></figcaption></figure>

3\. Return to your NFTs to view your newly added Collectable.

<figure><img src="/files/h06SGZot636g8uaKXS1W" alt="" width="180"><figcaption></figcaption></figure>


# Deposit NFT

1\. Click on the <mark style="color:blue;">・・・</mark> <mark style="color:blue;"></mark><mark style="color:blue;">**button**</mark> to open the <mark style="color:blue;">**Popup Menu**</mark>.

<figure><img src="/files/wX6noJSA5itaoL9i4EaH" alt="" width="180"><figcaption></figcaption></figure>

2\. Click on <mark style="color:blue;">**Deposit NFT**</mark>.

<figure><img src="/files/blDIfY77tqpO3kzkESd9" alt="" width="180"><figcaption></figcaption></figure>

3\. A page that displays your deposit address will open. Scan the QR code from an external wallet or click on <mark style="color:blue;">**Copy**</mark> to copy your address to the clipboard.

{% hint style="danger" %}
**Check your network!**

You may only use your address on Adena to deposit NFTs minted on the Gnoland blockchain. Sending NFTs from another blockchain may lead to a loss of funds.
{% endhint %}

<figure><img src="/files/00xrYBdI33cPWiBNl9SL" alt="" width="180"><figcaption></figcaption></figure>


# Send NFT

1\. Click on <mark style="color:blue;">**Send**</mark>.

<figure><img src="/files/uTdyhnwcLPHhilhLmGYr" alt="" width="180"><figcaption></figcaption></figure>

2\. Enter the recipient's account address and the memo(optional) to send. Click on <mark style="color:blue;">**Send**</mark> to proceed.

<figure><img src="/files/rbfoxdtpaB1DRqbKn47b" alt="" width="180"><figcaption></figcaption></figure>

3\. You will be sent to the <mark style="color:blue;">**History**</mark> page where you can check your transaction.

<figure><img src="/files/YFA22cgQS5so0xrFfLzk" alt="" width="180"><figcaption></figcaption></figure>


# Explore

The <mark style="color:blue;">**Explore**</mark> menu gives you a tour around the Gnoland ecosystem by **showcasing aspiring projects** building on Gnoland. A list of dapps that displays each project's name, description, and a button that brings you directly to their website is available.

<figure><img src="/files/9m3SWkfNS6P6LwfGWkmC" alt="" width="180"><figcaption></figcaption></figure>

{% hint style="info" %}
**Are you a developer? Add your dapp to this list!**

We welcome anyone to request to get their dapp added to this list by submitting an issue on [Adena's official repository](https://github.com/onbloc/adena-wallet/issues). Please be sure to provide a concise description and a correct link that points to the landing page of your dapp on the submission.
{% endhint %}


# History

Adena displays **your recent transactions** in the <mark style="color:blue;">**History**</mark> menu. Transactions are grouped by date executed.

1\. A list of transactions associated with the current account is visible, grouped by executed date. Click on a transaction for details.

<figure><img src="/files/1CDcwwaJBTlCX5yPNLfe" alt="" width="180"><figcaption></figcaption></figure>

2\. Detailed information about the selected transaction will be displayed. Click on the external link icon in the status field to view the transaction from [Gnoscan](https://gnoscan.io/), a Gnoland explorer.

<figure><img src="/files/1xl08o2EQEmq0iALyxNL" alt="" width="180"><figcaption></figcaption></figure>


# Web3 Interactions


# Connect to a Dapp

1\. Click on the <mark style="color:blue;">**Connect**</mark> button on the dapp.

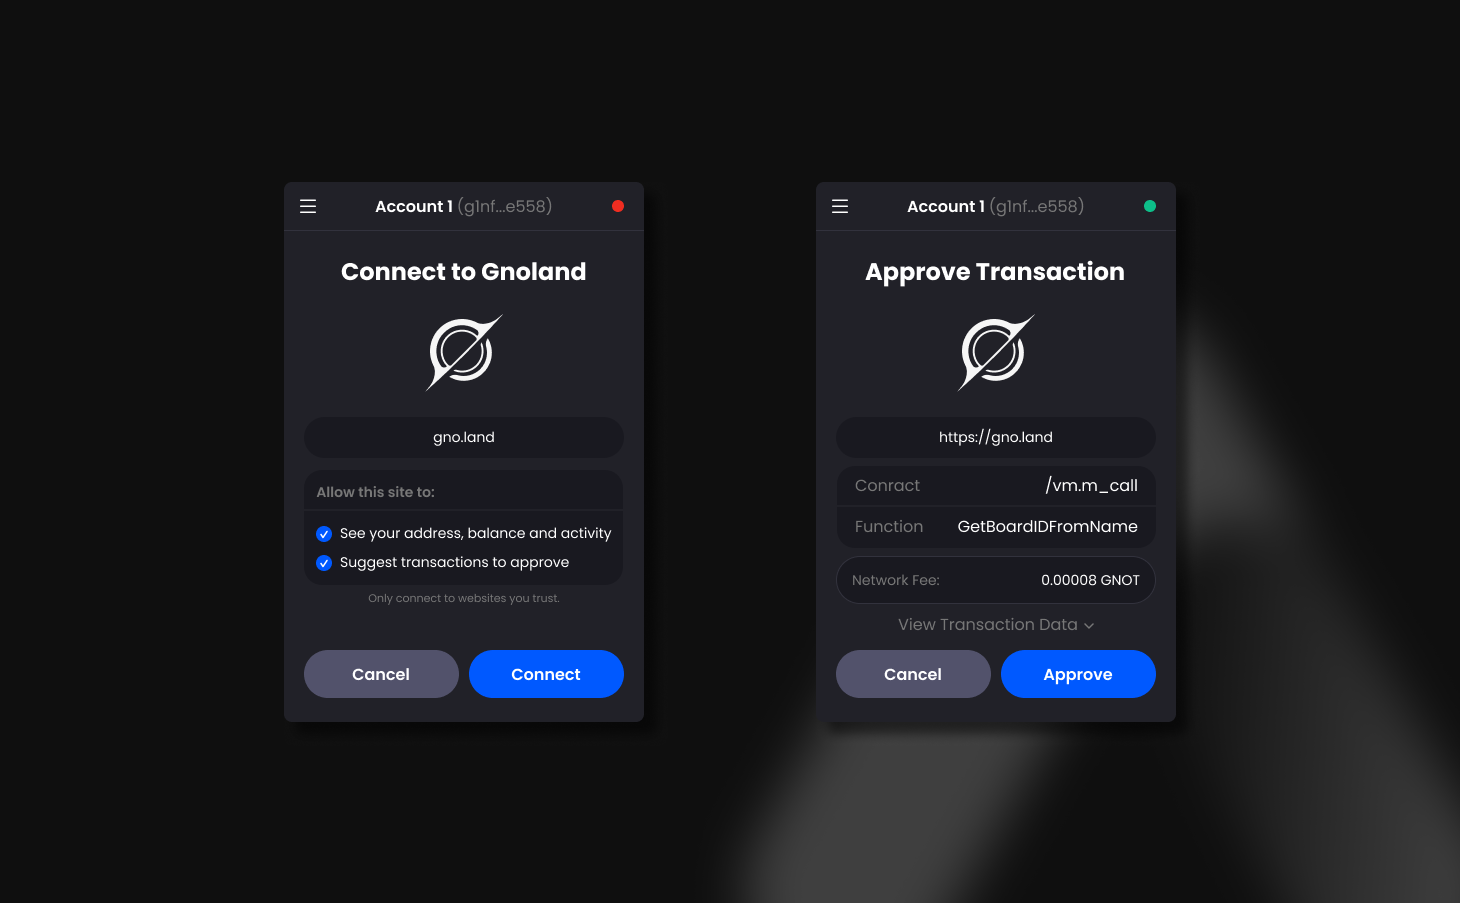
2\. Confirm the domain of the dapp you're connecting to, and click on <mark style="color:blue;">**Connect**</mark>. Please be aware that this will allow the dapp to:

* See your address, balance, and activity.
* Suggest transactions to approve.

<figure><img src="/files/j6PnZN83idoFJ7ysW7tT" alt="" width="180"><figcaption></figcaption></figure>

3\. Once the connection is established, the <mark style="color:blue;">**Connection Icon**</mark> on the right side of the header will turn green. You may hover over the icon to check your connection with the current website.

<figure><img src="/files/n1FCnCfuAYuh7mSKZjlX" alt="" width="180"><figcaption></figcaption></figure>

4\. If you've accidentally connected to a phishing dapp, head over to the [<mark style="color:blue;">**Connected Apps**</mark>](https://docs.adena.app/user-guide/settings/connected-apps) page to disconnect from the website.

<figure><img src="/files/mNQ5XsqzfPqJkdz1hbmZ" alt="" width="180"><figcaption></figcaption></figure>


# Approve a Transaction

While using dapps, you may sometimes want to approve transactions that let you interact with the blockchain. Adena will only execute transactions upon your approval, and you can modify certain arguments (arg) in the transaction if needed before signing. Be sure to double-check the data of transactions you’re signing, as they’re irreversible once submitted. Once you confirm that everything’s correct, click on Approve to send the transaction.

<figure><img src="/files/fMXHdsEEhrz5MkEjgdi6" alt="" width="180"><figcaption></figcaption></figure>

If you'd like to view the raw transaction data, click on the <mark style="color:blue;">**View Transaction Data**</mark> button.

<figure><img src="/files/gno6JfEStp2XIZ972JZq" alt="" width="180"><figcaption></figcaption></figure>


# Add a Network

Interacting with dapps that run on a custom Gnoland network will require you to add the network to Adena.

{% hint style="danger" %}
**Only add trusted networks from trusted providers!**

A malicious network provider can lie about the state of the blockchain. Only add custom networks from trusted providers.
{% endhint %}

1\. Click on <mark style="color:blue;">**Add Network**</mark> on the dapp.

2\. Carefully review the network information and press <mark style="color:blue;">**Approve**</mark>.

<figure><img src="/files/amJHLeMw9whFBXZQIK3Q" alt="" width="180"><figcaption></figcaption></figure>

3\. The newly added network will be available on the <mark style="color:blue;">**Switch Network Menu**</mark>.

<figure><img src="/files/74r3kyiovvlgsmHYWw8u" alt="" width="180"><figcaption></figcaption></figure>


# Switch Networks

When your current network is different from the one that the connected dapp is running on, it may request you to switch your network. Simply click on <mark style="color:blue;">**Switch**</mark> to change your network to the one that matches the dapp's.

<figure><img src="/files/tmpoiYpCCQVuhQ6k6eY5" alt="" width="180"><figcaption></figcaption></figure>


# Detect Wallet

Adena enables web applications to interact with the Gnoland blockchain, allowing users to sign and broadcast transactions.

Once the Adena Wallet Chrome Extension is installed on the user's device, the `adena` object will be injected into the `window`. To **detect the installation of Adena Wallet**, look for `window.adena`. If Adena is not installed, we suggest directing your users to [our website](https://adena.app/) on a new tab.&#x20;

#### Sample Code

```javascript
window.onload = async() => {
  //look for the adena object
  if (!window.adena) {
    //open adena.app in a new tab if the adena object is not found
    window.open("https://adena.app/", "_blank");
  } else {
    //write your logic here
    //the sample code below displays a method provided by Adena that initiates a connection
    await adena.AddEstablish("Adena");
  }
};
```


# Establish Connection

For a web application to send requests by using functions available on Adena, it must **establish a connection with the account** with the `AddEstablish`  method. Once the user approves the connection, the domain will be added to a locally-stored whitelist.

The application will encounter Error 1000 if it attempts to use a function without having established a connection.

#### Code

```javascript
adena.AddEstablish("name")
```

#### **Params**

<table><thead><tr><th width="173">Key</th><th width="149.33333333333331">Type</th><th>Description</th></tr></thead><tbody><tr><td><code>name</code></td><td><code>sting</code></td><td>The name of the website requesting to connect</td></tr></tbody></table>

#### Response

<table><thead><tr><th width="173">Key</th><th width="168.33333333333331">Type</th><th>Description</th></tr></thead><tbody><tr><td><code>code</code></td><td><code>number</code></td><td>Numeric result code</td></tr><tr><td><code>status</code></td><td><code>string</code></td><td>Returns <code>success</code> or <code>failure</code></td></tr><tr><td><code>type</code></td><td><code>string</code></td><td>Response type</td></tr><tr><td><code>message</code></td><td><code>string</code></td><td>Descriptive message of the result</td></tr><tr><td><code>data</code></td><td><code>object</code></td><td>-</td></tr></tbody></table>

#### Sample Request

```javascript
//the name string will be displayed on the connection pop-up
adena.AddEstablish("adena")
```

#### Sample Response

```json
{
    "code": 0,
    "status": "success",
    "type": "CONNECTION_SUCCESS",
    "message": "The connection has been successfully established.",
    "data": {}
}
```


# Get Account Info

Once your web application successfully connects to Adena, in most cases, you would first want to **get information about the connected account**. Use the `getAccount` method to receive a series of data about the account including its address, balance, public key, account number, and sequence.

#### Code

```javascript
adena.GetAccount();
```

#### **Params**

<table><thead><tr><th width="219">Key</th><th width="168.33333333333331">Type</th><th>Description</th></tr></thead><tbody><tr><td>-</td><td>-</td><td>-</td></tr></tbody></table>

#### Response

<table><thead><tr><th width="214">Key</th><th width="168.33333333333331">Type</th><th>Description</th></tr></thead><tbody><tr><td><code>code</code></td><td><code>number</code></td><td>Numeric result code</td></tr><tr><td><code>status</code></td><td><code>string</code></td><td>Returns <code>success</code> or <code>failure</code></td></tr><tr><td><code>type</code></td><td><code>string</code></td><td>Response type</td></tr><tr><td><code>message</code></td><td><code>string</code></td><td>Descriptive message of the result</td></tr><tr><td><code>data</code></td><td><code>object</code></td><td><strong>Account Model</strong></td></tr></tbody></table>

#### Account Model

<table><thead><tr><th width="212">Key</th><th width="168.33333333333331">Type</th><th>Description</th></tr></thead><tbody><tr><td><code>accountNumber</code></td><td><code>string</code></td><td>Account number</td></tr><tr><td><code>address</code></td><td><code>string</code></td><td>Account address</td></tr><tr><td><code>coins</code></td><td><code>string</code></td><td>Account balance</td></tr><tr><td><code>chainId</code></td><td><code>string</code></td><td>Current chain's Chain ID</td></tr><tr><td><code>sequence</code></td><td><code>string</code></td><td>Number of transactions signed by the account</td></tr><tr><td><code>status</code></td><td><code>string</code></td><td>Returns <code>ACTIVE</code> or <code>IN_ACTIVE</code></td></tr><tr><td><code>publicKey.@type</code></td><td><code>string</code></td><td>Public key type</td></tr><tr><td><code>publicKey.value</code></td><td><code>string</code></td><td>Public key value</td></tr></tbody></table>

#### Sample Request

```javascript
adena.GetAccount()
```

#### Sample Response

```javascript
{
   "code": 0,
   "status": "success",
   "type": "GET_ACCOUNT",
   "message": "Get account.",
   "data": {
      //status of the account; inactive if never used
      "status": "ACTIVE",
      //account address
      "address": "g1fnakf9vrd6uqn8qdmp88yam4p0ngy572answ9f",
      //account balance
      "coins": "3618115104ugnot",
      "public_key": {
        //key generation algorithm
        "@type": "/tm.PubKeySecp256k1",
        //public key value
        "value": "A3cWVULHSHC1mwK8o1vfJHKfNMvLEvKU/sHPQoFWRoey"
      },
      //account number
      "account_number": "5547",
      //nonce
      "sequence": "23"
      "chainId": "test3"
   },
}
```


# Transactions


# Sign & Send a Transaction

A web application may create an unsigned transaction and request Adena to **sign and send the transaction** with the connected account via the `doContract` method. Upon receiving the request, Adena will prompt the user to approve the transaction.&#x20;

If the user approves the transaction, Adena will use the user's private key to sign the transaction to create a signed transaction and broadcast it immediately.

#### Code

```javascript
adena.DoContract({
    tx: {
        messages: [
            {
                type: "string",
                value: object
            },
            // you may add additional messages within the brackets
            ...
        ],
        memo?: string
    }, 
    isNotification?: boolean // default: true
)
```

#### **Params**

<table><thead><tr><th width="188">Key</th><th width="197.33333333333331">Type</th><th>Description</th></tr></thead><tbody><tr><td><code>message.type</code></td><td><code>string</code></td><td><p><code>"/bank.MsgSend"</code> for transfers</p><p><code>"/vm.m_call"</code> for contract calls<br><code>"/vm.m_addpkg"</code> for adding packages<br><code>"/vm.m_run"</code> for simulating transactions</p></td></tr><tr><td><code>message.value</code></td><td><code>object</code></td><td>Values (must match the type's format)</td></tr><tr><td><code>memo</code></td><td><code>string</code></td><td>Transaction memo (tag)</td></tr><tr><td><code>tx</code></td><td><code>[Transaction Model]</code></td><td>Transaction info</td></tr><tr><td><code>isNotification</code></td><td><code>boolean</code></td><td>Notification (default: true)</td></tr></tbody></table>

#### Response

<table><thead><tr><th width="212">Key</th><th width="168.33333333333331">Type</th><th>Description</th></tr></thead><tbody><tr><td><code>code</code></td><td><code>number</code></td><td>Account number</td></tr><tr><td><code>status</code></td><td><code>string</code></td><td>Returns <code>success</code> or <code>failure</code></td></tr><tr><td><code>type</code></td><td><code>string</code></td><td>Response type</td></tr><tr><td><code>message</code></td><td><code>string</code></td><td>Descriptive message of the result</td></tr><tr><td><code>data</code></td><td><code>object</code></td><td><strong>Transaction Result Model</strong></td></tr></tbody></table>

#### Transaction Model

<table><thead><tr><th width="212">Key</th><th width="168.33333333333331">Type</th><th>Description</th></tr></thead><tbody><tr><td><code>messages[].type</code></td><td><code>string</code></td><td>"/bank.MsgSend" for transfers<br>"/vm.m_call" for contract calls<br>"/vm.m_addpkg" for adding packages<br>"/vm.m_run" for executing a gno script</td></tr><tr><td><code>messages[].value</code></td><td><code>object</code></td><td>Values (must match the type's format)</td></tr><tr><td><code>memo</code></td><td><code>String</code></td><td>Transaction memo (tag)</td></tr></tbody></table>

#### Transaction Result Model

<table><thead><tr><th width="212">Key</th><th width="168.33333333333331">Type</th><th>Description</th></tr></thead><tbody><tr><td><code>hash</code></td><td><code>string</code></td><td>Transaction hash</td></tr><tr><td><code>height</code></td><td><code>string</code></td><td>Block height</td></tr><tr><td><code>checkTx</code></td><td><code>object</code></td><td>Only returns on successful transactions</td></tr><tr><td><code>deliverTx</code></td><td><code>object</code></td><td>Only returns on successful transactions</td></tr></tbody></table>

### `/bank.MsgSend`

#### Sample Request

<pre class="language-javascript"><code class="lang-javascript"><strong>await adena.DoContract(
</strong>  {
    messages: [{
        type: "/bank.MsgSend",
        value: {
            from_address: "g1ffzxha57dh0qgv9ma5v393ur0zexfvp6lsjpae", // your Adena address
            to_address: "g122n67es9vzs0rmharsggfr4sdkd45aysnuzf7m", // recipient's address
            amount: "5000000ugnot" // sending amount. 1GNOT = 1000000ugnot
        }
    }],
    memo: "12313"
  }
)
</code></pre>

#### Sample Response

```json
{
    "code": 0,
    "status": "success",
    "type": "TRANSACTION_SENT",
    "message": "The transaction has been successfully sent.",
    "data": {
        "height": "4027",
        "hash": "SWHSwked0XUWk7R7UmW+iD4PgVugok/Pb7fW0Yf86qE=",
        "deliverTx": {},
        "checkTx": {}
    }
}
```

### `/vm.m_call`

#### Sample Request

```javascript
await adena.DoContract(
  {
    messages: [{
      type: "/vm.m_call",
      value: {
        caller: "g1ffzxha57dh0qgv9ma5v393ur0zexfvp6lsjpae", // your Adena address
        send: "",
        pkg_path: "gno.land/r/demo/foo20", // Gnoland package path
        func: "Transfer", // Function name
        args: [ // Arguments
          "g122n67es9vzs0rmharsggfr4sdkd45aysnuzf7m",
          "1"
        ]
      }
    }
  ], 
})
```

#### Sample Response

```json
{
    "code": 0,
    "status": "success",
    "type": "TRANSACTION_SENT",
    "message": "The transaction has been successfully sent.",
    "data": {
        "height": "4027",
        "hash": "SWHSwked0XUWk7R7UmW+iD4PgVugok/Pb7fW0Yf86qE=",
        "deliverTx": {},
        "checkTx": {}
    }
}
```

### `/vm.m_addpkg`

#### Sample Request

```javascript
await adena.DoContract({
  messages: [{
    type: "/vm.m_addpkg",
    value: {
      creator: "g1ffzxha57dh0qgv9ma5v393ur0zexfvp6lsjpae", // your Adena address
      deposit: "1ugnot", // amount of ugnot to deposit in the package (enter a blank or an amount above 1 ugnot)
      package: {
        name: "hello", // package name
        path: "gno.land/r/demo/hello", // package path (cannot be a duplicate from existing paths on Gnoland)
        files: [ // a list of files to deploy
          {
            name: "hello.gno", // file name
            body: "package hello\n\nfunc Hello() string {\n\treturn \"Hello() called\"\n}\n\nfunc Render() string {\n\treturn \"Render() called\"\n}", //file contents
          }
        ]
      }
    }
  }],
});
```

#### Sample Response

```json
{
    "code": 0,
    "status": "success",
    "type": "TRANSACTION_SENT",
    "message": "The transaction has been successfully sent.",
    "data": {
        "height": "4027",
        "hash": "SWHSwked0XUWk7R7UmW+iD4PgVugok/Pb7fW0Yf86qE=",
        "deliverTx": {},
        "checkTx": {}
    }
}
```

### `/vm.m_run`

#### Sample Request

```javascript
await adena.DoContract({
  messages: [{
    type: "/vm.m_run",
    value: {
      caller: "g1jg8mtutu9khhfwc4nxmuhcpftf0pajdhfvsqf5", // your Adena address
      send: "", // amount of ugnot to send
      package: {
        name: "main", // package name
        path: "", // msg_run is empty path
        files: [
          {
            name: "main.gno", // file name
            body: "package main\n\nfunc main() {\n\tprintln(\"HELLO WORLD\")\n}", // file content (msg_run has main function)
          }
        ]
      }
    }
  }]
});
```

#### Sample Response

```json
{
    "status": "success",
    "data": {
        "document": {
            "msgs": [
                {
                    "type": "/vm.m_run",
                    "value": {
                        "caller": "g1jg8mtutu9khhfwc4nxmuhcpftf0pajdhfvsqf5",
                        "send": "",
                        "package": {
                            "name": "main",
                            "path": "gno.land/r/demo/main",
                            "files": [
                                {
                                    "name": "script.gno",
                                    "body": "package main\n\nfunc Main() {\n\tprintln(\"HELLO WORLD\")\n}"
                                }
                            ]
                        }
                    }
                }
            ],
            "fee": {
                "amount": [
                    {
                        "amount": "1",
                        "denom": "ugnot"
                    }
                ],
                "gas": "2000000"
            },
            "chain_id": "test3",
            "memo": "",
            "account_number": "3223",
            "sequence": "82"
        },
        "signature": {
            "pub_key": {
                "type": "tendermint/PubKeySecp256k1",
                "value": "A+FhNtsXHjLfSJk1lB8FbiL4mGPjc50Kt81J7EKDnJ2y"
            },
            "signature": "MYYWRnJ1OL2Q/QQFy7gzVNs2Rt0YrqWT9na1RnZv0+Qel3VCO01OsSiCqfy6O/In80lzNfPi4a/XeM+wB4JV0Q=="
        }
    },
    "code": 0,
    "message": "The transaction has been successfully sent.",
    "type": "TRANSACTION_SENT"
}
```


# Sign Amino

A web application may also request Adena to **sign and send the transaction without broadcasting it directly on Adena** via the `Sign` method. Upon receiving the request, Adena will prompt the user to sign the transaction.

If the user proceeds to sign the transaction, Adena will return the signed transaction data on the console for the web application to broadcast it by itself.

#### Code

```javascript
adena.Sign(
    tx: {
        messages: [
            {
                type: "string",
                value: object
            },
            // you may add additional messages within the brackets
            ...
        ],
        memo?: string
    }, 
    isNotification?: boolean // default: true
)
```

#### **Params**

<table><thead><tr><th width="188">Key</th><th width="197.33333333333331">Type</th><th>Description</th></tr></thead><tbody><tr><td><code>message.type</code></td><td><code>string</code></td><td><p><code>"/bank.MsgSend"</code> for transfers</p><p><code>"/vm.m_call"</code> for contract calls<br><code>"/vm.m_addpkg"</code> for adding packages<br><code>"/vm.m_run"</code> for simulating transactions</p></td></tr><tr><td><code>message.value</code></td><td><code>object</code></td><td>Values (must match the type's format)</td></tr><tr><td><code>memo</code></td><td><code>string</code></td><td>Transaction memo (tag)</td></tr><tr><td><code>tx</code></td><td><code>[Transaction Model]</code></td><td>Transaction info</td></tr><tr><td><code>isNotification</code></td><td><code>boolean</code></td><td>Notification (default: true)</td></tr></tbody></table>

#### Response

<table><thead><tr><th width="212">Key</th><th width="168.33333333333331">Type</th><th>Description</th></tr></thead><tbody><tr><td><code>code</code></td><td><code>number</code></td><td>Account number</td></tr><tr><td><code>status</code></td><td><code>string</code></td><td>Returns <code>success</code> or <code>failure</code></td></tr><tr><td><code>type</code></td><td><code>string</code></td><td>Response type</td></tr><tr><td><code>message</code></td><td><code>string</code></td><td>Descriptive message of the result</td></tr><tr><td><code>data</code></td><td><code>object</code></td><td><strong>Signed Amino Model</strong></td></tr></tbody></table>

#### Transaction Model

<table><thead><tr><th width="212">Key</th><th width="168.33333333333331">Type</th><th>Description</th></tr></thead><tbody><tr><td><code>messages[].type</code></td><td><code>string</code></td><td>"/bank.MsgSend" for transfers<br>"/vm.m_call" for contract calls<br>"/vm.m_addpkg" for adding packages<br>"/vm.m_run" for executing a gno script</td></tr><tr><td><code>messages[].value</code></td><td><code>object</code></td><td>Values (must match the type's format)</td></tr><tr><td><code>memo</code></td><td><code>String</code></td><td>Transaction memo (tag)</td></tr></tbody></table>

#### Signed Amino Model

<table><thead><tr><th width="212">Key</th><th width="168.33333333333331">Type</th><th>Description</th></tr></thead><tbody><tr><td><code>signed</code></td><td><code>StdSignDoc</code></td><td>Signed transaction document</td></tr><tr><td><code>signature</code></td><td><code>StdSignature</code></td><td>Signature</td></tr><tr><td><code>checkTx</code></td><td><code>object</code></td><td>Only returns on successful transactions</td></tr><tr><td><code>deliverTx</code></td><td><code>object</code></td><td>Only returns on successful transactions</td></tr></tbody></table>

### `/bank.MsgSend`

#### Sample Request

<pre class="language-javascript"><code class="lang-javascript"><strong>await adena.Sign(
</strong>  {
    messages: [{
        type: "/bank.MsgSend",
        value: {
            from_address: "g1ffzxha57dh0qgv9ma5v393ur0zexfvp6lsjpae", // your address
            to_address: "g122n67es9vzs0rmharsggfr4sdkd45aysnuzf7m", // recipient's address
            amount: "5000000ugnot" // sending amount. 1GNOT = 1000000ugnot
        }
    }],
    memo: "12313"
  }
)
</code></pre>

#### Sample Response

<pre class="language-json"><code class="lang-json"><strong>{
</strong>  "code": 0,
  "status": "success",
  "type": "SIGN_SUCCESS",
  "message": "Signed data has been successfully returned.",
  "data": {
      "signed": {
          "msgs": [
              {
                  "type": "/bank.MsgSend",
                  "value": {
                      "from_address": "g1ffzxha57dh0qgv9ma5v393ur0zexfvp6lsjpae", // your Adena address
                      "to_address": "g122n67es9vzs0rmharsggfr4sdkd45aysnuzf7m", // sending address
                      "amount": "5000000ugnot"
                  }
              }
          ],
          "fee": {
              "amount": [
                  {
                      "amount": "1",
                      "denom": "ugnot"
                  }
              ],
              "gas": "1000000"
          },
          "chain_id": "test3",
          "memo": "12313",
          "account_number": "656760",
          "sequence": "177"
      },
      "signature": {
          "pub_key": {
              "type": "tendermint/PubKeySecp256k1",
              "value": "A09whvkfsR4pCSEYMMt/do4mD9Zf76Dzs9/kOirITiy0"
          },
          "signature": "rfEQWvD2aXEZsZyJ7JFxGNP0CWbMKdg+6RNULtZTMLwz3Yi+cNwYOMG5XYh10Gexj9rbpC3jI6s3ww0TyZx8mm=="
      }
  }
}
</code></pre>

### `/vm.m_call`

#### Sample Request

```javascript
await adena.Sign(
  {
    messages: [{
      type: "/vm.m_call",
      value: {
        caller: "g1ffzxha57dh0qgv9ma5v393ur0zexfvp6lsjpae", // your Adena address
        send: "",
        pkg_path: "gno.land/r/demo/foo20", // Gnoland package path
        func: "Transfer", // Function name
        args: [ // Arguments
          "g122n67es9vzs0rmharsggfr4sdkd45aysnuzf7m",
          "1"
        ]
      }
    }
  ], 
})
```

#### Sample Response

```json
{
  "code": 0,
  "message": "Sign amino.",
  "type": "SIGN_AMINO",
  "status": "success",
  "data": {
    "document": {
      "msgs": [
        {
          "type": "/vm.m_call",
          "value": {
            "caller": "g1ffzxha57dh0qgv9ma5v393ur0zexfvp6lsjpae",
            "send": "",
            "pkg_path": "gno.land/r/demo/foo20",
            "func": "Transfer",
            "args": [
              "g122n67es9vzs0rmharsggfr4sdkd45aysnuzf7m",
              "1"
            ]
          }
        }
      ],
      "fee": {
        "amount": [
          {
            "amount": "1",
            "denom": "ugnot"
          }
        ],
        "gas": "10000000"
      },
      "chain_id": "test3",
      "memo": "",
      "account_number": "656760",
      "sequence": "307"
    },
    "signature": {
      "pub_key": {
        "type": "tendermint/PubKeySecp256k1",
        "value": "A09whvkfsR4pCSEYMMt/do4mD9Zf76Dzs9/kOirITiy0"
      },
      "signature": "2WQXvhmVZqR1+l/16CSDBxOQupQOXTZj6aCbYtXcnOQ37nn3xVGdpdUbgkK7pbigMea138pPm+onsYkfZv1MuA=="
    }
  }
}
```

### `/vm.m_addpkg`

#### Sample Request

```javascript
await adena.Sign({
  messages: [{
    type: "/vm.m_addpkg",
    value: {
      creator: "g1ffzxha57dh0qgv9ma5v393ur0zexfvp6lsjpae", // your Adena address
      deposit: "1ugnot", // amount of ugnot to deposit in the package (enter a blank or an amount above 1 ugnot)
      package: {
        name: "hello", // package name
        path: "gno.land/r/demo/hello", // package path (cannot be a duplicate from existing paths on Gnoland)
        files: [ // a list of files to deploy
          {
            name: "hello.gno", // file name
            body: "package hello\n\nfunc Hello() string {\n\treturn \"Hello() called\"\n}\n\nfunc Render() string {\n\treturn \"Render() called\"\n}", //file contents
          }
        ]
      }
    }
  }],
});
```

#### Sample Response

```json
{
  "code": 0,
  "message": "Sign amino.",
  "type": "SIGN_AMINO",
  "status": "success",
  "data": {
    "document": {
      "msgs": [
        {
          "type": "/vm.m_addpkg",
          "value": {
            "creator": "g1ffzxha57dh0qgv9ma5v393ur0zexfvp6lsjpae",
            "deposit": "1ugnot",
            "package": {
              "name": "hello",
              "path": "gno.land/r/demo/hello",
              "files": [
                {
                  "name": "hello.gno",
                  "body": "package hello\n\nfunc Hello() string {\n\treturn \"Hello() called\"\n}\n\nfunc Render() string {\n\treturn \"Render() called\"\n}"
                }
              ]
            }
          }
        }
      ],
      "fee": {
        "amount": [
          {
            "amount": "1",
            "denom": "ugnot"
          }
        ],
        "gas": "2000000"
      },
      "chain_id": "test3",
      "memo": "",
      "account_number": "656760",
      "sequence": "307"
    },
    "signature": {
      "pub_key": {
        "type": "tendermint/PubKeySecp256k1",
        "value": "A09whvkfsR4pCSEYMMt/do4mD9Zf76Dzs9/kOirITiy0"
      },
      "signature": "YkB/GmmTDIG9LUOoH44OWWeiyrafv6AI4a8AqKWM+KAZlgrFXP7DAmPl1yaR1ec0QfJ9RsTWV80Yn2JhpP/1QQ=="
    }
  }
}
```

### `/vm.m_run`

#### Sample Request

```javascript
await adena.Sign({
  messages: [{
    type: "/vm.m_run",
    value: {
      caller: "g1jg8mtutu9khhfwc4nxmuhcpftf0pajdhfvsqf5", // your Adena address
      send: "", // amount of ugnot to send
      package: {
        name: "main", // package name
        path: "", // msg_run is empty path
        files: [
          {
            name: "main.gno", // file name
            body: "package main\n\nfunc main() {\n\tprintln(\"HELLO WORLD\")\n}", // file content (msg_run has main function)
          }
        ]
      }
    }
  }]
});
```

#### Sample Response

```json
{
    "status": "success",
    "data": {
        "document": {
            "msgs": [
                {
                    "type": "/vm.m_run",
                    "value": {
                        "caller": "g1jg8mtutu9khhfwc4nxmuhcpftf0pajdhfvsqf5",
                        "send": "",
                        "package": {
                            "name": "main",
                            "path": "gno.land/r/demo/main",
                            "files": [
                                {
                                    "name": "script.gno",
                                    "body": "package main\n\nfunc Main() {\n\tprintln(\"HELLO WORLD\")\n}"
                                }
                            ]
                        }
                    }
                }
            ],
            "fee": {
                "amount": [
                    {
                        "amount": "1",
                        "denom": "ugnot"
                    }
                ],
                "gas": "2000000"
            },
            "chain_id": "test3",
            "memo": "",
            "account_number": "3223",
            "sequence": "82"
        },
        "signature": {
            "pub_key": {
                "type": "tendermint/PubKeySecp256k1",
                "value": "A+FhNtsXHjLfSJk1lB8FbiL4mGPjc50Kt81J7EKDnJ2y"
            },
            "signature": "MYYWRnJ1OL2Q/QQFy7gzVNs2Rt0YrqWT9na1RnZv0+Qel3VCO01OsSiCqfy6O/In80lzNfPi4a/XeM+wB4JV0Q=="
        }
    },
    "code": 0,
    "message": "Sign Amino",
    "type": "SIGN_AMINO"
}
```


# Sign a Transaction

A web application may also request Adena to **create a signed transaction** via the `adena.SignTx` method. Upon receiving the request, Adena will prompt the user to sign the transaction.

If the user proceeds to sign the transaction, Adena will return the encoded transaction data on the console.

#### Code

```javascript
adena.SignTx(
    tx: {
        messages: [
            {
                type: "string",
                value: object
            },
            // you may add additional messages within the brackets
            ...
        ],
        memo?: string
    }, 
    isNotification?: boolean // default: true
)
```

#### **Params**

<table><thead><tr><th width="188">Key</th><th width="197.33333333333331">Type</th><th>Description</th></tr></thead><tbody><tr><td><code>message.type</code></td><td><code>string</code></td><td><p><code>"/bank.MsgSend"</code> for transfers</p><p><code>"/vm.m_call"</code> for contract calls<br><code>"/vm.m_addpkg"</code> for adding packages<br><code>"/vm.m_run"</code> for simulating transactions</p></td></tr><tr><td><code>message.value</code></td><td><code>object</code></td><td>Values (must match the type's format)</td></tr><tr><td><code>memo</code></td><td><code>string</code></td><td>Transaction memo (tag)</td></tr><tr><td><code>tx</code></td><td><code>[Transaction Model]</code></td><td>Transaction info</td></tr><tr><td><code>isNotification</code></td><td><code>boolean</code></td><td>Notification (default: true)</td></tr></tbody></table>

#### Response

<table><thead><tr><th width="212">Key</th><th width="168.33333333333331">Type</th><th>Description</th></tr></thead><tbody><tr><td><code>code</code></td><td><code>number</code></td><td>Account number</td></tr><tr><td><code>status</code></td><td><code>string</code></td><td>Returns <code>success</code> or <code>failure</code></td></tr><tr><td><code>type</code></td><td><code>string</code></td><td>Response type</td></tr><tr><td><code>message</code></td><td><code>string</code></td><td>Descriptive message of the result</td></tr><tr><td><code>data</code></td><td><code>object</code></td><td><strong>Encoded Transaction Model</strong></td></tr></tbody></table>

#### Transaction Model

<table><thead><tr><th width="212">Key</th><th width="168.33333333333331">Type</th><th>Description</th></tr></thead><tbody><tr><td><code>messages[].type</code></td><td><code>string</code></td><td>"/bank.MsgSend" for transfers<br>"/vm.m_call" for contract calls<br>"/vm.m_addpkg" for adding packages<br>"/vm.m_run" for executing a gno script</td></tr><tr><td><code>messages[].value</code></td><td><code>object</code></td><td>Values (must match the type's format)</td></tr><tr><td><code>memo</code></td><td><code>String</code></td><td>Transaction memo (tag)</td></tr></tbody></table>

#### Encoded Transaction Model

<table><thead><tr><th width="236">Key</th><th width="168.33333333333331">Type</th><th>Description</th></tr></thead><tbody><tr><td><code>encodedTransaction</code></td><td><code>string</code></td><td>Signed and encoded transaction</td></tr></tbody></table>

### `/bank.MsgSend`

#### Sample Request

```javascript
await adena.SignTx(
  {
    messages: [{
        type: "/bank.MsgSend",
        value: {
            from_address: "g1jg8mtutu9khhfwc4nxmuhcpftf0pajdhfvsqf5", // your address
            to_address: "g1ffzxha57dh0qgv9ma5v393ur0zexfvp6lsjpae", // recipient's address
            amount: "5000000ugnot" // sending amount. 1GNOT = 1000000ugnot
        }
    }],
    memo: "12313"
  }
)
```

#### Sample Response

```json
{
    code: 0,
    type: "SIGN_TX",
    status: "success",
    message: "Sign Transaction",
    data: {
        encodedTransaction: "CnMKDS9iYW5rLk1zZ1NlbmQSYgooZzFqZzhtdHV0dTlraGhmd2M0bnhtdWhjcGZ0ZjBwYWpkaGZ2c3FmNRIoZzFmZnp4aGE1N2RoMHFndjltYTV2MzkzdXIwemV4ZnZwNmxzanBhZRoMNTAwMDAwMHVnbm90EgwIgIl6EgYxdWdub3Qafgo6ChMvdG0uUHViS2V5U2VjcDI1NmsxEiMKIQPhYTbbFx4y30iZNZQfBW4i+Jhj43OdCrfNSexCg5ydshJAK3y9vuIO0BhY+P6f361/RP5QNFPCpHiaNE/cGhRyOV4MSDSl+++WN56NKefZF27MQTHu3lFDTZ7pPTTbkn7DeCIFMTIzMTM="
    },
}
```

### `/vm.m_call`

#### Sample Request

```javascript
await adena.SignTx(
  {
    messages: [{
      type: "/vm.m_call",
      value: {
        caller: "g1ffzxha57dh0qgv9ma5v393ur0zexfvp6lsjpae", // your Adena address
        send: "",
        pkg_path: "gno.land/r/demo/foo20", // Gnoland package path
        func: "Transfer", // Function name
        args: [ // Arguments
          "g122n67es9vzs0rmharsggfr4sdkd45aysnuzf7m",
          "1"
        ]
      }
    }
  ], 
  }
)
```

#### Sample Response

```json
{
    code: 0,
    type: "SIGN_TX",
    status: "success",
    message: "Sign Transaction",
    data: {
        encodedTransaction: "CnMKDS9iYW5rLk1zZ1NlbmQSYgooZzFqZzhtdHV0dTlraGhmd2M0bnhtdWhjcGZ0ZjBwYWpkaGZ2c3FmNRIoZzFmZnp4aGE1N2RoMHFndjltYTV2MzkzdXIwemV4ZnZwNmxzanBhZRoMNTAwMDAwMHVnbm90EgwIgIl6EgYxdWdub3Qafgo6ChMvdG0uUHViS2V5U2VjcDI1NmsxEiMKIQPhYTbbFx4y30iZNZQfBW4i+Jhj43OdCrfNSexCg5ydshJAK3y9vuIO0BhY+P6f361/RP5QNFPCpHiaNE/cGhRyOV4MSDSl+++WN56NKefZF27MQTHu3lFDTZ7pPTTbkn7DeCIFMTIzMTM="
    },
}
```

### `/vm.m_addpkg`

#### Sample Request

```javascript
await adena.SignTx({
  messages: [{
    type: "/vm.m_addpkg",
    value: {
      creator: "g1ffzxha57dh0qgv9ma5v393ur0zexfvp6lsjpae", // your Adena address
      deposit: "1ugnot", // amount of ugnot to deposit in the package (enter a blank or an amount above 1 ugnot)
      package: {
        name: "hello", // package name
        path: "gno.land/r/demo/hello", // package path (cannot be a duplicate from existing paths on Gnoland)
        files: [ // a list of files to deploy
          {
            name: "hello.gno", // file name
            body: "package hello\n\nfunc Hello() string {\n\treturn \"Hello() called\"\n}\n\nfunc Render() string {\n\treturn \"Render() called\"\n}", //file contents
          }
        ]
      }
    }
  }],
});
```

#### Sample Response

```json
{
    code: 0,
    type: "SIGN_TX",
    status: "success",
    message: "Sign Transaction",
    data: {
        encodedTransaction: "CnMKDS9iYW5rLk1zZ1NlbmQSYgooZzFqZzhtdHV0dTlraGhmd2M0bnhtdWhjcGZ0ZjBwYWpkaGZ2c3FmNRIoZzFmZnp4aGE1N2RoMHFndjltYTV2MzkzdXIwemV4ZnZwNmxzanBhZRoMNTAwMDAwMHVnbm90EgwIgIl6EgYxdWdub3Qafgo6ChMvdG0uUHViS2V5U2VjcDI1NmsxEiMKIQPhYTbbFx4y30iZNZQfBW4i+Jhj43OdCrfNSexCg5ydshJAK3y9vuIO0BhY+P6f361/RP5QNFPCpHiaNE/cGhRyOV4MSDSl+++WN56NKefZF27MQTHu3lFDTZ7pPTTbkn7DeCIFMTIzMTM="
    },
}
```

### `/vm.m_run`

#### Sample Request

```javascript
await adena.SignTx({
  messages: [{
    type: "/vm.m_run",
    value: {
      caller: "g1jg8mtutu9khhfwc4nxmuhcpftf0pajdhfvsqf5", // your Adena address
      send: "", // amount of ugnot to send
      package: {
        name: "main", // package name
        path: "", // msg_run is empty path
        files: [
          {
            name: "main.gno", // file name
            body: "package main\n\nfunc main() {\n\tprintln(\"HELLO WORLD\")\n}", // file content (msg_run has main function)
          }
        ]
      }
    }
  }]
});
```

#### Sample Response

```json
{
    code: 0,
    type: "SIGN_TX",
    status: "success",
    message: "Sign Transaction",
    data: {
        encodedTransaction: "CnMKDS9iYW5rLk1zZ1NlbmQSYgooZzFqZzhtdHV0dTlraGhmd2M0bnhtdWhjcGZ0ZjBwYWpkaGZ2c3FmNRIoZzFmZnp4aGE1N2RoMHFndjltYTV2MzkzdXIwemV4ZnZwNmxzanBhZRoMNTAwMDAwMHVnbm90EgwIgIl6EgYxdWdub3Qafgo6ChMvdG0uUHViS2V5U2VjcDI1NmsxEiMKIQPhYTbbFx4y30iZNZQfBW4i+Jhj43OdCrfNSexCg5ydshJAK3y9vuIO0BhY+P6f361/RP5QNFPCpHiaNE/cGhRyOV4MSDSl+++WN56NKefZF27MQTHu3lFDTZ7pPTTbkn7DeCIFMTIzMTM="
    },
}
```


# Create a Multisig Transaction

To create a multisig transaction, you can use either Adena's injection API or Gnokey CLI. Both methods generate an unsigned transaction file (.tx) that is fully compatible with each other, meaning you can create a transaction with Adena and sign it with Gnokey, or vice versa.

### Code

```typescript
adena.CreateMultisigTransaction(
  params: CreateMultisigTransactionParams,
  withSaveFile?: boolean
)
```

### Params

| Key           | Type               | Description                                                                |
| ------------- | ------------------ | -------------------------------------------------------------------------- |
| messages      | ContractMessage\[] | Array of transaction messages                                              |
| fee           | object             | Fee object containing gasFee and gasWanted                                 |
| fee.gasFee    | string             | The gas fee amount with denomination (e.g., "6113ugnot")                   |
| fee.gasWanted | string             | The maximum gas units allowed for the transaction                          |
| memo          | string             | Optional memo text for the transaction (optional)                          |
| withSaveFile  | boolean            | Flag to automatically save the transaction file (optional, default: false) |

#### ContractMessage Model

| Key   | Type   | Description                                         |
| ----- | ------ | --------------------------------------------------- |
| type  | string | Message type (e.g., "/vm.m\_call", "/bank.MsgSend") |
| value | object | Message value object containing transaction details |

### Response

| Key     | Type   | Description                              |
| ------- | ------ | ---------------------------------------- |
| code    | number | Response code (success: 0)               |
| status  | string | Returns "success" or "failure"           |
| type    | string | Response type                            |
| message | string | Descriptive message of the result        |
| data    | object | Create Multisig Transaction Result Model |

#### Create Multisig Transaction Result Model

| Key | Type  | Description                                                                |
| --- | ----- | -------------------------------------------------------------------------- |
| tx  | RawTx | The raw transaction object containing messages, fees, signatures, and memo |

### `/vm.m_call`

### Sample Request

```typescript
await adena.CreateMultisigTransaction({
  messages: [
    {
      type: "/vm.m_call",
      value: {
        caller: "g1ksdqtg675y28vkua8zrghxzlgwtpyxwklp5gpf", // Replace your multisig address
        send: "",
        pkg_path: "gno.land/r/gnoland/wugnot",
        func: "Approve",
        args: ["g1jg8mtutu9khhfwc4nxmuhcpftf0pajdhfvsqf5", "100"],
      },
    },
  ],
  fee: {
    gasFee: "6113ugnot",
    gasWanted: "6112955",
  },
});
```

### Sample Response

```json
{
  "code": 0,
  "status": "success",
  "type": "CREATE_MULTISIG_TRANSACTION_SUCCESS",
  "message": "Multisig transaction has been successfully created.",
  "data": {
    "tx": {
      "msg": [
        {
          "@type": "/vm.m_call",
          "caller": "g1ksdqtg675y28vkua8zrghxzlgwtpyxwklp5gpf",
          "send": "",
          "pkg_path": "gno.land/r/gnoland/wugnot",
          "func": "Approve",
          "args": ["g1jg8mtutu9khhfwc4nxmuhcpftf0pajdhfvsqf5", "100"]
        }
      ],
      "fee": {
        "gas_wanted": "6112955",
        "gas_fee": "6113ugnot"
      },
      "signatures": null,
      "memo": ""
    }
  }
}
```

### `Multi Messages(/bank.MsgSend, /vm.m_call)`

### Sample Request

```typescript
await adena.CreateMultisigTransaction({
  messages: [
    {
      type: "/bank.MsgSend",
      value: {
          from_address: "g1t6ygsc62tf0zhd4wsfzdtkwt6x9zkmumyhjpqj", // Replace your multisig address
          to_address: "g1jg8mtutu9khhfwc4nxmuhcpftf0pajdhfvsqf5",   // recipient's address
          amount: "1000ugnot" // sending amount. 1GNOT = 1000000ugnot
      }
    },
    {
      type: "/vm.m_call",
      value: {
        caller: "g1t6ygsc62tf0zhd4wsfzdtkwt6x9zkmumyhjpqj", // Replace your multisig address
        send: "1000ugnot",
        pkg_path: "gno.land/r/gnoland/wugnot",
        func: "Deposit",
        args: null,
      },
    },
    {
      type: "/vm.m_call",
      value: {
        caller: "g1t6ygsc62tf0zhd4wsfzdtkwt6x9zkmumyhjpqj", // Replace your multisig address
        send: "",
        pkg_path: "gno.land/r/gnoland/wugnot",
        func: "Transfer",
        args: ["g1jg8mtutu9khhfwc4nxmuhcpftf0pajdhfvsqf5", "1000"],
      },
    },
  ],
  fee: {
    gasFee: "1000000ugnot",
    gasWanted: "10000000",
  },
});
```

### Sample Response

```json
{
  "code": 0,
  "status": "success",
  "type": "CREATE_MULTISIG_TRANSACTION",
  "message": "Create Multisig Document",
  "data": {
    "tx": {
      "msg": [
        {
          "@type": "/bank.MsgSend",
          "from_address": "g1t6ygsc62tf0zhd4wsfzdtkwt6x9zkmumyhjpqj",
          "to_address": "g1jg8mtutu9khhfwc4nxmuhcpftf0pajdhfvsqf5",
          "amount": "1000ugnot"
        },
        {
          "@type": "/vm.m_call",
          "func": "Deposit",
          "pkg_path": "gno.land/r/gnoland/wugnot",
          "args": null,
          "caller": "g1t6ygsc62tf0zhd4wsfzdtkwt6x9zkmumyhjpqj",
          "send": "1000ugnot"
        },
        {
          "@type": "/vm.m_call",
          "func": "Transfer",
          "pkg_path": "gno.land/r/gnoland/wugnot",
          "args": [
            "g1jg8mtutu9khhfwc4nxmuhcpftf0pajdhfvsqf5",
            "1000"
          ],
          "caller": "g1t6ygsc62tf0zhd4wsfzdtkwt6x9zkmumyhjpqj",
          "send": ""
        }
      ],
      "fee": {
        "gas_wanted": "10000000",
        "gas_fee": "1000000ugnot"
      },
      "signatures": [],
      "memo": ""
    }
  }
}
```


# Sign a Multisig Transaction

A web application may request Adena to sign a multisig transaction via the SignMultisigTransaction method. This method allows authorized signers to add their signature to an unsigned transaction. Each signer can download their signature file (.sig) to share with the transaction initiator for final broadcasting.

Note: Unlike the UI-based signing method where you upload .tx files, the injection method manages all transaction data through code.

### Code

```javascript
adena.SignMultisigTransaction(
  multisigDocument: MultisigTransactionDocument,
  multisigSignatures?: Signature[],
  withSaveFile?: boolean
)
```

### Params

| Key                | Type         | Description                                                              |
| ------------------ | ------------ | ------------------------------------------------------------------------ |
| multisigDocument   | object       | Multisig Transaction Document Model                                      |
| multisigSignatures | Signature\[] | Array of existing signatures (optional)                                  |
| withSaveFile       | boolean      | Flag to automatically save the signature file (optional, default: false) |

#### Multisig Transaction Document Model

| Key           | Type   | Description                                                                |
| ------------- | ------ | -------------------------------------------------------------------------- |
| tx            | RawTx  | The raw transaction object containing messages, fees, signatures, and memo |
| chainId       | string | The chain ID of the target blockchain (e.g., "staging", "portal-loop")     |
| accountNumber | string | The account number of the multisig account                                 |
| sequence      | string | The sequence number of the multisig account                                |

#### Signature Model

| Key             | Type   | Description                                   |
| --------------- | ------ | --------------------------------------------- |
| pub\_key        | object | Public key object                             |
| pub\_key.\@type | string | Public key type (e.g., "/tm.PubKeySecp256k1") |
| pub\_key.value  | string | Base64-encoded public key                     |
| signature       | string | Base64-encoded signature                      |

### Response

| Key     | Type   | Description                            |
| ------- | ------ | -------------------------------------- |
| code    | number | Response code (success: 0)             |
| status  | string | Returns "success" or "failure"         |
| type    | string | Response type                          |
| message | string | Descriptive message of the result      |
| data    | object | Sign Multisig Transaction Result Model |

#### Sign Multisig Transaction Result Model

| Key                       | Type                        | Description                                                   |
| ------------------------- | --------------------------- | ------------------------------------------------------------- |
| result                    | object                      | Result object containing multisig document and all signatures |
| result.multisigDocument   | MultisigTransactionDocument | The original multisig transaction document                    |
| result.multisigSignatures | Signature\[]                | Array of all collected signatures                             |
| signature                 | Signature                   | The current signer's signature                                |

### Sample Request

```javascript
await adena.SignMultisigTransaction({
  tx: {
    msg: [
      {
        "@type": "/bank.MsgSend",
        from_address: "g1ksdqtg675y28vkua8zrghxzlgwtpyxwklp5gpf",
        to_address: "g1jg8mtutu9khhfwc4nxmuhcpftf0pajdhfvsqf5",
        amount: "2ugnot"
      },
    ],
    fee: {
      gas_wanted: "6112955",
      gas_fee: "6113ugnot",
    },
    signatures: null,
    memo: "",
  },
  accountNumber: "6224",  // Replace it with the accountNumber of your multisig account.
  sequence: "1",          // Replace it with the sequence of your multisig account.
  chainId: "staging",     // Replace your target chainId
}, [], true);
```

### Sample Response

```json
{
  "code": 0,
  "status": "success",
  "type": "SIGN_MULTISIG_TRANSACTION_SUCCESS",
  "message": "Multisig transaction has been successfully signed.",
  "data": {
    "result": {
      "multisigDocument": {
        "tx": {
          "msg": [
            {
              "@type": "/bank.MsgSend",
              "from_address": "g1ksdqtg675y28vkua8zrghxzlgwtpyxwklp5gpf",
              "to_address": "g1jg8mtutu9khhfwc4nxmuhcpftf0pajdhfvsqf5",
              "amount": "2ugnot"
            }
          ],
          "fee": {
            "gas_wanted": "6112955",
            "gas_fee": "6113ugnot"
          },
          "signatures": null,
          "memo": ""
        },
        "accountNumber": "6224",
        "sequence": "1",
        "chainId": "staging"
      },
      "multisigSignatures": [
        {
          "pub_key": {
            "@type": "/tm.PubKeySecp256k1",
            "value": "A+FhNtsXHjLfSJk1lB8FbiL4mGPjc50Kt81J7EKDnJ2y"
          },
          "signature": "..."
        }
      ]
    },
    "signature": {
      "pub_key": {
        "@type": "/tm.PubKeySecp256k1",
        "value": "A+FhNtsXHjLfSJk1lB8FbiL4mGPjc50Kt81J7EKDnJ2y"
      },
      "signature": "..."
    }
  }
}
```


# Send a Multisig Transaction

A web application may request Adena to broadcast a multisig transaction via the `BroadcastMultisigTransaction` method. This method allows you to submit a transaction along with the collected signatures from authorized signers. Upon the user's approval, Adena will broadcast the transaction to the blockchain.

**Note:** Unlike the UI-based broadcast method where you upload .tx and .sig files, the injection method manages all transaction data and signatures through code.

### Code

```typescript
adena.BroadcastMultisigTransaction(
  multisigDocument: MultisigTransactionDocument,
  multisigSignatures?: Signature[]
)
```

### Params

| Key                | Type   | Description                          |
| ------------------ | ------ | ------------------------------------ |
| multisigDocument   | object | Multisig Transaction Document Model  |
| multisigSignatures | array  | Array of Signature Models (optional) |

#### Multisig Transaction Document Model

| Key           | Type   | Description                                                                |
| ------------- | ------ | -------------------------------------------------------------------------- |
| tx            | RawTx  | The raw transaction object containing messages, fees, signatures, and memo |
| chainId       | string | The chain ID of the target blockchain (e.g., "staging", "portal-loop")     |
| accountNumber | string | The account number of the multisig account                                 |
| sequence      | string | The sequence number of the multisig account                                |

#### RawTx Model

| Key             | Type                    | Description                                                              |
| --------------- | ----------------------- | ------------------------------------------------------------------------ |
| msg             | RawTxMessageType\[]     | Array of transaction messages (BankSend, VmCall, VmAddPackage, or VmRun) |
| fee             | object                  | Fee object containing gas\_wanted and gas\_fee                           |
| fee.gas\_wanted | string                  | The maximum gas units allowed for the transaction                        |
| fee.gas\_fee    | string                  | The gas fee amount with denomination (e.g., "6113ugnot")                 |
| signatures      | RawSignature\[] \| null | Array of signatures or null if unsigned                                  |
| memo            | string                  | Optional memo text for the transaction                                   |

#### RawTxMessageType

| Message Type           | Description                                              |
| ---------------------- | -------------------------------------------------------- |
| RawBankSendMessage     | Message for sending tokens from one address to another   |
| RawVmCallMessage       | Message for calling a function in a Gno realm or package |
| RawVmAddPackageMessage | Message for adding a new package to the blockchain       |
| RawVmRunMessage        | Message for running Gno code                             |

#### Signature Model

| Key            | Type   | Description                                   |
| -------------- | ------ | --------------------------------------------- |
| pub\_key       | object | Public key object                             |
| pub\_key.type  | string | Public key type (e.g., `/tm.PubKeySecp256k1`) |
| pub\_key.value | string | Base64-encoded public key                     |
| signature      | string | Base64-encoded signature                      |

### Response

| Key     | Type   | Description                                 |
| ------- | ------ | ------------------------------------------- |
| code    | number | Code (success: 0)                           |
| status  | string | Returns success or failure                  |
| type    | string | Response type                               |
| message | string | Descriptive message of the result           |
| data    | object | Broadcast Multisig Transaction Result Model |

#### Broadcast Multisig Transaction Result Model

| Key         | Type   | Description      |
| ----------- | ------ | ---------------- |
| check\_tx   | object | CheckTx result   |
| deliver\_tx | object | DeliverTx result |
| hash        | string | Transaction hash |
| height      | string | Block height     |

### Sample Request

```typescript
await adena.BroadcastMultisigTransaction({
  tx: {
    msg: [
      {
        "@type": "/vm.m_call",
        func: "Approve",
        pkg_path: "gno.land/r/gnoland/wugnot",
        args: ["g1jg8mtutu9khhfwc4nxmuhcpftf0pajdhfvsqf5", "100"],
        caller: "g1ksdqtg675y28vkua8zrghxzlgwtpyxwklp5gpf",
        send: "",
      },
    ],
    fee: {
      gas_wanted: "6112955",
      gas_fee: "6113ugnot",
    },
    signatures: [],
    memo: "",
  },
  chainId: "staging",
  accountNumber: "6224",
  sequence: "0",
}, [{
  "pub_key": {
    "@type": "/tm.PubKeySecp256k1",
    "value": "A+FhNtsXHjLfSJk1lB8FbiL4mGPjc50Kt81J7EKDnJ2y"
  },
  "signature": "..."
}]);

```

**Important:** Replace the following fields with your actual transaction details:

* `caller`: Your multisig account address
* `chainId`: Your target chain ID
* `accountNumber` and `sequence`: Your account's current values
* Signatures array: The collected signatures from authorized signers

### Sample Response

```json
{
    "status": "success",
    "data": {
        "broadcastResult": {
            "check_tx": {
                "ResponseBase": {
                    "Error": null,
                    "Data": "",
                    "Events": [],
                    "Log": "msg:0,success:true,log:,events:[]",
                    "Info": ""
                },
                "GasWanted": "6112955",
                "GasUsed": "35800"
            },
            "deliver_tx": {
                "ResponseBase": {
                    "Error": null,
                    "Data": "",
                    "Events": [],
                    "Log": "msg:0,success:true,log:,events:[]",
                    "Info": ""
                },
                "GasWanted": "6112955",
                "GasUsed": "65724"
            },
            "hash": "sd643Z4flCIe3YHMYIYKtVcNrb1paVWSe6vRGlRHABc=",
            "height": "4769"
        },
        "txExplorerUrl": "https://gnoscan.io/transactions/details?chainId=staging&txhash=sd643Z4flCIe3YHMYIYKtVcNrb1paVWSe6vRGlRHABc="
    },
    "code": 0,
    "message": "Transaction has been successfully executed.",
    "type": "TRANSACTION_SUCCESS"
}
```


# Network


# Add a Custom Network

A web application may request Adena to **add a custom Gnoland network to Adena** via the `AddNetwork` method. Upon the user's approval, the network will be added to the list of available networks on the Change Network page in the Settings menu.

#### Code

```javascript
adena.AddNetwork(network: {
  chainId: string;
  rpcUrl: string;
  chainName: string;
})
```

#### **Params**

<table><thead><tr><th width="224">Key</th><th width="197.33333333333331">Type</th><th>Description</th></tr></thead><tbody><tr><td><code>network.chainId</code></td><td><code>string</code></td><td>Chain ID</td></tr><tr><td><code>network.rpcUrl</code></td><td><code>string</code></td><td>Network RPC Url</td></tr><tr><td><code>network.chainName</code></td><td><code>string</code></td><td>Chain Name</td></tr></tbody></table>

#### Response

<table><thead><tr><th width="212">Key</th><th width="168.33333333333331">Type</th><th>Description</th></tr></thead><tbody><tr><td><code>code</code></td><td><code>number</code></td><td>Code <code>(success: 0)</code></td></tr><tr><td><code>status</code></td><td><code>string</code></td><td>Returns <code>success</code> or <code>failure</code></td></tr><tr><td><code>type</code></td><td><code>string</code></td><td>Response type</td></tr><tr><td><code>message</code></td><td><code>string</code></td><td>Descriptive message of the result</td></tr><tr><td><code>data</code></td><td><code>object</code></td><td><strong>Add Network Result Model</strong></td></tr></tbody></table>

#### Add Network Result Model

<table><thead><tr><th width="212">Key</th><th width="168.33333333333331">Type</th><th>Description</th></tr></thead><tbody><tr><td><code>chainId</code></td><td><code>string</code></td><td>Chain ID</td></tr><tr><td><code>rpcUrl</code></td><td><code>string</code></td><td>Network RPC Url</td></tr><tr><td><code>chainName</code></td><td><code>string</code></td><td>Chain Name</td></tr></tbody></table>

#### Sample Request

```javascript
await adena.AddNetwork({
  chainId: 'dev-1',
  chainName: 'My Network',
  rpcUrl: 'http://localhost:8888',
});
```

#### Sample Response

```json
{
    "code": 0,
    "status": "success",
    "type": "ADD_NETWORK_SUCCESS",
    "message": "The network has been successfully added.",
    "data": {
        "chainId": "dev-1",
        "chainName": "My Network",
        "rpcUrl": "http://localhost:8888"
    }
}
```


# Switch Network

A web application may request Adena to **switch the current network settings to a new one** via the `SwitchNetwork` method. Upon the user's approval, Adena will switch the network to the one requested by the app.

#### Code

```javascript
adena.SwitchNetwork(chainId: string)
```

#### **Params**

<table><thead><tr><th width="224">Key</th><th width="197.33333333333331">Type</th><th>Description</th></tr></thead><tbody><tr><td><code>network.chainId</code></td><td><code>string</code></td><td>Chain ID</td></tr></tbody></table>

#### Response

<table><thead><tr><th width="212">Key</th><th width="168.33333333333331">Type</th><th>Description</th></tr></thead><tbody><tr><td><code>code</code></td><td><code>number</code></td><td>Code <code>(success: 0)</code></td></tr><tr><td><code>status</code></td><td><code>string</code></td><td>Returns <code>success</code> or <code>failure</code></td></tr><tr><td><code>type</code></td><td><code>string</code></td><td>Response type</td></tr><tr><td><code>message</code></td><td><code>string</code></td><td>Descriptive message of the result</td></tr><tr><td><code>data</code></td><td><code>object</code></td><td><strong>Switch Network Result Model</strong></td></tr></tbody></table>

#### Switch Network Result Model

<table><thead><tr><th width="212">Key</th><th width="168.33333333333331">Type</th><th>Description</th></tr></thead><tbody><tr><td><code>chainId</code></td><td><code>string</code></td><td>Chain ID</td></tr></tbody></table>

#### Sample Request

```javascript
await adena.SwitchNetwork('dev-1')
```

#### Sample Response

```json
{
    "code": 0,
    "status": "success",
    "type": "SWITCH_NETWORK_SUCCESS",
    "message": "The network has been successfully changed.",
    "data": {
        "chainId": "dev-1"
    }
}
```


# Detect Events


# Detect an Account Change

When a user switches their account to another one, the information that the web application has initially retrieved may not match the current account. To display the correct information and request transaction approvals to the matching account, the web application must track account changes happening on Adena with the function below.

#### Code

```javascript
adena.On("changedAccount", (address: string) => void);
```

#### **Params**

<table><thead><tr><th width="173">Key</th><th width="286.3333333333333">Type</th><th>Description</th></tr></thead><tbody><tr><td><code>key</code></td><td>'<code>changedAccount'</code></td><td>The event key of the '<code>changedAccount'</code></td></tr><tr><td><code>function</code></td><td><code>(address: string) => void</code></td><td>The function that gets triggered by the event</td></tr></tbody></table>

#### Sample Request

```javascript
//this will emit an account change when the user switches the current account on Adena
adena.On("changedAccount", (address) => {
  console.log("changed address is " + address);
});
```


# Detect a Network Change

The web application must keep track of which network Adena is connected to at all times, as Adena submits all requests to the current network. Adena provides a function to detect a change when a user tweaks the network settings in Adena.

#### Code

```javascript
adena.On("changedNetwork", (network: string) => void);
```

#### **Params**

<table><thead><tr><th width="173">Key</th><th width="313.3333333333333">Type</th><th>Description</th></tr></thead><tbody><tr><td><code>key</code></td><td>'<code>changedNetwork'</code></td><td>The event key of '<code>changedNetwork'</code></td></tr><tr><td><code>function</code></td><td><code>(network: string) => void</code></td><td>The function that gets triggered by the event</td></tr></tbody></table>

#### Sample Request

```javascript
//this will emit a network change when the user changes the network settings on Adena
adena.On("changedNetwork", (network) => {
  console.log("changed network is " + network)
});
```

#### **Networks (chainID)**

<table><thead><tr><th width="173">ID</th><th>Network</th></tr></thead><tbody><tr><td><code>test3</code></td><td>Gnoland Network (Testnet 3)</td></tr><tr><td><code>test2</code></td><td>Gnoland Network (Testnet 2)</td></tr><tr><td><code>dev</code></td><td>Gnoland Network (Local)</td></tr></tbody></table>


# Use Adena Wallet SDK


# JavaScript

## Use Adena Wallet SDK with JavaScript

The Adena Wallet SDK provides the necessary tools to integrate the Adena Wallet into JavaScript-based applications, enabling interactions with both the Adena Wallet and TM2 Wallet for signing transactions, managing accounts, and more.

For full documentation and source code, visit the [Adena Wallet SDK Repository](https://github.com/onbloc/adena-wallet-sdk)

### Install the SDK

To add the Adena Wallet SDK to your project, you can use either npm or yarn.

**Using npm:**

```bash
npm install @adena-wallet/sdk
```

**Using yarn:**

```bash
yarn add @adena-wallet/sdk
```

### Quick Start

Get started with the Adena Wallet SDK by following this simple guide.

#### Import the SDK

Start by importing the SDK into your project.

```javascript
import { AdenaSDK } from '@adena-wallet/sdk';

const adenaSDK = AdenaSDK.createAdenaWallet();
```

If you're using the wallet from tm2-js-client, you can create as follows:

```typescript
import { AdenaSDK } from '@adena-wallet/sdk';
import { Wallet } from '@gnolang/tm2-js-client';

const wallet = await Wallet.createRandom();
const adenaSDK = AdenaSDK.createGnoWallet(wallet);
```

#### Connect to a Wallet

Connect to a user's wallet to begin interacting with it.

```javascript
adenaSDK.connectWallet().then(() => {
  console.log('Wallet connected successfully.');
}).catch((error) => {
  console.log('Failed to connect:', error);
});
```

#### Fetch Account Details

Once the wallet is connected, you can retrieve user account details.

```javascript
adenaSDK.getAccount().then((account) => {
  console.log('Account details:', account);
}).catch((error) => {
  console.log('Failed to fetch account details:', error);
});
```

### Advanced Features

The Adena Wallet SDK supports a wide range of functionalities beyond connecting wallets and fetching account details. Here are some additional key features you can implement.

#### `connectWallet`

Connects to a wallet via the SDK.

**Example:**

```
adenaSDK.connectWallet().then(() => {
  console.log('Wallet connected');
});
```

#### `disconnectWallet`

Disconnects from a wallet via the SDK.

**Example:**

```
adenaSDK.disconnectWallet();
```

#### `getConnectionState`

Retrieves the current connection state of a wallet.

**Example:**

```
const state = adenaSDK.getConnectionState();
console.log('Connection state:', state);
```

#### `onConnectionChange`

Sets up a listener for connection state changes.

**Example:**

```
adenaSDK.onConnectionChange({
  callback: (event) => {
    console.log('Connection event:', event);
  },
});
```

#### `offConnectionChange`

Removes a previously set connection state change listener.

**Example:**

```
const listener = (event) => {
  console.log('Connection event:', event);
};

adenaSDK.onConnectionChange({ callback: listener });

// Later, remove the listener
adenaSDK.offConnectionChange({ callback: listener });
```

#### `isConnected`

Checks if a wallet is currently connected.

**Example:**

```
adenaSDK.isConnected().then((response) => {
  console.log('Is connected:', response.status);
});
```

#### `getAccount`

Retrieves account information from the connected wallet.

**Example:**

```
adenaSDK.getAccount().then((account) => {
  console.log('Account:', account);
});
```

#### `getNetwork`

Retrieves network information from the connected wallet.

**Example:**

```
adenaSDK.getNetwork().then((network) => {
  console.log('Network:', network);
});
```

#### `switchNetwork`

Switches the wallet to a different network.

**Example:**

```
adenaSDK.switchNetwork({ chainId: 'new-chain-id' }).then(() => {
  console.log('Network switched');
});
```

#### `addNetwork`

Adds a new network to the wallet.

**Example:**

```
adenaSDK.addNetwork({
  chainId: 'new-chain-id',
  chainName: 'New Network',
  rpcUrl: 'New Chain RPC URL',
}).then(() => {
  console.log('Network added');
});
```

#### `signTransaction`

Signs a transaction with the connected wallet.

**Example:**

```
const transactionRequest = {
  tx: TransactionBuilder.create()
      .messages(
        // transaction meesages...
        // use methods: 'makeAddPackageMessage', 'makeMsgCallMessage', 'makeMsgSendMessage', 'makeMsgRunMessage'
      )
      .build(),
  broadcastType: BroadcastType.SYNC,
)};

adenaSDK.signTransaction(transactionRequest).then((response) => {
  console.log('Signed transaction:', response.encodedTransaction);
});
```

#### `broadcastTransaction`

Broadcasts a signed transaction to the network.

**Example:**

```
const transactionRequest = {
  tx: TransactionBuilder.create()
      .messages(
        // transaction meesages...
        // use methods: 'makeAddPackageMessage', 'makeMsgCallMessage', 'makeMsgSendMessage', 'makeMsgRunMessage'
      )
      .build(),
  broadcastType: BroadcastType.SYNC,
)};

adenaSDK.broadcastTransaction(transactionRequest).then((response) => {
  console.log('Broadcast response:', response);
});
```

#### `onChangeAccount`

Sets up a listener for account changes.

**Example:**

```
adenaSDK.onChangeAccount({
  callback: (account) => {
    console.log('Account changed:', account);
  },
});
```

#### `onChangeNetwork`

Sets up a listener for network changes.

**Example:**

```
adenaSDK.onChangeNetwork({
  callback: (network) => {
    console.log('Network changed:', network);
  },
});
```

### Create a Transaction

You can use a helper module called `TransactionBuilder` to generate encoded transaction data.

#### Transaction message generation functions

#### `makeMsgSendMessage`

Generates a `MsgSend` of the bank transaction message.

**Example:**

```
const tx = TransactionBuilder.create()
  .messages(
    makeMsgSendMessage({
      from_address: 'address',
      to_address: 'address',
      amount: '1ugnot',
    }),
    // You can add multiple messages
  )
  .memo('memo')
  .build();
```

#### `makeAddPackageMessage`

Generate a `AddPackage` of the VM transaction message.

**Example:**

```
const tx = TransactionBuilder.create()
  .messages(
    makeAddPackageMessage({
      creator: 'g1jg8mtutu9khhfwc4nxmuhcpftf0pajdhfvsqf5',
      deposit: '1ugnot',
      package: {
        name: "hello", // package name
        path: "gno.land/r/g1jg8mtutu9khhfwc4nxmuhcpftf0pajdhfvsqf5/hello", // package path (cannot be a duplicate from existing paths on Gnoland)
        files: [ // a list of files to deploy
          {
            name: "hello.gno", // file name
            body: "package hello\n\nfunc Hello() string {\n\treturn \"Hello() called\"\n}\n\nfunc Render() string {\n\treturn \"Render() called\"\n}", //file contents
          }
        ]
      }
    }),
    // You can add multiple messages
  )
  .memo('memo')
  .build();
```

#### `makeMsgCallMessage`

Generate a `MsgCall` of the VM transaction message.

**Example:**

```
const tx = TransactionBuilder.create()
  .messages(
    makeMsgCallMessage({
      caller: "g1jg8mtutu9khhfwc4nxmuhcpftf0pajdhfvsqf5", // your address
      send: "",
      pkg_path: "gno.land/r/demo/foo20", // Gnoland package path
      func: "Transfer", // Function name
      args: [ // Arguments
        "g1ffzxha57dh0qgv9ma5v393ur0zexfvp6lsjpae",
        "1"
      ]
    }),
    // You can add multiple messages
  )
  .memo('memo')
  .build();
```

#### `makeMsgRunMessage`

Generates a `MsgRun` of the vm transaction message.

**Example:**

```
const tx = TransactionBuilder.create()
  .messages(
    makeMsgRunMessage({
      caller: "g1jg8mtutu9khhfwc4nxmuhcpftf0pajdhfvsqf5", // your address
      send: "",
      package: {
        files: [
          {
            name: "main.gno",
            // MsgRun runs the main function.
            body: 'package main\n\nfunc main() {\n\tprintln("HELLO WORLD")\n}',
          },
        ],
        name: "main",
        path: "",
      },
    }),
    // You can add multiple messages
  )
  .memo('memo')
  .build();
```

### Error Handling and Debugging

Use `console.error` to capture detailed logs for any issues encountered during interactions with the SDK. Ensure you handle promise rejections to avoid unexpected application crashes.

For example:

```typescript
adenaSDK.connectWallet()
  .then(() => {
    // Proceed with further operations
  })
  .catch((error) => {
    // Log detailed error
    console.error('Error during wallet connection:', error);
    // Handle errors gracefully, such as showing user-friendly messages in the UI
  });
```


# Errors

You may encounter an error while interacting with Adena. Below is **the list of error codes and their descriptions**. We try to display errors and their details as concisely as possible.

<table><thead><tr><th width="89" align="center">Code</th><th width="341.8046875" align="center">Type</th><th width="105" align="center">Status</th><th width="256" align="center">Message</th><th width="553">Solution</th></tr></thead><tbody><tr><td align="center">1000</td><td align="center">NOT_CONNECTED</td><td align="center">Failure</td><td align="center">A connection has not been established.</td><td>The web application must first establish a connection with Adena.</td></tr><tr><td align="center">1001</td><td align="center">UNRESOLVED_TRANSACTION_EXISTS</td><td align="center">Failure</td><td align="center">An unresolved transaction pop-up exists.</td><td>The user must approve or reject the previous transaction prior to initiating a new transaction.</td></tr><tr><td align="center">1002</td><td align="center">INVALID_FORMAT</td><td align="center">Failure</td><td align="center">The transaction is in an invalid format.</td><td>Be sure to match the format and fill it with the parameters Adena supports.</td></tr><tr><td align="center">2000</td><td align="center">WALLET_LOCKED</td><td align="center">Failure</td><td align="center">Adena is locked.</td><td>The user must unlock Adena.</td></tr><tr><td align="center">3001</td><td align="center">ACCOUNT_MISMATCH</td><td align="center">Failure</td><td align="center">The account does not match the caller.</td><td>Be sure to match the <code>caller</code> parameter with the actual account address.</td></tr><tr><td align="center">3002</td><td align="center">NO_ACCOUNT</td><td align="center">Failure</td><td align="center">No account found on Adena.</td><td>The user must create or restore an account on Adena.</td></tr><tr><td align="center">4000</td><td align="center">TRANSACTION_REJECTED</td><td align="center">Failure</td><td align="center">The transaction has been rejected by the user.</td><td>-</td></tr><tr><td align="center">4000</td><td align="center">SIGN_REJECTED</td><td align="center">Failure</td><td align="center">The signature has been rejected by the user.</td><td>-</td></tr><tr><td align="center">4000</td><td align="center">CONNECTION_REJECTED</td><td align="center">Failure</td><td align="center">The connection request has been rejected by the user.</td><td>-</td></tr><tr><td align="center">4000</td><td align="center">SWITCH_NETWORK_REJECTED</td><td align="center">Failure</td><td align="center">The network change has been rejected by the user.</td><td>-</td></tr><tr><td align="center">4000</td><td align="center">ADD_NETWORK_REJECTED</td><td align="center">Failure</td><td align="center">The network addition request has been rejected by the user.</td><td>-</td></tr><tr><td align="center">4001</td><td align="center">TRANSACTION_FAILED</td><td align="center">Failure</td><td align="center">Adena could not execute the transaction.</td><td>Check if all parameters are accurate. In case it's a blockchain network issue, you'll get an error code coming from the blockchain.</td></tr><tr><td align="center">4001</td><td align="center">SIGN_FAILED</td><td align="center">Failure</td><td align="center">Adena could not generate the signature hash.</td><td>Check if all parameters are accurate.</td></tr><tr><td align="center">4001</td><td align="center">ALREADY_CONNECTED</td><td align="center">Failure</td><td align="center">The account is already connected to this website.</td><td>-</td></tr><tr><td align="center">4001</td><td align="center">NETWORK_TIMEOUT</td><td align="center">Failure</td><td align="center">The network response has timed out.</td><td>Check the connection status of the blockchain network.</td></tr><tr><td align="center">4001</td><td align="center">REDUNDANT_CHANGE_REQUEST</td><td align="center">Failure</td><td align="center">Unable to change to the current network settings.</td><td>-</td></tr><tr><td align="center">4001</td><td align="center">NETWORK_ALREADY_EXISTS</td><td align="center">Failure</td><td align="center">The network already exists.</td><td>-</td></tr><tr><td align="center">4001</td><td align="center">UNADDED_NETWORK</td><td align="center">Failure</td><td align="center">The network has not been added on Adena.</td><td>Use the <code>AddNetwork</code> method to add the custom network to Adena first.</td></tr><tr><td align="center">4001</td><td align="center">NOT_INITIALIZED_NETWORK</td><td align="center">Failure</td><td align="center">The network has not been initialized on Wallet.</td><td>-</td></tr><tr><td align="center">4005</td><td align="center">UNSUPPORTED_TYPE</td><td align="center">Failure</td><td align="center">Adena does not support the requested type.</td><td>Only use types supported by Adena.</td></tr><tr><td align="center">9000</td><td align="center">UNEXPECTED_ERROR</td><td align="center">Failure</td><td align="center">Adena has encountered an unexpected error.</td><td>Ask for support on <a href="https://discord.gg/6eTSyZ3569">Discord</a>.</td></tr><tr><td align="center">0</td><td align="center">CONNECTION_SUCCESS</td><td align="center">Success</td><td align="center">The connection has been successfully established.</td><td>-</td></tr><tr><td align="center">0</td><td align="center">GET_ACCOUNT</td><td align="center">Success</td><td align="center">Account information has been successfully returned.</td><td>-</td></tr><tr><td align="center">0</td><td align="center">GET_NETWORK</td><td align="center">Success</td><td align="center">Network information has been successfully returned.</td><td>-</td></tr><tr><td align="center">0</td><td align="center">SIGN_TX</td><td align="center">Success</td><td align="center">Signature hash has been successfully generated.</td><td>-</td></tr><tr><td align="center">0</td><td align="center">ADD_NETWORK_SUCCESS</td><td align="center">Success</td><td align="center">The network has been successfully added.</td><td>-</td></tr><tr><td align="center">0</td><td align="center">SWITCH_NETWORK_SUCCESS</td><td align="center">Success</td><td align="center">The network has been successfully changed.</td><td>-</td></tr><tr><td align="center">0</td><td align="center">TRANSACTION_BROADCAST_SUCCESS</td><td align="center">Success</td><td align="center">Transaction has been successfully broadcasted.</td><td>This only indicates that the transaction has been successfully included in the mempool; it does not guarantee the transaction’s success.</td></tr></tbody></table>

#### Sample Error

```javascript
//The error thrown when a dapp requests to sign an unsupported transaction type.
{
    "status": "failure",
    "data": {},
    "code": 4005,
    "message": "Adena does not support the requested transaction type", 
    "type": "UNSUPPORTED_TYPE"
}
```

{% hint style="info" %}
**Need help?**

Although most errors are easily comprehensible and resolvable, you may rarely encounter an unexpected issue. If you need support, join [the official Gnoland Discord server](https://discord.gg/3YbdqVP8Tb) and ask for help in the <mark style="color:blue;">#adena</mark> channel.
{% endhint %}


# Displaying Your App

<figure><img src="/files/22MmwvucJEzWLzNVWjuc" alt=""><figcaption></figcaption></figure>

Upon receiving a connection or an approval request from a web application, Adena interprets the data in a human-readable format for users. To customize how you would want your title and your logo to be displayed, see the table below for **where you should store your assets**.

<table><thead><tr><th>Item</th><th width="271.3333333333333">Location</th><th>Fallback</th></tr></thead><tbody><tr><td><strong>Title</strong></td><td><code>addEstablish("</code><strong><code>string</code></strong><code>")</code></td><td>'Unknown'</td></tr><tr><td><strong>Icon</strong></td><td><a href="https://www.w3schools.com/html/html_favicon.asp">Favicon</a></td><td>A blank icon</td></tr></tbody></table>


# Sample Usage

### **1. Detecting Adena**

Since Adena is installed on the user's device, `window.adena` will return available functions.

<figure><img src="/files/oNsKzztwjhcW8TWquRU4" alt=""><figcaption></figcaption></figure>

### 2. Establishing a Connection

Once the application confirms that Adena is installed on the current device, it must first request to establish a connection via `window.adena.AddEstablish("name")`.

<figure><img src="/files/jK7U8Fbh1O4Muqr4TyLT" alt=""><figcaption></figcaption></figure>

This will open a connection request page asking the user to approve adding the current domain to a local whitelist.

<figure><img src="/files/NTCgqM8hjKNhL0wpBJEC" alt=""><figcaption></figcaption></figure>

### 3. Getting Account Information

Provided that the user approves the connection request, running `window.adena.GetAccount();` will return information about the current account.

<figure><img src="/files/ef5zVHKK8ieMwRUTI184" alt=""><figcaption></figcaption></figure>

### 4. Sending Tokens

Let's first send some $GNOTs to an address. We'll be using `/bank.MsgSend` for this operation.

<figure><img src="/files/TOcOt1fN19XVgeRCzavV" alt=""><figcaption></figcaption></figure>

Running the function will open a pop-up page asking the user to approve the transaction. Clicking on <mark style="color:blue;">**Approve**</mark> will submit the transaction. The console will return `TRANSACTION_SENT` if the transaction has been successfully sent. Once confirmed, the transaction will appear in your <mark style="color:blue;">**History**</mark> and its details can be found on Gnoscan, the explorer for Gnoland.

<figure><img src="/files/opF57olId4OhZo5gvgCO" alt=""><figcaption></figcaption></figure>

### 5. Calling a Contract

Let's try creating a board named **integrate\_adena**. We'll use the same sample code from the **Establish a Connection** section, `/vm.m_call`, with different parameters.

<figure><img src="/files/yDqw2MKaKQUHO6ccnbdn" alt=""><figcaption></figcaption></figure>

Running the function will open a pop-up page asking the user to approve the transaction. Clicking on <mark style="color:blue;">**Approve**</mark> will complete the transaction. The console will return `TRANSACTION_SENT` if the transaction has been successfully submitted to the blockchain. Once the transaction is confirmed, the board will be created on [Test2 Gnoland Boards](https://test2.gno.land/r/boards).

<figure><img src="/files/957WOltsmrHWr6beqRMy" alt=""><figcaption></figcaption></figure>

As you can see, a board named **integrate\_adena** has been created.

### 6. Adding a Package

Let's upload a test package with a simple function. We'll be using `/vm.m_addpkg` for this operation. Note that the actual code of the package is entered under `Files` as an array.

<figure><img src="/files/JvhUCvdz2laYrXe8YY31" alt=""><figcaption></figcaption></figure>

Running the function will open a pop-up page asking the user to approve the transaction. Clicking on <mark style="color:blue;">**Approve**</mark> will complete the transaction. The console will return `TRANSACTION_SENT` if the transaction has been successfully submitted to the blockchain. Just like other transactions above, it will appear in your <mark style="color:blue;">**History**</mark> once confirmed. Track it on Gnoscan, and you'll see that your code will be fully auditable and transparent for anyone to see.

<figure><img src="/files/u86XmGTcqSxAoy6but69" alt=""><figcaption></figcaption></figure>


# FAQ

## General

<details>

<summary>I'm new to gno.land and I don't have any tokens. How can I get started?</summary>

To get started, visit the [official faucet](https://faucet.gno.land/) or click the Faucet button on the main page of Adena to receive some testnet GNOTs. Then, check out the [Explore](/user-guide/explore) page on Adena for a list of projects building on Gnoland.

</details>

<details>

<summary>What tokens does Adena support?</summary>

For now, Adena only supports GNOT. We will soon support all Gnoland-based tokens such as GNOSH, GRC-20s, and GRC-721s.

</details>

<details>

<summary>How does "Sign In With Google" work?</summary>

Adena has integrated with Web3Auth, an infrastructure that allows secure & non-custodial private key split and reconstruction based on their multi-party computation technology. Simply put, Web3Auth splits your private key into multiple shares, which are distributed across their nodes and reconstructed once you authenticate yourself with your Google account. No single 3rd party ever has access to your whole key besides you, which makes the Web3Auth infrastructure non-custodial.

</details>

<details>

<summary>What are the differences between available networks?</summary>

Adena supports different networks: TestnetX, Portal Loop, Local, and Custom Networks.

* **TestnetX**: A permanent multi-note testnet, that you can use for stable and persistent development, including indexing blocks and transactions. You can find more information [here](https://docs.gno.land/concepts/testnets).
* **Portal Loop:** Portal Loop is an always up-to-date rolling testnet, which you can use as the up-to-date base of Gno for your development. You can find more information [here](https://docs.gno.land/concepts/testnets/#portal-loop).
* **Local:** A network that you may only access by setting up a local environment. Developers mainly use the local network for testing and prototyping purposes. If you're a developer, check out [this guide](https://onbloc.gitbook.io/gnoland-developer-portal/) to configure your local environment.
* **Custom Networks**: You can add and remove a custom network with an RPC and a Tx-indexer endpoint.

</details>

<details>

<summary>Can I import accounts from other wallets?</summary>

Yes, you may import your existing accounts from other wallets to Adena. Click on [this link](/user-guide/sign-in/advanced-options/import-wallet) for a detailed guide.

</details>

<details>

<summary>How do I recover tokens sent to a wrong address?</summary>

Adena cannot recover your tokens sent to the wrong address. A finalized transaction on a blockchain is irreversible. As Adena doesn't track any user information, there's no way for us to contact the owner of the address. Please be sure to double-check the details of your transaction before submitting it to the blockchain.

</details>

<details>

<summary>Is Adena available on mobile devices?</summary>

Adena will soon be available on Android and iOS devices! Be sure to follow us on [Twitter](https://twitter.com/adenaapp) to be the first one to hear the news!

</details>

<details>

<summary>How do I update Adena?</summary>

The Chrome browser automatically checks and updates all browser extensions once every few hours.&#x20;

You can also manually update Adena with the following steps:

1. Visit chrome://extensions/ in your browser.
2. Activate Developer mode by clicking on the button on the top right corner of the page.
3. Click on the <mark style="color:blue;">**Update**</mark> button on the top left corner.

</details>

<details>

<summary>Are there any fees paid to Adena?</summary>

No. You're only charged with a transaction fee that's 100% paid to the network. Adena doesn't collect any fees from users.

</details>

<details>

<summary>Do you plan to support other networks in the future?</summary>

Yes. Due to the interoperable nature of the Cosmos ecosystem that Gnoland is part of, support for inter-blockchain transfers between different blockchains is crucial for UX improvement. As of now, we plan to support blockchains that are inter-connected with Gnoland to ensure that users can send/receive tokens flowing in and out of Gnoland.

</details>

## Security

<details>

<summary>What is a seed phrase?</summary>

A seed phrase is a randomly-generated string of words that gives you access to a wallet. A wallet can hold several accounts, each with a unique address. A wallet serves as a master key to all of your accounts, meaning that losing your seed phrase will result in the loss of all associated accounts.

This is why it's very important that you NEVER share your seed phrase with anyone. Anyone with your seed phrase will have full access to your wallet along with all assets in it. The Adena support team will NEVER ask you for your seed phrase under any circumstances.

</details>

<details>

<summary>What's the difference between a private key and a seed phrase?</summary>

A private key is used to sign transactions sent from your account. It is unique to a single account and is derived from your seed phrase, meaning that you can always recover your private key as long as you have your seed phrase. However, both are equally as important, as losing either can be used to access your account.

</details>

<details>

<summary>How does Adena store my seed phrase?</summary>

Adena encrypts your seed phrase and your private keys with your password and stores them only on your device. However, if you've imported accounts from Ledger, your private key only remains on your Ledger, not on your device where Adena is installed.

</details>

<details>

<summary>I've connected to a malicious website! How do I make sure my tokens are safe?</summary>

First, revoke your connection to the website at the [Connected Apps](/user-guide/sidebar-menu/settings/connected-apps) page. Then, we highly recommend creating a new wallet with a new seed phrase and transferring all your assets from your current wallet to protect yourself from possible key exposure.

</details>

## Troubleshooting

<details>

<summary>Why does my transaction keep failing?</summary>

Below are a few possible reasons why your transactions could be failing.

1. **The Gnoland blockchain has halted:** As the Gnoland blockchain is in its testnet phase, it might experience short outages from time to time. This issue usually gets addressed and fixed quickly. The best solution is to try again in a few hours.
2. **Your transaction has run out of gas:** This usually happens when executing transactions from a realm (smart contract) on a dapp. If you're a user, contact the dapp developer for help. If you're a developer, increase the gas limit.
3. **Your Adena Extension is not updated:** Be sure that you're using the latest version of Adena on the [About Adena](/user-guide/sidebar-menu/settings/about-adena) page. To check for the latest version available, visit the [official download page for Adena](https://chrome.google.com/webstore/detail/adena/oefglhbffgfkcpboeackfgdagmlnihnh) and scroll down to the <mark style="color:blue;">**Version**</mark> Section on <mark style="color:blue;">**Additional Information**</mark>.

It can be challenging for you to identify the cause as a normal user. If you need help with troubleshooting, please visit [Adena's Official Discord Channel](https://discord.gg/6eTSyZ3569) on Gnoland's Server and ask for support. Make sure that you're getting help from an official team member of Adena with the role <mark style="color:blue;">**team/onbloc**</mark>.

</details>

<details>

<summary>Why do I keep getting the "Invalid seed phrase" error?</summary>

Check for typos, and make sure that you're entering a 12 or 24-word long seed phrase with no trailing white spaces.

</details>

<details>

<summary>I forgot my password and didn't back up my seed phrase! Is there a way to recover my wallet?</summary>

Adena is a non-custodial wallet, meaning that all user data including your password, keys, and your seed phrase, is stored on your own device. Once you lose these, there's no way for us to recover them. Please be sure to back them up somewhere safe.

</details>

## Developers

<details>

<summary>I'm a dapp developer! How can I integrate Adena to my web application?</summary>

Integrating Adena is a total breeze for any developer. Get started by checking out our [integration manual](/integrations/detect-wallet), and follow the steps in order.

</details>

<details>

<summary>Can I add a logo for my token on Adena?</summary>

Yes! We allow anyone from the community to add logos of their tokens on Adena by submitting a PR on [this repository](https://github.com/onbloc/adena-resource). Carefully read and follow the instructions in the repository. However, your request might be declined if we suspect your project to be harmful or malicious.

</details>

## Feedback & Support

<details>

<summary>How do I share a feedback or an idea for a new feature?</summary>

Your feedback is highly valued at Adena. Please fill out [this form](https://bit.ly/adena_feedback) where you can submit feedback or suggestions.

</details>

<details>

<summary>How do I report a bug?</summary>

Email us at <mark style="color:blue;">**<support@adena.app>**</mark> or submit a PR on our [official Github Repository](https://github.com/onbloc/adena-wallet).

</details>

{% hint style="info" %}
**Support**

Can't find what you're looking for? Reach out to us at <mark style="color:blue;">**<support@adena.app>**</mark>.
{% endhint %}


# Audits

The Adena codebase has been audited by security specialists. All of our reports are made accessible on GitHub for transparency.

{% embed url="<https://github.com/onbloc/adena-wallet/tree/main/audits>" %}

### Security Evaluation by All In Bits

All In Bits (AiB), the core engineering team behind Gno and gno.land has conducted a time-boxed security evaluation of Adena's source code. No critical or high level issues were identified. All findings were resolved in Patch v1.9.0 and the final report was released on April 23, 2024.

{% file src="/files/a1xXJ6tpQ4tnyNVOYABk" %}

### Formal Audit by Halborn Security

Halborn Security has conducted a formal security assessment on the Adena Wallet browser extension. No critical level issues were identified. All findings were resolved in Patch v1.15.0 and the final report was released on March 7th, 2025.

{% file src="/files/De959qBDc8KcLFdPQt5C" %}


# Brand Assets

![](/files/kaZ6EIRhBPeq5L7mB0ZY)

This page serves as the guideline on the appropriate usage of our assets including our logo, design, and app components.

{% hint style="info" %}
[Click here](https://drive.google.com/drive/folders/1wocWOfQK5dG8HKpb0zcTl36yOVHO6xqD?usp=sharing) to download our logo files in various formats and the official Adena Brand Guide in PDF.
{% endhint %}

If you have a specific type of logo you've like to download in mind, check out the **Download Logo** page:

{% content-ref url="/pages/MTXEnBALzW3XuuhP6BRX" %}
[Download Logo](/resources/brand-assets/download-logo)
{% endcontent-ref %}

If you wish to learn more about our design and branding, check out the **Style Guide**:

{% content-ref url="/pages/MN7wmFXVE6ldFPt8TvAY" %}
[Style Guide](/resources/brand-assets/style-guide)
{% endcontent-ref %}

If you wish to study the anatomy of our app, check out the **Components**:

{% content-ref url="/pages/9fH0BEtWpGQJmRPdqx7j" %}
[Components](/resources/brand-assets/components)
{% endcontent-ref %}


# Download Logo

The Adena logo is available in various types. Click on the links below the image to download the zip files containing the logo in Blue, White, and Black versions, available in png and svg formats.

<div><figure><img src="/files/BY7ivJoHAaeMSVhztRi0" alt=""><figcaption><p><span data-gb-custom-inline data-tag="emoji" data-code="2b07">⬇️</span><a href="https://drive.google.com/uc?export=download&#x26;id=1Msrn60HBcxpq4z4sFDEBpyFzNfoF6w-Y"><strong>Download</strong></a></p></figcaption></figure> <figure><img src="/files/IZPijcD8f6vi5I9T0oDF" alt=""><figcaption><p><span data-gb-custom-inline data-tag="emoji" data-code="2b07">⬇️</span><a href="https://drive.google.com/uc?export=download&#x26;id=1_lVFxxcSyWOdLfEPx00KsjYGuBS__7d_"><strong>Download</strong></a></p></figcaption></figure> <figure><img src="/files/ijTqI7aUHqIjxWOyvERa" alt=""><figcaption><p><span data-gb-custom-inline data-tag="emoji" data-code="2b07">⬇️</span><a href="https://drive.google.com/uc?export=download&#x26;id=17FNaHkFhOyAlLI7UjpgWo4P6lVaMQ73J"><strong>Download</strong></a></p></figcaption></figure> <figure><img src="/files/pCGRmBpPdKvKdNdMYz3W" alt=""><figcaption><p><span data-gb-custom-inline data-tag="emoji" data-code="2b07">⬇️</span><a href="https://drive.google.com/uc?export=download&#x26;id=1Uv8gBPLpbVnxYvlFn5CWqd3XODPHOyIB"><strong>Download</strong></a></p></figcaption></figure> <figure><img src="/files/wxPC42Z2v5hWGrvT3dXI" alt=""><figcaption><p><span data-gb-custom-inline data-tag="emoji" data-code="2b07">⬇️</span><a href="https://drive.google.com/uc?export=download&#x26;id=1cwLv6tBqS6oaHjU_B8kQOC9tPb61nGty"><strong>Download</strong></a></p></figcaption></figure> <figure><img src="/files/CVuHIeSZhI72gDxiiP3w" alt=""><figcaption><p><span data-gb-custom-inline data-tag="emoji" data-code="2b07">⬇️</span><a href="https://drive.google.com/uc?export=download&#x26;id=1ZFYvI0mBnpiFPVKiuXCoT4TZyU_sg5gn"><strong>Download</strong></a></p></figcaption></figure></div>


# Style Guide

### 1. Logo

The Signature Blue logo is used with a dark background by default to reflect our corporate principles being reliability and future-orientation. Using the Signature White logo is recommended for grayscale-toned websites.

![](/files/6Ht5sWV2i1QZZwV2pk5b)

Using the logo with square and circular backgrounds is allowed.

![](/files/HruZrJ2KQOFk7N6K2Ltc)

The Circular Type logo is used as the icon for the Chrome extension and mobile applications.

![](/files/FZ9qxGDxKMvbw4CKft9Q)

{% hint style="danger" %}
**Do not modify the logo!**

The Adena logo should not be altered in any way. Examples of prohibited use are:

* Distorting the logo
* Rotating the logo
* Changing the colors or gradations
* Changing the font of the Logotype area
* Using special effects
  {% endhint %}

### 2. Typeface

Poppins is the base font used throughout Adena's suite of products. Poppins is an open source font with a clean, modern style that reflects the streamlined web3 experience we aim to bring to our users.

![](/files/aCjPVgAV0DTkq92ml2SW)

### 3. Color Palette

The primary brand color of Adena is **Adena Blue**, represented in hex as **#0059FF**. In most cases, dark colors under the **Neutral** group are used for backgrounds with white colors under the same group as the font color. **Red** colors are used to present errors or failures; and the Green colors for successful actions and completion.

![](/files/IHpyo4dXHbUHHzL9PYxk)

Gradients or shadows are used to distinguish the components from backgrounds or to put an emphasis.

![](/files/t15oHYD4uvFYSV0c0FSf)

{% hint style="danger" %}
**Do not alter our primary brand color!**

Altering our primary brand color, **Adena Blue**, is strictly prohibited under any circumstances.
{% endhint %}

### 4. Icons

Icons serve as buttons, indicators, or inputs within our products.

![](/files/WWzV8SN6D4cKgpEbQyq7)


# Components

### 1. Buttons

![](/files/BrBiSRpJkrUbywYaAG80)

![](/files/JvluR9GXZaaq3d2pDRiM)

### 2. Input Fields

![](/files/SEVgd745Il59bHgcwqjt)

### 3. Dropdown & Search

![](/files/brcsXk6wqKqti2ZuL5oZ)

### 4. Seed Phrase & Private Key

![](/files/bdPO89VpIc7XzkZi0lU9)

### 5. Progressive

![](/files/befpdHf2TQ7opoppZSIm)

### 6. List

![](/files/6RVYZ789tk6D255q5aXJ)

### 7. Navigation

![](/files/M3wGJYOh87PvHeWBEHC9)